PureLink PT-MA-HD88-C User Manual Download Page 18

www.purelink.de 

18 


2)


Preset Mapping:   

a)


Select Mapping(1-8) 

b)


Click “Recall” button to recall previous mapping which are saved 

 
3)


Rename Mapping:   

a)


Rename the mapping(Mapping1-Mapping8) 

b)


Click “Confirm” button to confirm the change 


12.


Default Reset Button 

Click this button to do factory default reset 
The default reset process will take about 80~90 seconds 
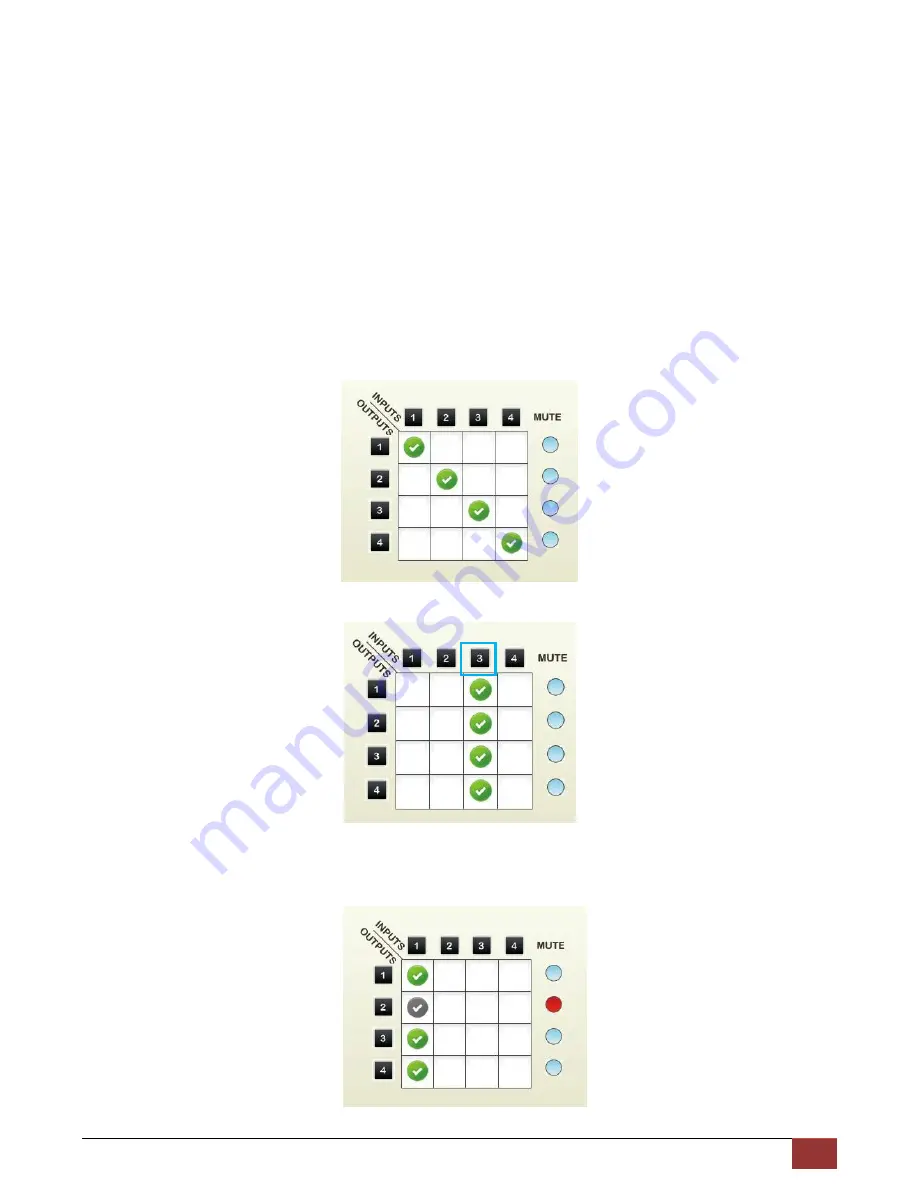


13.


In/Out Switch Button 

Click the button on the checkerboard to select Input & Output port 


    User can click the input number button to let all outputs select the same input 
    Ex: All outputs select input 3 


14.


Mute Output Button 

Click the circle button to turn off output’s video and audio 
Ex: Mute Output 2 


Summary of Contents for PT-MA-HD88-C

Page 1: ...www purelink de 1 8x8 HDMI Matrix Switcher with IR 3D Support User s Guide Model no PT MA HD88 C Designed in Germany Made in Taiwan 2010 PureLink GmbH All rights reserved...

Page 2: ...Notice 3 2 Introduction 3 3 Package Contents 4 4 Before Installation 4 5 Panel Descriptions 5 6 IR Pass through 7 7 Installation 8 8 EDID LEARNING 8 Section 2 Operation appoach 9 Section 3 Specificat...

Page 3: ...uid or aerosol cleaners to clean this unit Always unplug the power to the device before cleaning 2 Introduction The PT MA HD88 C 8x8 HDMI Matrix Switcher with IR 3D Support provides the most flexible...

Page 4: ...contents PT MA HD88 C x1 Matrix Receiver X8 Rack mounting ear set x1 IR Remote control x1 IR Blaster x1 IR Receiver X9 Power supply unit 12VDC 5A x1 Power supply unit 5VDC 2A X8 Installation software...

Page 5: ...on which had been selected 6 IR SENSOR IR sensor for receiving the IR commands from IR remote REAR PANEL PT MA HD88 C transmitting unit TX 7 Power Power control 8 RS 232 RS 232 control port 9 System I...

Page 6: ...tance Please adjust the signal level from strongest to weakest and stop turning the rotary switch whenever the audio video is playing normally Inappropriate signal level setting may cause overpowering...

Page 7: ...ASTER IR control on individual display device IR RECEIVER IR receiver connected here can receive all IR command signals from the IR remote controls of PT MA HD88 C and all other HDMI source devices CA...

Page 8: ...learning function is only necessary whenever you encounter any display on the HDMI output port that cannot play audio and video properly Because the HDMI source devices and displays may have various...

Page 9: ...ing Mode 2 Use the Right input push button to get into the selection of the mapping configuration and use UP DOWN 1 8 to choose which set you want to save current input output mapping 3 After you sele...

Page 10: ...n to enter this mode 2 Press UP and DOWN button to select the default EDID mode 1 8 3 Press LEFT button to go back to pre layer 4 Press UP and DOWN button to select which input will be applied 5 Press...

Page 11: ...er key 2 to select Input 2 3 2 2 Function Key Button Function OFF Standby mode ON Power on the matrix switcher MUTE Turn off output s video and audio STATUS Preset output status SAVE Save current mapp...

Page 12: ...g Preset A H 1 8 storage site Take Ex Preset saved mapping from 5 1 Press PRESET button Preset A H Take PRESET 1 8 2 Press number key E to select the storage site 5 Preset A H Take PRESET 1 8 5 3 Pres...

Page 13: ...oftware size 3 MB 4 Minimum RAM requirement 256 MB 1 FW SW Version Button 7 Firmware Update Button 2 COM Port Selection 8 Network Button 3 Connection Status 9 Mapping Button 4 Connect Disconnect Butto...

Page 14: ...on connected status 3 FW SW Version Button Click button to show version information 4 COM Port Selection Click button to select COM Port 5 Connection Status 1 Connected Status 2 Connecting Status 3 Di...

Page 15: ...lect Input c Click Learn button to learn default EDID 2 Load EDID File to Input a Select Input b Click Load button to select the EDID file 3 Learn EDID From Display a Select EDID Port b Select Input c...

Page 16: ...D content c Click Save EDID on Computer to save the generated EDID as a file 5 View EDID Content a Select Input or From File b Click View button to read the EDID and analysis c Click Save As to save t...

Page 17: ...4 Click Start button to begin the firmware update 10 Network Button 1 Click Read From Device to read the device IP address 2 Select Ethernet and then will be a pop up windows 3 Key in the device IP ad...

Page 18: ...2 Default Reset Button Click this button to do factory default reset The default reset process will take about 80 90 seconds 13 In Out Switch Button Click the button on the checkerboard to select Inpu...

Page 19: ...r IR receiver 1x RJ 45 1x IR socket for IR receiver Output 8x RJ 45 9x IR socket for IR blaster 1x HDMI 1x IR socket for IR blaster HDMI Input selection Push in button IR remote control RS 232 control...

Page 20: ...mple if user would like to play the Input 2 upon output 2 output 3 and output 4 and only output 3 cannot support 1080p support up to 720p only please learn the EDID from the display connected to the o...

Page 21: ...cable For long extension users solid LAN cables are the only viable choice 4 EIA TIA 568 B termination T568B for LAN cables is recommended for better performance 5 To reduce the interference among th...

Page 22: ...Performance Guide Performance rating Type of CAT5 6 cable Wiring Shielding CAT5 CAT5e CAT6 Solid Unshielded UTP Shielded STP Stranded Unshielded UTP Shielded STP Termination Please use EIA TIA 568 B t...

Page 23: ...www purelink de 23...

Page 24: ...www purelink de 24...

Reviews: