background image

EN

9

Listening to iPod/iPhone/iPad

Compatibility

Contour is compatible with most iPod, iPhone and iPad models. For the latest information, 
check the compatibility table on our website:  
www.pure.com/products/ipod-compatibility.

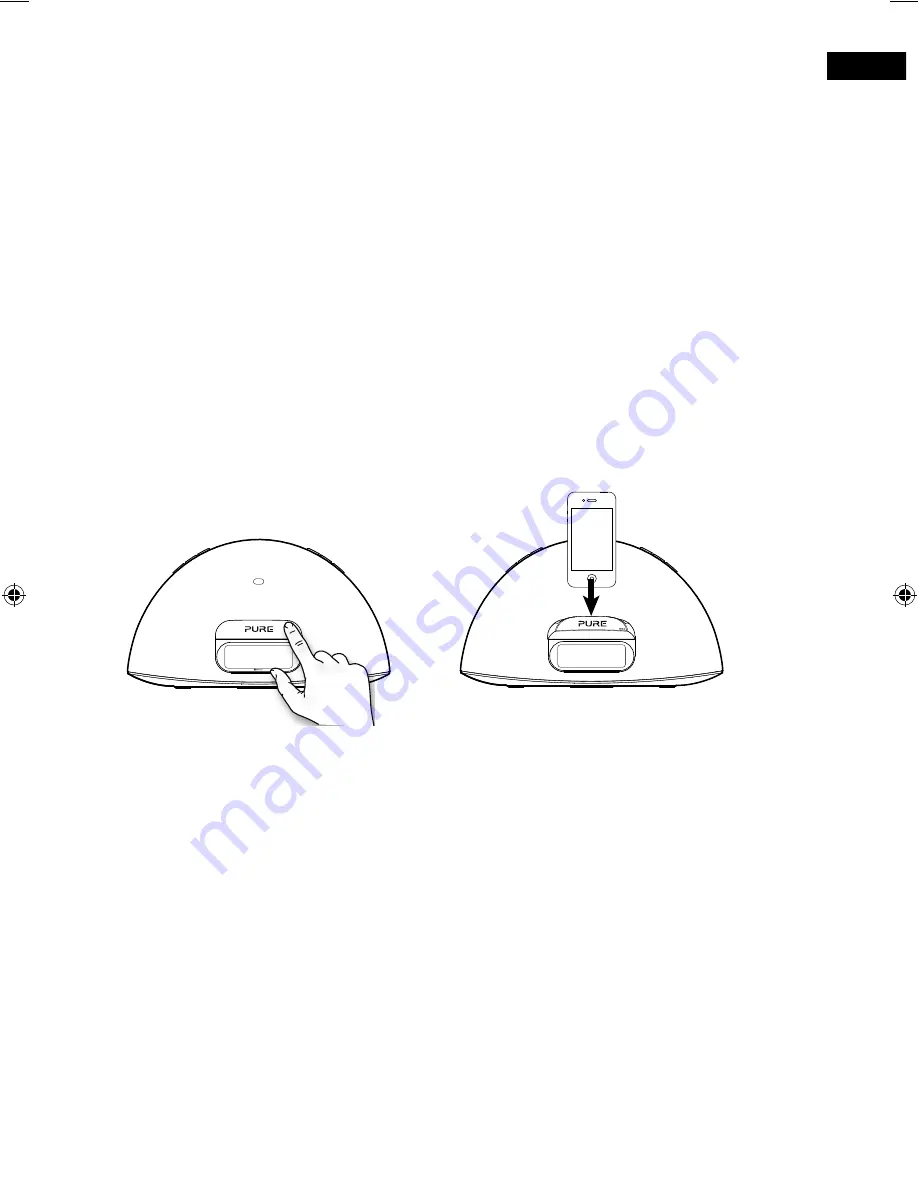
Docking your device

1.  Push the right hand end of the front panel as shown to release the dock.
2.  Carefully dock your device onto the connector. 
 

Your device will start charging as soon as it is docked and will continue charging whether 
Contour is switched on or in standby. 

Note: 

If Contour is switched on, Contour will automatically switch to the iPod source as soon 

as you dock your iOS device. If Contour is in standby, Contour will remain in standby and start 
charging your iOS device.

Note: 

The headphone socket is disabled when an iPhone/iPod/iPad is docked.

Selecting the iPod source

Press the 

Source

 button to select IPOD. On devices with apps you can also play audio from 

other apps e.g. the Pure Connect app, if you pause the iPod playback.

Controlling your device

When the iPod source is selected your device will start playing the last iPod track you were 
listening to. Use the remote or controls on your Apple device to navigate menus and 
control playback.
To access the Contour options menu while you have an iPod/iPhone docked, press and hold 
the 

Menu

 button on the remote.*

Changing the information displayed on screen

Press and hold the 

Menu

 button, press 

Select

 to choose the DISPLAY option.

Choose one of the following options:
TITLE/ARTIST 

Track title and artist name.

TIME  

 Full screen clock.

*Not supported on Apple products running iOS version 7.

Contour_D1_Bluetooth-v2_Euro.indb   9

9/18/2015   11:06:09 AM

Summary of Contents for Contour D1

Page 1: ...Contour D1...

Page 2: ......

Page 3: ...no time and explains how to make the most of your Contour We re constantly improving and adding new features to our products To take advantage of any enhancements made since your product was shipped p...

Page 4: ...ck do not expose this apparatus to rain or moisture The apparatus shall not be exposed to dripping or splashing and objects filled with liquids such as vases shall not be placed on apparatus 17 CAUTIO...

Page 5: ...Changing the information displayed on screen 12 Using Bluetooth 12 Using the aux input 13 Alarms and timers 13 Setting an alarm 14 Cancelling a sounding alarm 14 Snoozing a sounding alarm 14 Changing...

Page 6: ...the dock 2 Insert the adaptor lightning A or 30 pin B that corresponds to your iPod iPhone iPad into the connector socket C as shown on the following page 3 A B C Pull the plastic tab from the remote...

Page 7: ...EN 5 Removing an adaptor Inserting an adaptor...

Page 8: ...NGUAGE Insert the connector of the mains power adapter into the socket on the rear of Contour Attach the appropriate adapter pins for your region if required and plug in to the mains supply 4 4 5 6 Wa...

Page 9: ...ocket Analogue stereo input for MP3 player USB socket USB connector for software updates mini B type On Standby Source Press to change between Digital radio FM iPod Auxiliary input and Bluetooth Favou...

Page 10: ...Select Browse and select tracks and menu options In FM step down and up the frequency range in steps of 0 05 MHz Press and hold to seek tune to the next station Repeat Toggle to repeat current track...

Page 11: ...ging your iOS device Note The headphone socket is disabled when an iPhone iPod iPad is docked Selecting the iPod source Press the Source button to select IPOD On devices with apps you can also play au...

Page 12: ...quality audio by installing the free Pure Connect app on your iPod touch iPhone or iPad The Pure Connect app gives you free access to thousands of internet radio stations and on demand content podcas...

Page 13: ...favourites list 3 Press or on the remote to decide where you want to save the favourite if you choose an existing favourite it will be replaced 4 Press and hold down or Select on the remote until you...

Page 14: ...ces that appear on the mobile device s screen On most Bluetooth devices your device will automatically connect to Contour once paired On some devices you will need to manually connect after pairing Se...

Page 15: ...ct Time Set the alarm time Press or to adjust the hours then press Select Repeat to set the minutes then press Select Days Set the days that the alarm sounds Press or to choose between DAILY every day...

Page 16: ...ess the Snooze button on the remote and press or to choose a snooze duration then press Select to confirm You can also change the snooze duration in the Clock menu See the following page for more info...

Page 17: ...light saving time You can adjust the following settings SET TIME Manually set the time and date if required 12 24HR Choose between 12 or 24 hour time display SNOOZE Set your preferred snooze duration...

Page 18: ...ses to identify Contour Bluetooth version Scroll to BT VER and press Select to display the Bluetooth version on Contour Bluetooth upgrade Scroll to BT UPGRD and press Select to upgrade the Bluetooth s...

Page 19: ...Unavailable stations have a before their name on the station list If you select a station which has this symbol your radio tries to tune to that station If still unavailable you will return to the la...

Page 20: ...i B type for software updates Output connectors 3 5mm stereo output for headphones LCD display Custom auto dimming LCD display large text and feature icons Remote control Infrared remote control CR202...

Page 21: ...Apple performance standards Apple is not responsible for the operation of this device or its compliance with safety and regulatory standards Please note that the use of this accessory with iPod iPhone...

Page 22: ...D4 8LZ United Kingdom http support pure com Pure Friedrich Ludwig Jahn Stra e 2 14 64589 Stockstadt Rhein Deutschland http support pure com de Pure Vertrieb uber TELANOR AG Unterhaltungselektronik Bac...

Page 23: ...www pure com connect pure com www facebook com pure 106KP...

Reviews: