background image

This trampoline is designed and manufactured to

provide you and your family with many years of fun

and exercise, but for your benefit and safety, please

read this manual carefully and in full before

assembling and using your trampoline.

 DO NOT allow more than one (1) person on the

trampoline at a time. Multiple jumpers increase the

chance of someone becoming injured. Jumpers may

collide with one another, fall off the trampoline, fall on

or through the springs or land incorrectly on the mat.

Multiple jumpers increase the chances of loss of

control, collision and falling off. This can result in

severe injury or death.

 Always secure the trampoline against unauthorized

and unsupervised use.

 Trampolines are rebounding devices which propel

the user to unaccustomed heights and into a variety

of body movements. Rebounding off of

the trampoline, striking the frame or springs, or

improperly landing on the trampoline mat (bed) may

cause injury.

 The frame of your trampoline is made of steel and it

will conduct electricity. No electrical equipment

(lights, heaters, extension cords, household

appliances, etc.) should be permitted on or around

the equipment under any circumstances to avoid the

risk of electrocution.

 As your trampoline mat is raised off the ground,

there is the risk of falling when entering or exiting the

trampoline. Children should be assisted when

entering and exiting the trampoline to reduce their

risk of falling.

Do not flip, somersault or perform maneuvers which

may cause you to land on the head or neck.

Paralysis or death can result even if you land in the

middle of the trampoline mat.

•  

I

MPORTANT:

You must not use the trampoline if you have a

medical history of neck or back injuries or certain

mental or physical conditions – an existing condition

dramatically increases the risk of serious injury or

death.

No modification should be carried out to the

trampoline or any of its components. Any

modification could lead to damage to the product or

result in a personal injury.


WEATHER CONDITIONS:

Special care should be taken as weather conditions

change. In particular, a wet trampoline mat (bed) is

too slippery for safe jumping. Gusty or severe winds

can cause jumpers to lose control. To reduce the

chance of injury, use the trampoline only under

appropriate weather conditions. In cold weather,

tongues and lips can stick to metal at sub zero

temperatures. In warmer and sunnier weather, parts

can become extremely hot, and the temperature

should be regularly checked during play, especially

metal parts.

 HIGH WINDS:

It is possible for the Trampoline to be blown about by

high wind. If you anticipate high winds, the

Trampoline must be moved to a sheltered location,

or be disassembled. Pure Fun™ is not responsible

for any damage to property or product resulting from

wind or extreme weather. You can purchase an

ANCHOR KIT for your trampoline from Pure Fun, by

visiting us on the web at: 

www.PureFun.Net

PRODUCT SAFETY INFORMATION

6

 [email protected]

GQBrands.com

1-866-498-5269

Summary of Contents for 9012PS

Page 1: ...CustomerService GQBrands com 1 866 498 5269 4401 Samuell Blvd Ste 150 Mesquite TX 75149 Owner s Manual Please read all the instructions before using this product Consult a physician before beginning a...

Page 2: ...AL INSTALLATION OR OTHER CONSEQUENTIAL DAMAGES SOME STATES DO NOT ALLOW THE EXCLUSION OR LIMITATION OF INCIDENTAL OR CONSEQUENTIAL DAMAGES ACCORDINGLY THE ABOVE LIMITATION MAY NOT APPLY TO YOU THE WAR...

Page 3: ...under 3 years of age WARNING While every attempt is made to ensure the highest degree of protection in all equipment we cannot guarantee freedom from injury The user assumes all risks of injury due to...

Page 4: ...when landing in the middle of the bed Do not allow more than one person on the trampoline Use by more than on person at the same time increases the chance of injury Use trampoline only with mature kn...

Page 5: ...cidental strangulation Children MUST NEVER use the trampoline unless supervised by a responsible adult with knowledge of trampoline use DO NOT leave children unattended at any time Use the trampoline...

Page 6: ...reduce their risk of falling Do not ip somersault or perform maneuvers which may cause you to land on the head or neck Paralysis or death can result even if you land in the middle of the trampoline m...

Page 7: ...on 1 2 3 Hand and Knee Drop Start bouncing from a standing position keeping your eyes on the frame pad Land on the bed on your hands and knees Push with your hands and come back up to an erect positio...

Page 8: ...d swing your arms up in the same direction Turn your hips in the same direction as your head and arms completing a twist Land in the seat drop position 2 2 3 3 4 4 BASIC TRAMPOLINE SKILLS Seat Drop La...

Page 9: ...r similar equipment any structures swimming pools or bodies of water electrical power wires or other utility cabling walls fences roof overhangs etc Please be aware of the following when selecting a p...

Page 10: ...re proper fit and clearance from environmental objects If the trampoline must be moved once it is assembled you MUST securely tape the top rail frame joints and use a MINIMUM of 2 adults placed equidi...

Page 11: ...parate them into 4 groups of Top Rails Make sure to place them all on a at and secure surface before you begin NOTE The Curved Top Rail has spring holes in the top section The bottom should be smooth...

Page 12: ...s of the last joint slightly towards the center of the circle to line the sections together The second person should hold the joint on the opposite side while you bring the remaining section together...

Page 13: ...pinch 7 Lay out the Trampoline Mat 1 inside the frame The Logo and Sewn Safety Label should be facing upwards Do not remove the Safety Label from the trampoline mat Please refer to the following page...

Page 14: ...n placed Attach all remaining Springs using the T Hook that was provided clockwise NOTE Failure to use appropriate tools may result in injury or pinching due to tension of the springs We recommend you...

Page 15: ...after a period of use The bands require a certain amount of slack as they are attached to the jumping surface which will have significant vertical movement during use Failure to leave slack in the ban...

Page 16: ...TRAMPOLINE ASSEMBLY INSTRUCTIONS 16 CustomerService GQBrands com GQBrands com 1 866 498 5269...

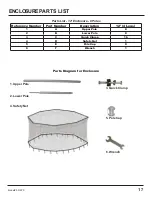
Page 17: ...r Description 12 4 Legs 1 A Upper Pole 8 2 B Lower Pole 8 3 C Quick Clamp 16 4 D Safety Net 1 5 E Pole Cap 8 6 F Wrench 1 Parts Diagram for Enclosure 1 Upper Pole 2 Lower Pole 3 Quick Clamp 5 Pole Cap...

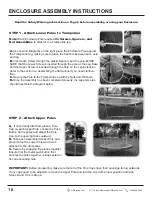
Page 18: ...rampoline Leg with 2x Nuts and Washers D Once the assembly has been completed properly the support poles should resemble the diagram below STEP 2 Attach Upper Poles A If not already attached place a P...

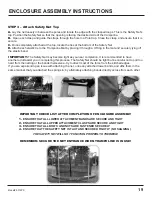
Page 19: ...ou in completing this process The Safety Net should be tight but be careful not to pull too hard from the netting or the bands themselves try to direct most of the force from the stitched edges If you...

Page 20: ...o make sure that shoes are removed before bouncing and ensure that any other sharp objects such as belt buckles brooches and jewelry are also not worn THE SPRINGS NEVER stand on the springs while the...

Page 21: ...dur ing the move and prevent the connector points from dislocating and separating When moving lift the trampoline slightly off the ground and keep it horizontal to the ground Never drag or roll the t...

Page 22: ...irt shorts or sweats and regulation gymnastics shoes heavy socks or be barefoot If you are just beginning you may want to wear long sleeve shirts and pants to protect against scrapes and abrasions unt...

Page 23: ...present potential hazards Missing improperly positioned or insecurely attached frame padding Punctures frays tears or holes worn in the bed or frame padding Deterioration in the stitching or fabric of...

Reviews: