DSOP24V
v.1.0
POWER SUPPLY SYSTEM
DSO 24V
FOR PAVIRO SYSTEM BY BOSCH
EN
Version No: 5 of 30.11.2017
Replaces version: 4 of 21.08.2017
Page 1: ...DSOP24V v 1 0 POWER SUPPLY SYSTEM DSO 24V FOR PAVIRO SYSTEM BY BOSCH EN Version No 5 of 30 11 2017 Replaces version 4 of 21 08 2017...
Page 2: ...cator rA1 rA2 18 5 4 4 The battery temperature indicator t C 18 5 4 5 Failure history FLh 18 5 4 6 The current failures FLc 19 5 4 7 The list of failure codes 20 5 5 CONFIGURATION OF POWER SUPPLY SETT...
Page 3: ...HISTORY 39 7 7 UPDATE 40 8 THE CONFI DSO PROGRAM FOR DESIGNERS 41 9 TECHNICAL PARAMETERS 45 Table 16 Parameters of the DSO system 45 Table 17 Electrical parameters of the DSO 45 Table 18 Safety of Use...
Page 4: ...f batteries 27 6V DC Uninterruptible Power Supply High efficiency up to 90 320W 1000W power supply units of the PS24DSOxxxx series Independently protected outputs for OUT1 9 amplifiers Three independe...
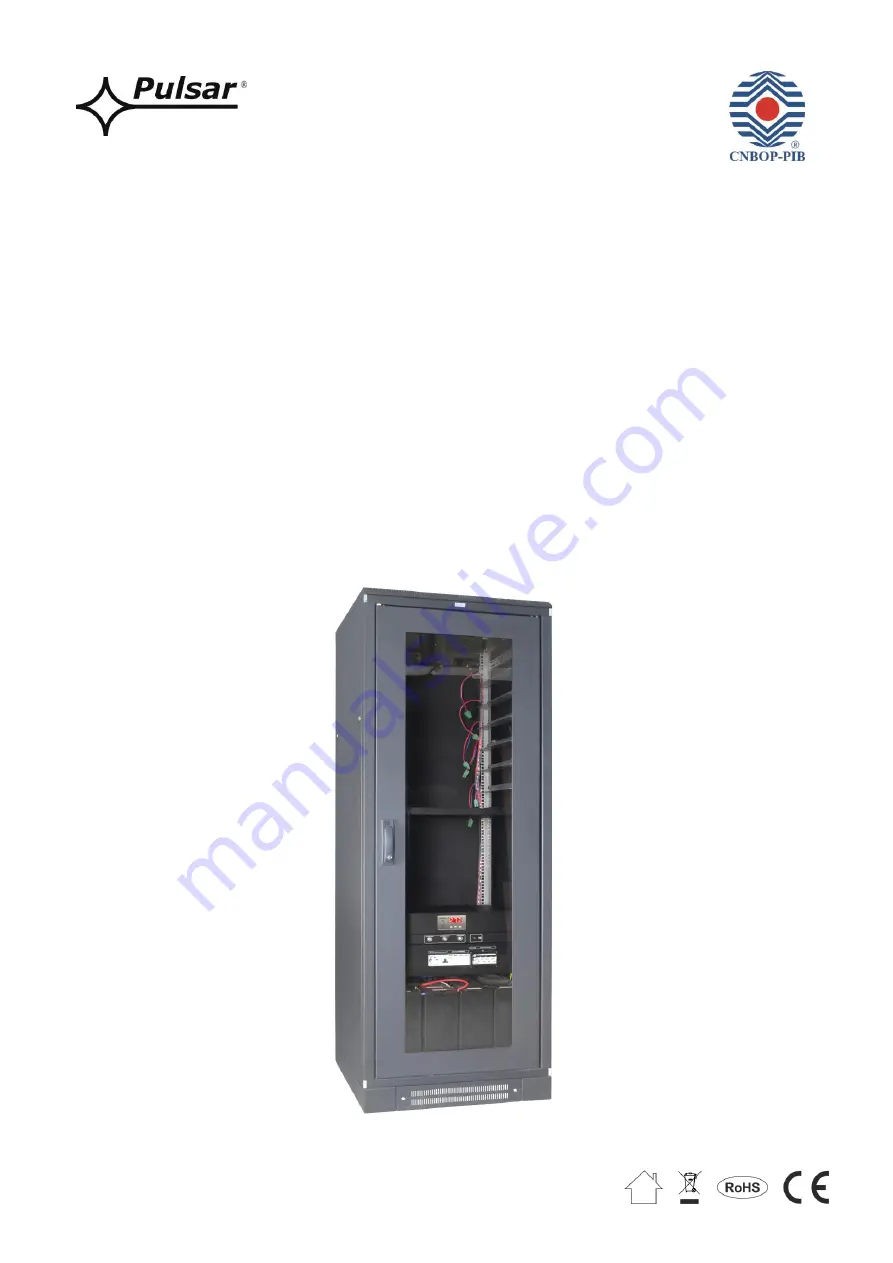
Page 5: ...teries each with up to 230Ah which allows for a total capacity of 460Ah Power supply from the power grid can be supplied to the cabinet in the form of 1 phase or 3 phase connection which depends on th...
Page 6: ...binet can be accessed via the glass front doors removable side walls and rear doors In addition the use of two types of locks separate for the front and rear doors restricts unauthorized access The ca...
Page 7: ...00x1303 mm 600x600x2103 or 600x800x2103 mm 600x600x2236 or 600x800x2236 mm 600x800x2459 mm Weight 66kg 89kg 600x600mm 104kg 600x800mm 91kg 600x600mm 106kg 600x800mm 152kg Static load 1000kg Protection...
Page 8: ...n 4 1 The LZxxxx safety strip Safety strip is fitted with circuit breakers surge arresters and a dummy connector The main overcurrent circuit breaker disconnects the 230V 400V mains from all system de...
Page 9: ...ance socket Surge arresters The overcurrent circuit breaker of the power supply unit of the DSO The main overcurrent circuit breaker Safety contact strip is connected to the mains The access is obtain...
Page 10: ...00A 22x58mm 442000 aM Recommended cable parameters OMY 3 x 1 5 mm 2 4 mm 2 YLY 3 x 1 5 mm 2 4 mm 2 OMY 5 x 2 5 mm 2 4 mm 2 YLY 5 x 1 5 mm 2 4 mm 2 Dimensions Standard RACK 19 H 3U 4 2 230VAC LDxxxx vo...
Page 11: ...e normally without failure opened in the case of failure they must be closed A voice alarm signal or failure indication triggers the appropriate optical and acoustic indication The button on the front...
Page 12: ...Normal operation no failure terminals are opened Failure indication electrical contacts are closed Terminals 0 51 2mm AWG 24 12 Dimensions Standard RACK 19 H 1U Example of connection of the optical a...
Page 13: ...e powered from the 230V mains in the case of the power loss they are switched off Fig 14 Fan panel with the a thermostat Table 8 Components of the fan panel Component No Description Bimetallic thermos...
Page 14: ...h an additional Ethernet module with a 10Base T 100Base TX interface to connect to the Internet Such a configuration enables the remote monitoring of the Voice Alarm System over the Internet from anyw...
Page 15: ...d BAT2 battery connector LED light indicating the controller fuse status The CONTROLLER 24V power supply output of the controller The controller power output fuse F 10A 250V 6 3x32mm Amplifier fuse st...
Page 16: ...displayed The 230V AC AUX and ALARM LED lights indicate the presence of 230V AC voltage 24V receivers voltage and the collective failure of the power supply unit respectively Fig 18 Control panel Tabl...
Page 17: ...SU V The current drawn from the battery A displayed only during battery operation Resistance of the first battery circuit m Resistance of the second battery circuit m Battery temperature C Failure his...
Page 18: ...esult is displayed with a resolution of 1 C 5 4 5 Failure history FLh The power supply stores the last 30 failures in the non volatile memory allowing for a later review Use the or buttons in order to...
Page 19: ...ay is arranged according to priority The failures that are displayed first are of the highest priority The section 5 4 7 summarizes all failure codes that may appear during the power supply operation...
Page 20: ...w below 26V Failure in the charging circuit of the power supply unit F09 Low voltage OUT PSU ALARM The voltage at the OUT output lower than 26V F10 Low battery voltage APS ALARM The battery voltage be...
Page 21: ...ion Additional information Battery test tSt On performing the battery test Ton battery test in progress Section 5 5 1 6 1 Calibration of the battery circuit CAL On Calibration Ton Calibration in progr...
Page 22: ...he battery test the tSt parameter will be displayed In the event of a negative test result the power supply will indicate a failure To return to the main menu simultaneously press the rightmost and le...
Page 23: ...10s factory setting 1min 10min 30min The 230V power failure is indicated by changing the status of the EPS and ALARM technical outputs Simultaneously press the rightmost and leftmost buttons and hold...
Page 24: ...aneously press the rightmost and leftmost buttons and hold for at least 5 seconds The tSt parameter will be displayed Use the or buttons in order to display the bUZ parameter Press OK The information...
Page 25: ...to display the dlS parameter Press OK The information about the current setting will be displayed Use the or buttons to set the desired option On dimming on OFF dimming off Press the OK button to con...
Page 26: ...e higher than 29 2V Failure of the battery charging circuit Fuse failure OUT1 9 Router output fuse failure Overload of the PSU Too high battery temperature Temperature sensor failure Internal damage o...
Page 27: ...ch corresponds to power supply failure collective failure of the PSU EXTi technical input of collective failure The EXTi technical input external input indicates the collective failure and is designed...
Page 28: ...he power supply output In the event of short circuit in any of the OUT1 OUT9 amplifier outputs the controller output or router outputs the corresponding fuse in the circuit is permanently blown Restor...
Page 29: ...6 2 Calibration of the batteries The power supply is equipped with a battery calibration function to be carried out when replacing the batteries with new ones Replacing the batteries with new ones fit...
Page 30: ...against the battery terminals short circuit The PSU is fitted with a circuit protecting against the battery terminals short circuit In the event of a short circuit the control circuit immediately disc...
Page 31: ...ontain information about the current errors e g No AC power High resistance in the battery circuit AUXn fuse failure etc with the exact time of failure In addition each event contains additional infor...
Page 32: ...st be different than the address of the power supply that is 192 168 1 100 The appropriate configuration can be made in the settings of the Network Interface Card Fig 27 NIC Network Interface Card set...
Page 33: ...dow will be loaded showing the current state of the DSO power system The available parameters that can be read include the voltage at the power supply output the state of the mains supply presence or...
Page 34: ...al number of the power supply unit Configuration Number the number identifying the DSO system configuration Peripherals Information about the current state of the peripherals of the power supply Fig 3...
Page 35: ...r time change Press Save to confirm the changes 7 4 2 Password change After selecting the Change Password option you can change the default user and administrator password settings It is recommended t...
Page 36: ...s option enter the available IP address for power supply identification Mask Place to enter the IP subnet mask It is usually expressed as 255 255 255 0 Gateway gateway address An address that usually...
Page 37: ...of the outgoing mail IP IP address of the outgoing mail Sender Email account address Password Email account password Recipient 1 Email address of the recipient 1 Recipient 2 Email address of the reci...
Page 38: ...rature of the batteries recommended by the majority of manufacturers is 25 C Operation at higher temperatures results in significantly reduced battery life in such a way that the service life is reduc...
Page 39: ...at any time by pressing the Abort button It is possible to read the whole history of the power supply at once To do that press the Download all button Fig 40 The History tab The event log is displaye...
Page 40: ...e software update function via a file downloaded at www pulsar pl To update the power supply software you must Download the latest version of the file at the www pulsar pl Press the Search button in t...
Page 41: ...of the system after power failure It is also possible to manually change the cabinet depth from 600mm to 800mm not applicable for the 24U height these cabinets are available in 600mm version only The...
Page 42: ...when designing a cooling system for a room in which a DSO cabinet will be installed In this step it is possible to change the battery capacity to be greater than that calculated by the program The CO...
Page 43: ...www pulsar pl DSOP24V 43 Fig 43 Technical information on the DSO Fig 44 The summary of DSO configurations...
Page 44: ...CRIPTION field includes the price summary and is the summary of the configured DSO including additional components such End of Line EOL Supervision Board and Firefighter s Microphone Power Supply Unit...
Page 45: ...0W max 1 Efficiency 90 max Output voltage 22 0V 28 8V DC buffer operation 20 0V 28 8V DC battery operation 2 Maximum output current outputs routers controller 6x2 5A 10 5A Output current Imax A Imax B...
Page 46: ...e DSO configuration 2 Full range of operating temperatures taking into account accelerated charging and discharged batteries during battery operation 3 Permissible only during battery operation Table...
Page 47: ...enclosures and PE plates 3 Connect the 24V power supply cables to the appropriate equipment amplifiers controller and routers as described in the cables 4 Connect the technical outputs of the power su...
Page 48: ...he properly made and fully operational shock protection circuit is UNACCEPTABLE It can cause a device failure or an electric shock 8 Switch on the 230 400V AC supply The corresponding LEDs on the fron...
Page 49: ...M technical outputs will change status into opposite If the indication panel is installed the yellow indicator will light be lit and the alarm sound will be activated e Turn on the fuse in the battery...
Page 50: ...ment use a replacement of the same parameters Technical inspections should be performed at least every 12 months recommended every 6 months During the technical maintenance the DSO system verification...
Page 51: ...ing the warranty period has not dropped to 80 of the rated capacity 2 The periodic maintenance of all batteries including performing the appropriate measurements shall be performed every 12 months fro...