background image

4K HDBaseT 6x6 Matrix Switcher                                                             


PTN Electronics Limited                            12                          www.PTN-electronics.com 

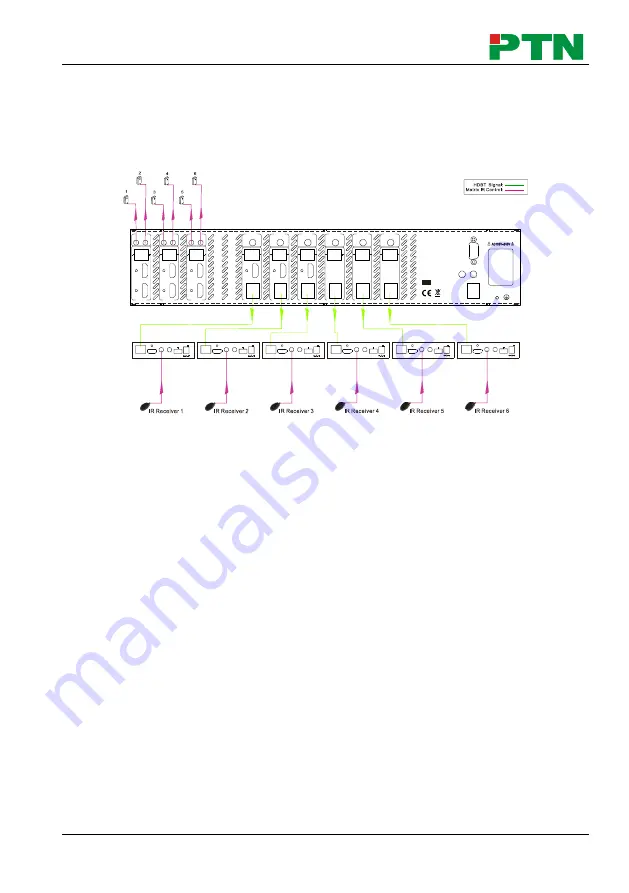
4.2.2 IR Operations 

1)  IR Matrix Switching 

The 6 

―IR OUT‖ ports and the 6 ―IR IN‖ ports on the far-end receivers make up an


6x6


IR 

matrix. See as below: 


IR Matrix 

The IR signal is sent by corresponding IR remote, then it is transferred to HDBaseT 
receiver, then to corresponding zone of the matrix through the twisted pair, finally it is 
transferred to IR OUT port and received by controlled device.


Switching Operation

: (6 IR IN ports correspond with 6 HDMI input ports separately in 

default mode.) 

a)  Sending command (reference to 

4.3 RS232 Control)

: [x1]R[x2]. 

x1: Corresponding to the 6 IR OUT ports of the matrix, the IR transmitter connected 

to this port can be placed at IR receiving area of output device or MUH66TP-N 
itself. 

x2: Corresponding to the zone (receive IR signal from HDBaseT receiver with IR IN 

port connects with IR receiver) number of MUH66TP-N. 

Example: Send command 

―3R2.‖ to transfer IR signal received from zone 2 to IR 

OUT port 3. 

2)  Force Carrier 

a) 

Only if the IR receiver connected to HDBaseT receiver is with IR carrier, can the 
received IR signal be transferred to IR OUT port of the matrix. 

b) 

Only if the IR receiver connected to 

IR


ALL IN

 port of the matrix is with IR carrier, 

can the received IR signal be transferred to IR OUT port of the matrix. 

IR Transmitter

H

D

M

6

H

D

M

4

H

D

M

2

H

D

M

5

H

D

M

3

H

D

M

1

5

6

3

4

1

2

5

6

3

4

1

2

RS232 AUDIO

RS232 AUDIO

RS232 AUDIO

RS232 AUDIO

RS232 AUDIO

RS232 AUDIO

AUDIO

AUDIO

AUDIO

L

R

T

x

R

x

L

R

T

x

R

x

L

R

T

x

R

x

L

R

T

x

R

x

L

R

T

x

R

x

L

R

T

x

R

x

L

R

L

R

L

R

L

R

L

R

L

R

H

D

M

I

H

D

M

I

H

D

M

I

H

D

B

a

s

e

T

H

D

B

a

s

e

T

H

D

B

a

s

e

T

H

D

B

a

s

e

T

H

D

B

a

s

e

T

H

D

B

a

s

e

T

IR IN

IR IN

IR IN

IR IN

IR IN

IR IN

IR OUT

IR OUT

IR OUT

OUTPUT 1

OUTPUT 2

OUTPUT 3

OUTPUT 4

OUTPUT 5

OUTPUT 6

INPUT

INPUT

INPUT

R

S

2

3

2

T

C

P

/I

P

IR

 A

L

L

 I

N

IR

 E

Y

E

Matrix

4K


Tx

Rx

RS232

IR IN

IR OUT

24V 

HDMI OUT

HDBT IN

PoC

Tx

Rx

RS232

IR IN

IR OUT

24V 

HDMI OUT

HDBT IN

PoC

Tx

Rx

RS232

IR IN

IR OUT

24V 

HDMI OUT

HDBT IN

PoC

Tx

Rx

RS232

IR IN

IR OUT

24V 

HDMI OUT

HDBT IN

PoC

Tx

Rx

RS232

IR IN

IR OUT

24V 

HDMI OUT

HDBT IN

PoC

Tx

Rx

RS232

IR IN

IR OUT

24V 

HDMI OUT

HDBT IN

PoC

TPHD402PR 1

TPHD402PR 2

TPHD402PR 3

TPHD402PR 4

TPHD402PR 5

TPHD402PR 6

Summary of Contents for MUH66TP-N

Page 1: ...www PTN electronics com MUH66TP N 4K HDBaseT 6x6 Matrix Switcher All Rights Reserved Version MUH66TP N_2015V1 1 User Manual ...

Page 2: ...he properties of the trademark owner No part of this publication may be copied or reproduced without the prior written consent of PTN Electronics Limited FCC Statement This equipment generates uses and can radiate radio frequency energy and if not installed and used in accordance with the instructions may cause harmful interference to radio communications It has been tested and found to comply wit...

Page 3: ...the unit to rain moisture or install this product near water Do not put any heavy items on the extension cable in case of extrusion Do not remove the housing of the device as opening or removing housing may expose you to dangerous voltage or other hazards Install the device in a place with fine ventilation to avoid damage caused by overheat Keep the module away from liquids Spillage into the housi...

Page 4: ...Connection with TPHD402PR 6 4 System Operations 7 4 1 Front Panel Button Control 7 4 1 1 Switching I O connection 7 4 1 2 EDID Management 8 4 1 3 Inquiry 9 4 1 4 Clear operation 10 4 2 IR Control 10 4 2 1 Usage of IR Remote 11 4 2 2 IR Operations 12 4 3 RS232 Control 15 4 3 1 Connection with RS232 Communication Port 15 4 3 2 Installation uninstallation of RS232 Control Software 15 4 3 3 Basic Sett...

Page 5: ...tronics Limited www PTN electronics com 4 4 1 Control Modes 26 4 4 2 GUI for TCP IP control 26 4 4 3 GUI Update 30 4 5 Firmware Update via USB 31 5 Specification 32 6 Panel Drawing 33 7 Troubleshooting Maintenance 34 8 After sales Service 36 ...

Page 6: ...ected audio is output via HDMI outputs HDBaseT outputs and the audio output sockets The unit also supports bi directional RS232 IR control 1 2 Features Support HDMI 1 4 4Kx2K 1080p 3D HDCP1 4 compatible support manual HDCP management and auto detecting Transmit 4Kx2K signal for 8m via HDMI port 40m via HDBT port Audio source selectable via RS232 command 6 HDBaseT outputs for easy extension to 70m ...

Page 7: ...In built IR sensor receive IR signals sent from IR remote LCD Screen Display real time operation status INPUTS Menu buttons Normal mode Back lit buttons ranging from 1 to 6 Inquiry mode buttons 1 4 Press ENTER for more than 3 seconds to enter this mode Dial to select different menus to select different options OUTPUTS buttons EDID Manageme nt buttons Normal mode Back lit buttons ranging from 1 to ...

Page 8: ...ual are for reference only different model and specifications are subject to real product 2 2 Rear Panel No Name Description INPUTS a IR OUT 6 in total connect with IR emitters to deliver the IR signal sent from the far end receivers connected to the HDBaseT ports These IR OUT sockets make up an IR matrix with the IR IN sockets on the far end receivers and all can be RS232 TCP IP IR ALL IN IR EYE ...

Page 9: ...ver the communication protocol must be the same with the MUH66TP N s f AUDIO stereo audio output ports 6 in total g HDMI Local HDMI output ports for HDMI Inputs 1 3 synchronously switched with HDBaseT Output 1 3 h HDBaseT output extension ports works with HDBaseT receivers to extend signals and energize far end HDBaseT receiver on a single CAT5e 6 cable RS232 Serial port for unit control 9 pin fem...

Page 10: ... installed in a clean environment and has a prop temperature and humidity 2 All of the power switches plugs sockets and power cords should be insulated and safe 3 All devices should be connected before power on 3 3 Connection Diagram 3 4 Connection Procedure 1 Connect HDMI sources e g DVD to HDMI inputs of the MUH66TP N with HDMI cables 2 Connect auxiliary audio sources to the AUDIO IN ports with ...

Page 11: ...s 8 Connect an AC 100V 240V power outlet and the MUH66TP N with the AC power cord Note 1 Connect HDBT ports of MUH66TP N and far end receiver with straight through cable 2 Output audio is selectable via RS232 command Audio X Y It s free to select whether analog audio or HDMI audio to output Default is HDMI audio 3 IR receivers connected to IR IN IR ALL IN should be with carrier If not send command...

Page 12: ...t 2 Note In default status the 6 IR OUT sockets correspond with 6 HDMI INPUTS When you convert an HDMI input to an output the corresponding IR OUT will be switched synchronously 2 To convert an input to several outputs Operation input output output ENTER Example Switch input 2 to output 2 4 3 To convert an input to all outputs Operation input ALL ENTER Example Convert input 1 to all outputs Note I...

Page 13: ... OUTPUTS ENTER Example All input ports learn EDID data from output 4 Note Indicators of the pressed buttons will blink green for three times if the conversion is done then it will be off If the conversion failed they will be off immediately EDID invoking There are six types of embedded EDID data The chart below illustrates the detailed information of the embedded EDID data Output Button EDID Data ...

Page 14: ...utton to navigate checking the previous next items Function Items Example Description Check the connection status of inputs Y means the corresponding port is connected with input device N means not Check the connection status of outputs Y means the corresponding port is connected with output device N means not Correspondence between inputs and outputs Shows the correspondence between the 6 inputs ...

Page 15: ... 3 seconds Then output 2 corresponds to input 1 4 1 4 Clear operation When you switch output channel learn EDID data or set EDID data press Clear button to withdraw the operation before you press ENTER to carry it on When you press it the matrix will return to the previous status 4 2 IR Control By using IR HDBaseT transmission technology the MUH66TP N has some functions as follows 1 Control far en...

Page 16: ...ttons ALL EDID and CLEAR same with the corresponding front panel buttons Please refer to 4 1 Front Panel Button Control for details Navigation buttons ENTER Confirm button Output channels range from 1 6 buttons 7 8 are not available Each channel has 1 IR IN 1 HDBaseT 1 RS232 and 1 AUDIO outputs and channel 1 3 have HDMI outputs Note With this IR remote MUH66TP N can be controlled by the built in I...

Page 17: ...T port 3 2 Force Carrier a Only if the IR receiver connected to HDBaseT receiver is with IR carrier can the received IR signal be transferred to IR OUT port of the matrix b Only if the IR receiver connected to IR ALL IN port of the matrix is with IR carrier can the received IR signal be transferred to IR OUT port of the matrix IR Transmitter HDMI 6 HDMI 4 HDMI 2 HDMI 5 HDMI 3 HDMI 1 5 6 3 4 1 2 5 ...

Page 18: ...y See the figure below Control far end device from Local Note The IR receiver connected to IR IN must be with IR carrier The IR signal received from IR ALL IN port will be transmitted to all the six far end HDBaseT receivers connected to HDBaseT ports of the MUH66TP N See as below DVD HDTV Tx Rx RS232 IR IN IR OUT 24V HDMI OUT HDBT IN PoC TPHD402PR IR Remote HDTV HDMI 6 HDMI 4 HDMI 2 HDMI 5 HDMI 3...

Page 19: ...UT INPUT INPUT RS232 TCP IP IR ALL IN IR EYE Matrix 4K Tx Rx RS232 IR IN IR OUT 24V HDMI OUT HDBT IN PoC Tx Rx RS232 IR IN IR OUT 24V HDMI OUT HDBT IN PoC Tx Rx RS232 IR IN IR OUT 24V HDMI OUT HDBT IN PoC Tx Rx RS232 IR IN IR OUT 24V HDMI OUT HDBT IN PoC Tx Rx RS232 IR IN IR OUT 24V HDMI OUT HDBT IN PoC Tx Rx RS232 IR IN IR OUT 24V HDMI OUT HDBT IN PoC TPHD402PR 1 TPHD402PR 2 TPHD402PR 3 TPHD402PR...

Page 20: ...Unused 5 Gnd Ground 6 N u Unused 7 N u Unused 8 N u Unused 9 N u Unused 4 3 2 Installation uninstallation of RS232 Control Software Installation Copy the control software file to the computer connected with MUH66TP N Uninstallation Delete all the control software files in corresponding file path 4 3 3 Basic Settings Firstly connect MUH66TP N with an input device and an output device Then connect i...

Page 21: ...e System Commands Type Inquire the models information MHD66TP N Lock Lock the front panel buttons on the Matrix System Locked Unlock Unlock the front panel buttons on the Matrix System Unlock Version Inquire the version of firmware VX X X MessageOff Turn off the feedback command from the com port It will only show simple words like SWITCH OK MessageOff Parameter Configuration area Monitoring area ...

Page 22: ... X 1 6 All Transfer all input signals to the corresponding output channels respectively like 1 1 2 2 All Through All Switch off all the output channels All Closed x Transfer signals from the input channel x to the output channel x X Through X 1 6 x Switch off the output channel x X Closed X 1 6 x Switch on the output channel x X Open X 1 6 All Switch on all output channels All Open x1 V x2 Transfe...

Page 23: ...eT receivers press other buttons or send other commands to start STANDBY Audio X Y Select HDMI audio or analog audio as audio source for output 1 6 Audio X Y X 1 6 Y 0 HDMI audio or 1 Analog audio Y X Z HDCP management command Y is for input value I or output value O X is the number of the port if the value of X is ALL it means all ports Z is for HDCP compliant status the value may be 1 HDCP compl...

Page 24: ... device b Y 9 send this command to all HDBaseT receivers to control all far end devices c Y A B C D E or F d Y G H I J K or L For items c or d send this command it will be saved to the matrix switcher but taken without action to corresponding HDBaseT receiver And its command function will be effective almost at the same time when you send the command PWON for item c or PWOFF for item d Note A G ar...

Page 25: ...D data and carriage return character EDIDMInit Restore the factory default EDID data of every input EDIDMInit EDIDM X B Y Manually EDID switching Enable input Y to learn the EDID data of output X If the EDID data is not available then set it as initialized EDID data EDIDM X B Y EDIDUpgrade x Upgrade EDID data via the RS232 port x is the input port when the value of X is 9 it means to upgrade all i...

Page 26: ...InPortEDI D X Return the EDID data of input x x 1 6 0801 Auto HDCP management activate carrier native mode 0801 0900 Switch to carrier native mode Carrier native 0901 Switch to force carrier mode Force carrier 0911 Reset to factory default Factory Default 9951 Check the command sent by port 1 when PWON Port 1 data when PWON 9952 Check the command sent by port 2 when PWON Port 2 data when PWON 9953...

Page 27: ...FF Port 6 data when PWOFF 9961 Check the system locking status System Locked Unlock 9962 Check the status while in standby mode STANDBY PWON PWOFF 9963 Check the working mode of infrared carrier Carrier native Force carrier 9964 Check the IP address IP 192 168 0 178 default 9966 Check the audio sources of all outputs Channel 1 is HDMI Audio Channel 2 is HDMI Audio Channel 3 is HDMI Audio Channel 4...

Page 28: ...ion Out 1 0000x0000 Out 2 1920x1080 Out 3 1920x1080 Out 4 1920x1080 Out 5 0000x0000 Out 6 1920x1080 9977 Check the status of digital audio of output channels Out 1 2 3 4 Audio Y Y Y Y Out 5 6 Audio Y Y 9978 Check the HDCP compliant status of the inputs In 1 2 3 4 HDCPEN Y Y Y Y In 5 6 HDCPEN Y Y Note 1 Please disconnect all the twisted pairs before sending command EDIDUpgrade X 2 In above commands...

Page 29: ...4 RS232 Communication Commands HDMI 6 HDMI 4 HDMI 2 HDMI 5 HDMI 3 HDMI 1 5 6 3 4 1 2 5 6 3 4 1 2 RS232 AUDIO RS232 AUDIO RS232 AUDIO RS232 AUDIO RS232 AUDIO RS232 AUDIO AUDIO AUDIO AUDIO L R Tx Rx L R Tx Rx L R Tx Rx L R Tx Rx L R Tx Rx L R Tx Rx L R L R L R L R L R L R HDMI HDMI HDMI HDBaseT HDBaseT HDBaseT HDBaseT HDBaseT HDBaseT 1 2 3 4 5 6 IR IN IR IN IR IN IR IN IR IN IR IN IR OUT IR OUT IR O...

Page 30: ...O RS232 AUDIO AUDIO AUDIO AUDIO L R Tx Rx L R Tx Rx L R Tx Rx L R Tx Rx L R Tx Rx L R Tx Rx L R L R L R L R L R L R HDMI HDMI HDMI HDBaseT HDBaseT HDBaseT HDBaseT HDBaseT HDBaseT 1 2 3 4 5 6 IR IN IR IN IR IN IR IN IR IN IR IN IR OUT IR OUT IR OUT OUTPUT 1 OUTPUT 2 OUTPUT 3 OUTPUT 4 OUTPUT 5 OUTPUT 6 INPUT INPUT INPUT RS232 TCP IP IR ALL IN IR EYE Matrix 4K Tx Rx RS232 IR IN IR OUT 24V HDMI OUT HD...

Page 31: ...Port cannot be changed Controlled by Single PC Connect a computer to the TCP IP port of the MUH66TP N and set its network segment to the same as the MUH66TP N s HDMI 6 HDMI 4 HDMI 2 HDMI 5 HDMI 3 HDMI 1 5 6 3 4 1 2 5 6 3 4 1 2 RS232 AUDIO RS232 AUDIO RS232 AUDIO RS232 AUDIO RS232 AUDIO RS232 AUDIO AUDIO AUDIO AUDIO L R Tx Rx L R Tx Rx L R Tx Rx L R Tx Rx L R Tx Rx L R Tx Rx L R L R L R L R L R L R...

Page 32: ...he router s then PCs within the LAN are able to control MUH66TP N Follow these steps to connect the devices Step1 Connect the TCP IP port of the MUH66TP N to Ethernet port of PC with twisted pair Step2 Set the PC s network segment to the same as the MUH66TP N s Do please remember the PC s original network segment Step3 Set the MUH66TP N s network segment to the same as the router Router Internet P...

Page 33: ...llows users to interact with MUH66TP N through graphical icons and visual indicators Type 192 168 0 178 in your browser it will enter the log in interface shown as below There are 2 selectable usernames admin default password admin and user default password user Log in as admin can access more configuration interfaces than user Enter username and the right password Here is a brief introduction to ...

Page 34: ...saving and recall for overall connection status Users Display or modify credential settings front panel lock and GUI version If there is any modification press Save to restore the settings or press Cancel to withdraw Interface Set title bar label LCD readout and button labels press Save to save the settings Configuration Set HDCP Cmpliance status for every input and manage EDID See the screenshot ...

Page 35: ...y Note Log in as user access main interface only 4 4 3 GUI Update GUI for MUH66TP N supports online update in http 192 168 0 178 100 Type the username and password the same as the GUI log in settings modified password will be available only after rebooting to log in the configuration interface After that click Administration at the source menu to get to Upload Program as shown below ...

Page 36: ...llow these steps to upgrade firmware Step1 Copy the upgrade software and the latest upgrade file bin to PC Step2 Connect the USB ports of MUH66TP N and the PC via USB cable Step3 Double click the update software icon see as below It will enter the upgrade interface shown as below Step4 Click Connect USB Step5 Click Open to load the upgrade file then click Updata to start firmware upgrading Note To...

Page 37: ...s Video Signal HDMI or DVI D Maximum Pixel Clock 225MHz Resolution Range Up to 4Kx2K 1080P 3D Switching Speed 200ns Max Max Pixel Clock 225MHz EDID Management In built EDID data and manual EDID management HDCP Supports HDCP 1 4 auto detecting for HDCP status selectable HDCP status Audio General Output Signal Analog audio Output Connector 3 pin pluggable terminal block PCM Format Distortion 0 1 32Ω...

Page 38: ... blocks IR Control In built IR sensor Extended IR receiver RS232 Control 9 pin female TCP IP Control Works with In built web GUI General Power Supply 100V 240V AC Power Consumption 80W full load Temperature 10 40 Reference Humidity 10 90 Dimension W H D 437 x 87 8 x 380 mm Weight 5 3Kg 6 Panel Drawing ...

Page 39: ...command 1 or change HDCP compliance status in GUI The display doesn t support the input resolution Switch for another input source or enable the display to learn the EDID data of the input Cannot control the device via front panel buttons Front panel buttons are locked Send command Unlock or select unlock in GUI interface to unlock Cannot control the device via IR remote The battery has run off Ch...

Page 40: ...ce e g a PC through RS232 port Wrong connection Check to ensure the connection between the control device and the unit Wrong RS232 communication parameters Type in correct RS232 communication parameters Baud rate 9600 Data bit 8 Stop bit 1 Parity bit none Broken RS232 port Send it to authorized dealer for checking Static becomes stronger when connecting the video connectors Bad grounding Check the...

Page 41: ...or removed from the product Damage deterioration or malfunction caused by Normal wear and tear Use of supplies or parts not meeting our specifications No certificate or invoice as the proof of warranty The product model showed on the warranty card does not match with the model of the product for repairing or had been altered Damage caused by force majeure Servicing not authorized by PTN Other caus...

Page 42: ...4K HDBaseT 6x6 Matrix Switcher PTN Electronics Limited www PTN electronics com ...

Page 43: ...4K HDBaseT 6x6 Matrix Switcher PTN Electronics Limited www PTN electronics com ...

Page 44: ...www PTN electronics com PTN Electronics Limited Tel 86 755 2846 1819 Fax 86 755 8471 7796 Email info PTN electronics com Website www PTN electronics com ...

Reviews: