background image


Loosen


the


two


screws


on


the


probe


holder


to


make


adjustments.


​​

Rotating


the


probe 

counter


clockwise


will


raise


it


1mm


per


turn.


Rotating


it


is


very


handy


for


precise 

adjustments,


but


it


can


also


be


pushed


in


and


out


when


the


set


screws


are


loosened 

completely.


​​

Then


rerun


Calibrate


Z


followed


by


the


First


layer


calibration


again. 


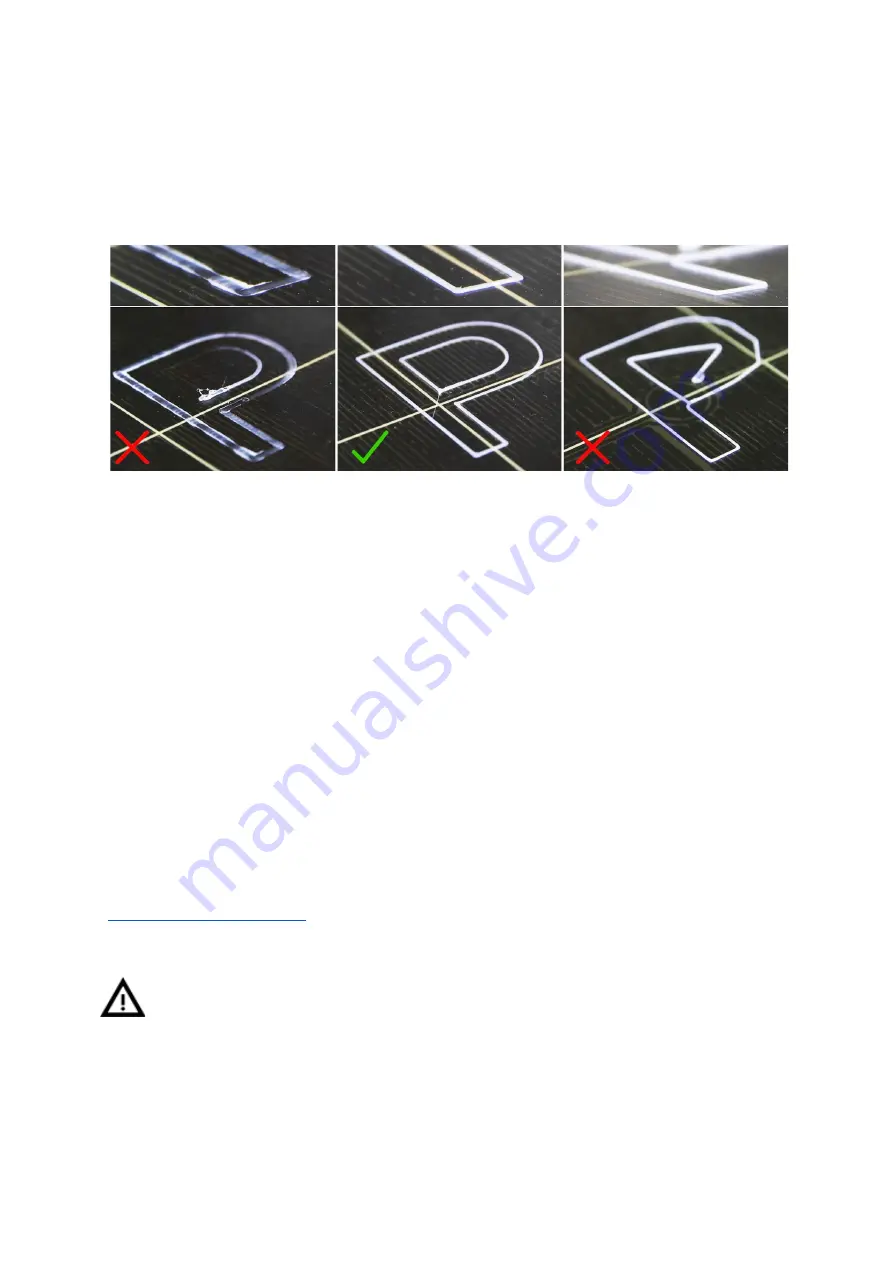
Pict.


11


-


The


properly-tuned


first


layer


6.3.9.1


Bed


level


correction


(kit


only

Bed


level


correction


is


an


advanced


feature


that


is


designed


to


allow


advanced


users


to 

correct


for


the


slightest


imperfections


in


the


first


layer.


This


feature


can


be


found


in 

Calibration


-


​​

Bed


level


correction.


For


example,


if


the


first


layer


seems


to


be


ever


so 

slightly


more


squished


on


the


right


side,


you


can


virtually


raise


the


nozzle


by


​​

+20


microns


on 

the


right


side.


Settings


are


available


for


Left,


Right,


Front


and


Back.


The


limit


is


+-50


microns 

and


even


+-20


microns


can


make


a


huge


difference.


When


you


are


using


this


function,


do 

small


incremental


changes.


A


negative


value


will


act


as


lowering


the


bed


in


the


selected 

direction.


6.3.10


​​


Fine


tuning


the


first


layer 


6.3.10.1


Print


Prusa


logo 

After


finishing


the


calibration


gcode,


it


is


a


good


idea


to


print


a


simple


object.


The


Prusa


logo 

from


the


supplied


SD


card


is


a


great


example.


The


​​

Live


adjust


Z


function


(described


in 

6.3.9.


First


layer


calibration

)


works


during


every


print,


so


you


can


fine


tune


at


any


point.


You 

can


see


the


properly-tuned


first


layer


in


Pict.


12. 

 
Calibration


might


be


slightly


different


for


different


steel


print


sheets


as


the


coating 

thickness


varies.


It


is


a


good


practice


to


check


the


first


layer


and


adjust


accordingly 

with


​​

Live


adjust


Z


when


switching


between


different


types


of


steel


sheets. 

24 

Summary of Contents for Original Prusa i3 MK3

Page 1: ......

Page 2: ...all the drivers page 41 4 Calibrate the printer by following our calibration flow wizard page 11 5 Insert the SD into the printer and print your first model page 26 Important notice tip hint or information that helps you print with ease Read carefully This part of the text has the greatest importance either for user safety of for proper printer service This symbol indicates text related to a print...

Page 3: ...MK3 the third iteration of the original 3D printer It is constantly updated with the latest innovations and you ve just purchased its latest version In addition to printer hardware upgrades the main goal is to make the technology more accessible and understandable to all users Josef Prusa also organizes workshops for the public participates in professional conferences dedicated to the popularizati...

Page 4: ... 6 3 5 1 Calibrate XYZ error messages and resolution kit only 18 6 3 6 Calibrate Z 20 6 3 7 Mesh bed leveling 21 6 3 8 Loading the filament into the extruder 21 6 3 8 1 Unloading the filament 22 6 3 9 First layer calibration kit only 23 6 3 9 1 Bed level correction kit only 24 6 3 10 Fine tuning the first layer 24 6 3 10 1 Print prusa logo 24 6 3 9 2 Check probe height kit only 25 7 Printing 26 7 ...

Page 5: ...12 1 2 Fans 59 12 1 3 Extruder drive gear 6 0 12 1 4 Electronics 6 0 12 1 5 PEI rejuvenation 6 0 12 2 Print surface preparation 6 0 12 3 Filament sensor 6 1 12 3 1 Running out of filament 6 1 12 3 2 Filament jam 6 1 12 3 3 False sensor readings and debugging 6 1 12 3 3 1 Dust on the sensor how to clean 6 2 12 3 3 2 Extreme light conditions 6 2 12 3 3 3 Exotic filaments 6 2 12 4 Clogged jammed extr...

Page 6: ... upgrades which lead to improved reliability increased print speed and ease of use and assembly Please check the http prusa3d com drivers page for the updated version of this 3D printing handbook PDF download In case of any printer related problem do not hesitate to contact us at info prusa3d com We are glad to receive all of your valuable comments and tips We strongly suggest you visit our offici...

Page 7: ...ble on it or step on it or otherwise expose it to any damage Make sure that the power cord is not mechanically or otherwise damaged Stop using damaged power cord immediately and replace it 5 When you disconnect the power cord from the socket pull the plug rather than the cord to reduce the risk of damage to the plug or to the AC outlet 6 Never disassemble the printer power supply it does not conta...

Page 8: ...vice or help We will gladly help with any specific prints 3D printers use two different diameters of filament 2 85 mm and 1 75 mm you can find more in the chapter Materials The 1 75mm version is used more worldwide although there is no difference in printing quality The filament is provided on a spool where you can find the basic information filament maker material ABS PLA etc and filament diamete...

Page 9: ... in chapter 6 2 Printer assembly We offer the support for users who purchased the printer kit through our official forum If you need help do not hesitate to visit our forum at forum prusa3d com You can find the answers to your problem there If not please just post your question directly there Pict 2 Original Prusa i3 MK3 printer kit unboxed 9 ...

Page 10: ... cut those off too Pict 3 Proper handling of a printer Both the assembled version and the kit version come with a few things you might need during the printer use USB Cable used for uploading new firmware or alternatively printing from the computer Acupuncture needle used for cleaning a clogged nozzle See the chapter 12 5 Nozzle cleaning for more information Glue stick Used for better adhesion of ...

Page 11: ...ore printing Place the printer in a horizontally stable position the best place is a workbench where there is no risk of draft Attach the filament holders to the upper frame Attach a spool of Filament to the holders Make sure the filament spool doesn t jam and can move freely Plug in the AC power cord and turn on the switch Check out the firmware version in the Support menu via LCD panel and pleas...

Page 12: ...rget to read chapter 6 3 2 PEI print surface preparation before running the Wizard It follows the calibration flow and helps you with the following steps Selftest Chapter 6 3 4 Calibrate XYZ Chapter 6 3 5 Loading the filament Chapter 6 3 8 First layer calibration Chapter 6 3 9 It is not mandatory to use it and you can cancel the wizard at the beginning Then you should just manually follow the cali...

Page 13: ... 3 2 Flexible steel sheet surface preparation The MK52 heatbed has embedded high curie temperature magnets These magnets are able to firmly hold removable spring steel sheets There are two pins at the end of the heatbed that will align perfectly with cut out slots in the spring steel sheets Make sure the bed is clean and there isn t any debris on it before you put on the steel sheet Never print di...

Page 14: ...ve to be cleaned before every print It is just important to not touch the steel sheet with your hands or dirty tools Clean your tools with the same solution as you would the sheet and you will be able to start your next print right away Pict 6 Steel print sheets smooth PEI sheet glossy powder coated PEI and textured powder coated PEI All original print surfaces from Prusa Research are coated from ...

Page 15: ...e functionality or adhesion 6 3 2 3 Spring steel sheet with smooth double sided PEI Uses the same PEI sheets as on the MK2 S You can leave small marks on the print surface with your nozzle or tools they will typically be shinier than the rest It does not affect the functionality or adhesion However if you want to have the same surface look on the whole printbed you can resurface it The easiest way...

Page 16: ...deliver any acetone based products due to shipping constraints In that case you get only the bottle and ABS from our e shop and you have to source the acetone locally 6 3 4 Selftest kit only The purpose of the selftest routine is to check most common errors when assembling and connecting electronics and to help indicate any possible errors after assembly You can run the Selftest from Calibration m...

Page 17: ...ures the length of the axis by moving the print head from end to end twice If the measured value is different from the physical length your print head might be blocked from moving all the way Check by hand if the print head moves smoothly when the printer is powered off Endstops Wiring error Z Check the proper cabling of the PINDA probe Routine indicates the PINDA probe has a malfunction or is not...

Page 18: ...libration procedure the printer homes the X and Y axis After that the Z axis will begin to move up until both sides touch the printed parts at the top Please make sure the print head went all the way up the Z axis and that you heard a rattling sound as the Z stepper motors skip steps This procedure ensures that 1 the X axis is perfectly horizontal 2 the print nozzle is in a known distance from the...

Page 19: ...e slightly skewed Good job Good job the X Y axes are not precisely perpendicular but still quite all right The firmware will correct for the X Y skew during normal printing so boxes will be printed with right angles 5 XYZ calibration all right A skew will be corrected automatically You may consider to re align the X Y axes as described in the chapter 6 3 5 1 Y axis alignment Still the firmware wil...

Page 20: ...e Calibration menu It is always done with the steel sheet on It should be performed whenever you move the printer to a different location It saves the heights of all 9 calibration points in nonvolatile memory Stored information is used every time mesh bed leveling is called during a print When the measured values are vastly different from the stored values the print is canceled because it is a goo...

Page 21: ...ed the probe will still precisely follow the surface according to its measured mesh The deviation limit for the compensation is 50μm or 0 05 mm Pict 8 Visualisation of mesh bed leveling 6 3 8 Loading the filament into the extruder To load filament simply insert it into the extruder Make sure that the filament tip is nice and pointy Printer will prompt you to select the inserted filament material p...

Page 22: ...changed If your filament is running out during a print you can easily change it for a new spool Just go to the LCD menu select Tweak submenu and press Change filament The printer will pause the print head will go out of the print area unload the old filament and the LCD will guide you on what to do You can even insert filament of a different color and make your prints more colorful Check out chapt...

Page 23: ...a zig zag pattern on the print surface The nozzle will be at the height based on the PINDA probe setting it must not by any means touch the print surface Pict 10 How to tune the nozzle height live during the test print Note 0 640 mm is only for illustration Your setting will be different Observe the line which is being extruded on the print surface A new menu will automatically show up where you c...

Page 24: ...nozzle by 20 microns on the right side Settings are available for Left Right Front and Back The limit is 50 microns and even 20 microns can make a huge difference When you are using this function do small incremental changes A negative value will act as lowering the bed in the selected direction 6 3 10 Fine tuning the first layer 6 3 10 1 Print Prusa logo After finishing the calibration gcode it i...

Page 25: ...rews on the probe holder to make adjustments Rotating the probe clockwise lowers it 1mm per turn Rotating it is very handy for precise adjustments but it can also be pushed in and out when set screws are loosened completely Then try again Calibrate XYZ Keep in mind the probe must always be higher than the nozzle tip otherwise it will catch on prints Pict 13 Probe response diagram Now you are done ...

Page 26: ... not contain any special characters otherwise the printer is not able to display the file on the LCD A list of acceptable characters would be clearer 7 1 Removing objects from the printer Removing prints from the build plate is much easier because of the ability to remove and bend the build plate Different thermal expansion of the steel sheet and plastics used in 3D printing also helps with detach...

Page 27: ...ails They are the temperature of the nozzle and the heatbed 1 2 printing time 3 and the actual Z axis position 5 Pict 15 LCD layout 1 Nozzle temperature actual desired temperature 2 Heatbed temperature actual desired temperature 3 Progress of printing in shown only during the printing 4 Status bar Prusa i3 MK3 ready Heating file_name gcode etc 5 Z axis position 6 Printing speed 7 Elapsed printing ...

Page 28: ...CD functions like Calibration Wizard you may encounter special symbols in the bottom right corner Double down arrow informs you that the message contains more screens which automatically switch and you should wait Tick sign informs you that you need to press the control knob to continue 7 2 3 Print statistics The printer tracks printing statistics When you access this option during a print you wil...

Page 29: ...printer and resetting it to the factory state Entering the factory reset menu 1 Press and release the reset button marked X and positioned under the control knob on the LCD panel 2 Press and hold the control knob until you hear a beep 3 Release the control knob Options Language option resets the language preference Statistics will erase all the recorded print time and material from the memory Ship...

Page 30: ...top Folders are shown on the top of the SD card menu and then other files follow The maximum number of files which can be displayed is 100 If there are more than 100 files on the SD card only the first 100 will be displayed Pict 18 SD card sorting 7 2 8 Testing if file gcode is complete The printer automatically looks for common g codes which indicate the end of the generated file If they are not ...

Page 31: ... Z during the printing process only Tune during the printing process only Speed Nozzle Bed Fan speed Flow Change filament Mode Pause print during the printing process only Stop print during the printing process only Preheat PLA 215 60 PET 240 90 ABS 255 100 HIPS 220 100 PP 254 100 FLEX 230 50 Cooldown Print from SD Load filament Unload filament Settings Temperature Nozzle Bed Fan speed Move axis M...

Page 32: ...ct language SD card Normal FlashAir Sort Time Alphabet None Calibration Wizard First layer calibration Auto home Selftest Calibrate XYZ Calibrate Z Mesh Bed Leveling Bed level correction PID Calibration Show end stops Reset XYZ calibration Temperature Calibration Statistics Support Firmware version XYZ calibration detail Extruder info Belt status Temperatures Fail stats 32 ...

Page 33: ...er we do not advise increasing the speed over 200 Watch the results of increased speed on the printed model and adjust the speed accordingly When increasing the speed always check that the model is cooled properly especially when printing a small object from ABS increased speed causes distortion sometimes called warping of the model You can prevent this issue by printing more similar objects toget...

Page 34: ...tion information The next step is loading the model with Load model button and choosing the file_name gcode no special symbols in file name You can control the movement of all printer axes at the control area Next you can preheat the printer and prepare it for the printing Set the temperatures for the nozzle heater and heatbed bed and click Set button The printer starts heating immediately Always ...

Page 35: ... displayed after loading the model 7 2 12 Power panic The printer can fully recover from a complete loss of power without the need for batteries A special sensor detects mains voltage and in case of an interruption it immediately shuts down the heatbed and extruder heating leaving enough power in the capacitors to store the position and lift the print head away from print In case of a very short p...

Page 36: ...ill degrade very quickly and lose their properties Most of the abrasive materials are composites plastics with something mixed in Some examples are ColorFabb XT CF20 ColorFabb Bronzefill ColorFabb Brassfill and some glow in the dark filaments Always ask your filament vendor if you are not sure A slight disadvantage is that some standard materials like ABS aren t possible to print as fast as with a...

Page 37: ...t octoprint org or Repetier Server www repetier server com to control the printer via a web browser interface PowerPanic functionality will not work with OctoPrint as of now but Prusa Research is working with OctoPrint developers on implementing it An up to date connection diagram and configuration information can always be found at Manual prusa3d com or help prusa3d com Pict 23 Connecting Raspber...

Page 38: ...eeded to reach the temperature and maintain it Do not touch the nozzle during this process until the process is fully finished as it will reach high temperatures Be aware that PID tuning is not a solution for all of the temperature fluctuation issues Always make sure that your printer is located in a room with stable ambient temperatures more about that in Thermal Runaway and Temperature Drops at ...

Page 39: ...rpendicular or slightly skewed nothing needs to be tweaked because the printer will perform with the best accuracy Pict 24 Distance of the front calibration point from the axis start Pressing the button will get you to the 2nd screen This screen will identify how far you are from the perfect perpendicularity It is measuring the skew of your X Y axis Up to 0 25 Severe skew compensating for offset o...

Page 40: ...the printer specific custom gcode PrusaControl uses the same K values but will not allow users to edit Simplify3D Cura users just need to add M900 K into the starting gcode script Keep in mind you need to manually change that for different filament materials Only Slic3r PE has custom gcode for each filament preset and therefore K value is changed automatically Set the speed you want print somethin...

Page 41: ...etFabb repairing corrupted or unprintable models Settings optimizing print settings for Slic3r Cura Simplify3D and KISSlicer Drivers for Prusa i3 printer Windows and Mac drivers Test objects 10 Printing your own models 10 1 Where can you get the 3D models The best way to get started with your own 3D printing is to find already created models on the internet they should be in the stl or obj format ...

Page 42: ...along with detailed video tutorials so it s a very good choice for novice enthusiasts There is a great deal of 3D programs free or paid your choice depends more on your personal taste and preferences The following is a list of other programs used for making 3D models OpenScad DesignSpark Mechanical Fusion 360 Blender Maya 3DS Max Autocad and many more Pict 25 Fusion 360 10 3 PrusaControl A 3D prin...

Page 43: ...face 1 Undo Redo buttons return changes 2 Scale button allows you to scale with the mouse while the model is selected 3 Rotate button allows you to rotate with the mouse while the model is selected outer circle step are 0 1 inner circle step is 45 4 Auto arrange button positions objects on the print bed 5 Material selection menu 6 Quality Speed setting of a print menu 7 Infill menu 8 Supports menu...

Page 44: ... Slic3r PE directly Pict 27 Slic3r interface 1 The Add button loads models into Slic3r 2 Delete and Delete All buttons remove the model s from Slic3r 3 Opens the detailed settings of print filament and printer 4 When the model is ready for print this button generates the gcode file 5 Quality Speed setting of a print 6 Material selection 7 Printer selection 8 Right click on model opens the menu wit...

Page 45: ... 3D printing benchmark 10 6 Print in color with ColorPrint There is a simple way to create layer based multicolored 3D prints with PrusaControl or with our simple online ColorPrint app by manually changing the filament Pict 29 Multicolored object printed with ColorPrint ColorPrint is now directly integrated into the PrusaControl and filament changes can be added when the gcode is already generated...

Page 46: ... menu Drag the gcode to the frame and click on Add change button Find the height of the layer where you want to make the color change This can be easily found in Slic3r under tab Layers The scale along right side displays the height of individual layers Set this number to the box The number of these changes is unlimited When you are done with your modification download the file This file is ready ...

Page 47: ...otend and LCD will display Changed correctly with three options 1 Yes Everything went ok and printing can continue Check if the new color is clear without any remains of the previous filament if yes choose this option to continue printing with a new color 2 Filament not loaded If the new filament was not loaded properly choose this option and the printer will start the automatic filament load agai...

Page 48: ...rt material When you print models you can find special cases different from standard printing The first case is printing with support material If you print an object with a gradient lower than 45 the material overhang would be preventing the object to be printed correctly Slic3r allows you to print such objects thanks to the Printing with support function Support material is an extra structure pri...

Page 49: ...e heatbed The first option is to resize the object to a printable size Right click on an object in Slic3r opens a menu with the Scale option then you choose Uniformly if you want to scale down the model evenly or you can alter the size of a model along the one of the axes Along X Y Z axis Pict 33 Size change of a printed object 49 ...

Page 50: ...you have to cut the object using Slic3r Right click and choose the Cut option in the menu You can cut the object horizontally if you need to perform a cut in a different axis use the Flip option in the same menu Pict 34 Cutting the object with the Cut option 50 ...

Page 51: ...anywhere near as dangerous as for example PLA solvents The best use of ABS is for architectural models concept models spare parts car interior gears phone cases etc On the other hand thermal contraction is where ABS makes it really hard to successfully print something And that s especially true when printing anything big Even with the heatbed at 100 C your part may start lifting from the build pla...

Page 52: ... disadvantages The low melting temperature also means low temperature resistance Parts start to lose mechanical strength at temperatures over 60 C The combination of being both biodegradable and having low temperature resistance means that it s not ideal for outdoor use not to mention low UV resistance Also PLA is only soluble in chemicals like chloroform or hot benzene So when connecting multiple...

Page 53: ...ed and warps In addition to that PETG is ductile It has a healthy amount of flex which can prevent parts from breaking under stress Unlike PLA or ABS PETG tends to ooze a bit and may leave strings of plastic on your print You can fight this with increasing retraction and playing with hotend temperature but if you use our filament presets in Slic3r or Prusa Control we already did that for you and t...

Page 54: ...rsal and stable material with excellent heat resistance and it produces very smooth layers HIPS is also very malleable and it can be dissolved using limonene HIPS is mostly suited for printable mechanical components ADVANTAGES DISADVANTAGES Smooth High level of warping Durable Bad smell Soluble Nozzle temperature 220 C Bed temperature 100 C You can set the bed temperature between 80 to 110 C depen...

Page 55: ...at all But whether you need a phone cover an action camera case or wheels for your RC car flexible is the way to go Before you start printing from Flex clean the nozzle from the previous material preheat the nozzle and load PLA to remove any other previous material When loading Flex loosen the extruder idler screws Keep in mind that when printing from Flex the automatic filament change function ma...

Page 56: ...d nozzle is strongly suggested for long term printing A larger nozzle is recommended while printing with wood composites 0 5 mm and up Please use corresponding print settings in Slic3r or PrusaControl as print parameters can be very different depending on the plastic base The first step in polishing is sanding It s a good idea to start with a coarse grit size 80 and slowly move up the grit table A...

Page 57: ...10 nGen Developed by Eastman Chemical Company and colorFabb nGen offers increased resistance to heat as well as dimensional stability The material is low odor and styrene free ADVANTAGES DISADVANTAGES High gloss Brittle Good surface finish A bit of warping Good layer adhesion Nozzle temperature 240 C Bed temperature 80 100 C bigger object higher temp Heatbed Make sure the surface is clean Do not u...

Page 58: ...r produces slightly different material even though they are under the same group For example Prusa PLA and ColorFabb PLA will have a slightly different output when printed To achieve the best possible output you should experiment with the nozzle temperature fan speed print speed and flow All of these can be changed even during a print from the Tweak menu on the LCD panel The same idea also applies...

Page 59: ...lip will prevent the grease from getting inside Super lube or any other multi purpose grease will do 12 1 2 Fans Both fans should be checked and cleaned every couple hundred hours dust or plastic build up can decrease their efficiency or even damage them Computer cleaner spray will get the dust away and tweezers can be used for little plastic strands Both extruder and part cooling fans measure cur...

Page 60: ... on both sides of the extruder assembly Clean what you can then rotate the gear and repeat Nothing needs to be disassembled Clean when you see signs of missing plastic in the objects e g missing lines of extrusion 12 1 4 Electronics It is good practice to check and eventually reconnect the electrical connectors on the mini RAMBo board Do so after first 50 hours of printing and then every 150 200 h...

Page 61: ... stuck Unfortunately in most cases it s not possible to recover the current print because it s hard to detect the exact moment of the jam happening However in a future version of the firmware we plan to offer a few more options to possibly save the print When the jam is detected the printer will try to unload the filament However this may not always be possible if too much filament was already gro...

Page 62: ...nsor and this can result in weird behavior Certain colors like ivory matte white or lime green can also cause false alarms If you re printing with any of these filaments and you re getting a lot of false alarms consider turning the sensor off in Settings Fil sensor on off 12 4 Clogged jammed extruder Material clogged in the extruder can cause problems with the printing or with the loading of a new...

Page 63: ...t the temperature is set correctly PLA 210 C ABS 255 C HIPS 220 C PET 240 C Also check that the filament was correctly loaded into the extruder If that is not the case Follow the instructions below 1 Heat the nozzle according to the filament you want to print from Load the filament and push a bundled acupuncture needle 0 3 0 35 mm into the nozzle from below between 1 and 2 cm deep 2 Choose Load fi...

Page 64: ...e fan mouthpiece and the two screws on the print fan and remove both parts Pict 40 part 1 3 Remove the two front screws on the nozzle fan Pict 40 part 2 4 Unscrew the two screws holding the extruder cover Pict 40 part 3 Even though the nozzle itself is accessible directly we recommend removing the extruder cover to get access to the heating element 5 Now the whole nozzle body is accessible Pict 40...

Page 65: ...Pict 40 Nozzle change 65 ...

Page 66: ...operly the printer is away from drafts and object design is right the printed object should not break The easiest way to avoid breaking or overall model fragility is to choose a different material The strongest are PET HIPS and PLA while PLA has low heat resistance PET is the firmest and has the lowest thermal expansion When parts break and there is no spare time to reprint the model you can use s...

Page 67: ... are cut or drilled by a machine for highest precision but with uneven tightening it is possible to warp the frame Using your hand try to wiggle with the frame sides and check whether some corners are lifting up or not In case you find some imperfections release the screws press the extrusions against the FLAT SURFACE and tighten them again Pict 41 Proper way to tighten the frame plates and alumin...

Page 68: ...he assembly manual Pict 42 Proper wiring of the connectors 13 3 Printer can t read the SD card First make sure that the file name on the SD does not contain special characters otherwise the file could not be displayed on the LCD If there is no error in the file name check the EXT2 wiring from electronics to LCD If the cable is connected properly try to swap the cables 68 ...

Page 69: ... the belts are not tightened properly the result is an irregular shape instead of a perfect circle Y axis belt is located under the heatbed X axis belt moves the extruder See the pictures with properly tightened belts You can check the belt status on the LCD menu under Support Belt status after successfully running a selftest Values 240 40 are good Pict 43 A properly tightened Y axis belt under th...

Page 70: ... axis belt 13 5 Detached cables to the heatbed Do not forget to use a spiral wrap on heatbed cables and attach the cables properly so they won t restrict movement during printing Pict 45 Cables should be wrapped in a spiral wrap 70 ...

Page 71: ......

Page 72: ...Print and share Do not forget to tag your prints with prusai3mk3 while sharing so we can find pin and showcase them with our http www prusa3d com original prusa i3 prints Happy Printing 71 ...

Reviews: