background image

Downloaded from Projector.com

200"

154"

26.9' (8.2 m)

600"

462"

80.7' (24.6 m)

7

40"

77" 115"

154"

231"

308"

462"

600"

100"

150"

200"

300"

400"

760 mm

760 mm

100"
SCREEN

POSITIONING:

ROOM LIGHT

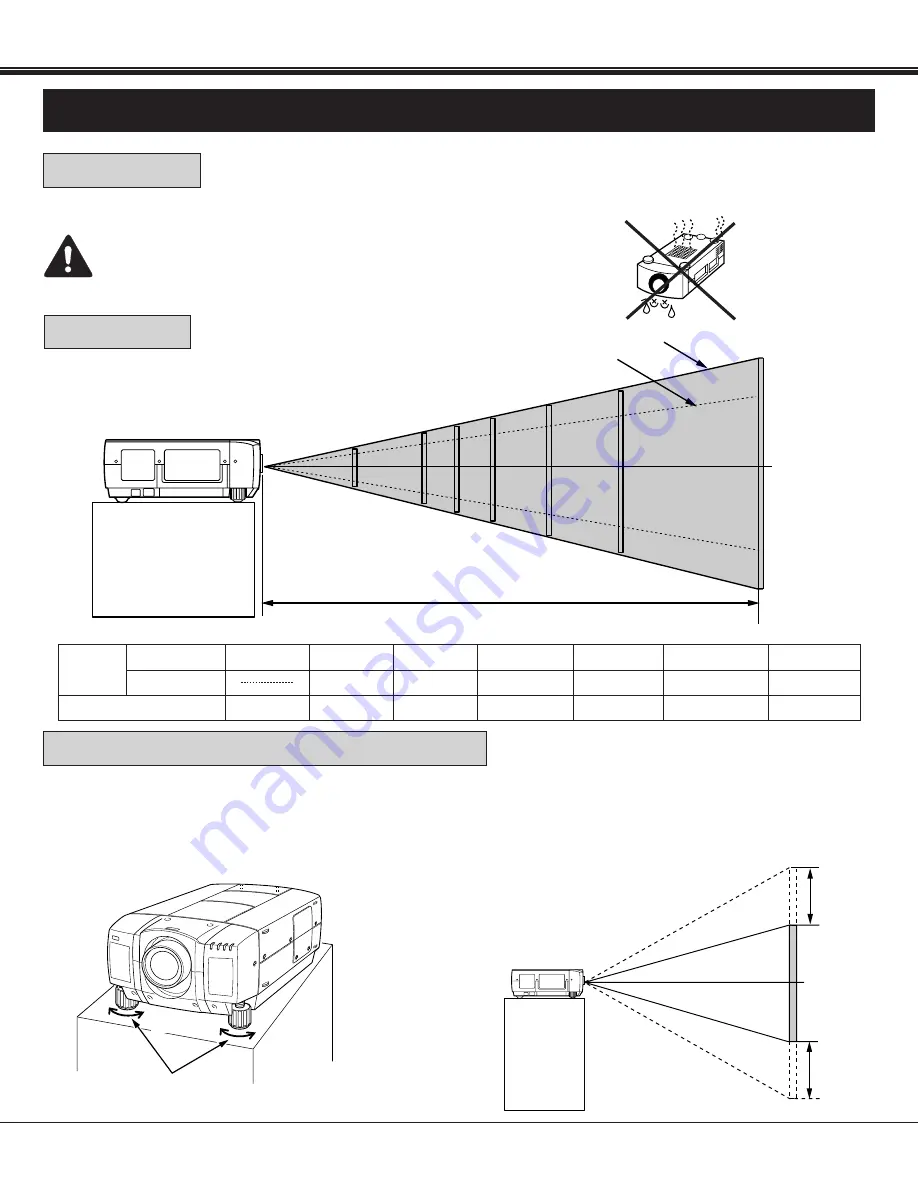
This projector is basically designed to project on a flat projection surface.

This projector can be focused from 4.9' (1.5 m) ~ 80.7' (24.6 m).

Refer to the figure below as an example when positioning the projector to the screen.

The projector should be placed in a room with
limited light. Picture quality will be directly
affected by lightning conditions.

Minimum Zoom

Maximum Zoom 

DISTANCE

Screen
Size

Max. Zoom

Min. Zoom

Distance

40"

4.9' (1.5 m)

100"

77"

13.1' (4.0 m)

150"

115"

20' (6.1 m)

300"

231"

40' (12.2 m)

400"

308"

53.8' (16.4 m)

THIS PROJECTOR SHOULD NEVER BE SET IN THE WAY
INDICATED. NEVER HANG THE PROJECTOR UPSIDE DOWN.
IT MAY RESULT IN FIRE HAZARD.

Two feet adjust the projection angle and leveling the
projector. The projection angle can be adjusted up to 4

°

degrees by rotating the two (left and right) feet located on
the bottom of the projector.
Level the projector by rotating the two feet.

MOVE THE PROJECTED IMAGE POSITION

Adjust the projected image position (maximum 760mm
downward or upward on the 100" screen) by using lens shift
function. (See page 33.)

UP

UP

DOWN

DOWN

LEVELING/ELEVATION 
FEET

LEVELING AND ELEVATING ADJUSTMENTS

SETTING-UP THE PROJECTOR

INSTALLATION

Summary of Contents for Pro AV 9400

Page 1: ...e do not make any claim of copyright The copyright remains the property of their respective owners ABOUT PROJECTOR COM Projector com http www projector com is your review and buying guide resource for DLP and LCD video projectors Visit the site to read the latest projector news and reviews read and comment on projector specifications download user manuals and much more ...

Page 2: ...D o w n l o a d e d f r o m P r o j e c t o r c o m Multimedia Projector Model Pro AV 9400 Pro AV 9400L Without Lens PRESENTATIONS WORKING SESSIONS TRAINING MULTIMEDIA ANIMATION VIDEO ...

Page 3: ... with our projectors They were caused by problems that could have been prevented if the owner had followed the instructions in the guide You can often correct operating problems yourself If your projector fails to work properly see TROUBLESHOOTING section on pages 55 56 and try the solutions marked for each problem SAFETY PRECAUTIONS TO THE OWNER INFORMATION TO THE USER NOTE This equipment has bee...

Page 4: ...can reduce the service life of your projector and can also be dangerous 3 IMPORTANT SAFETY INSTRUCTIONS All the safety and operating instructions should be read before the product is operated Read all of the instructions given here and retain them for later use Unplug this projector from AC power supply before cleaning Do not use liquid or aerosol cleaners Use a damp cloth for cleaning Do not use ...

Page 5: ...OUND MUTE FUNCTION 33 ZOOM ADJUSTMENT 33 FOCUS ADJUSTMENT 33 LENS SHIFT ADJUSTMENT 33 DIGITAL ZOOM FUNCTION 34 NORMAL PICTURE FUNCTION 34 FREEZE PICTURE FUNCTION 34 NO SHOW FUNCTION 34 P TIMER FUNCTION 34 AUTO IMAGE FUNCTION 34 CURSOR FUNCTION 34 MENU OPERATION 35 36 MODE SELECT 35 SOUND ADJUSTMENT 36 LANGUAGE ADJUSTMENT 36 VIDEO MODE 37 39 COLOR SYSTEM SELECT 37 VIDEO SOURCE SELECT 37 PICTURE IMA...

Page 6: ... projector This projector can detect display signals from most personal computers currently distributed It is free from complicated adjustments to project picture images from PC Screen display can be selected among Computer mode True Digital zoom Expand Compress Panning Video mode Regular 4 3 Wide 16 9 MENU DISPLAY is displayed with English German French Italian Spanish and Japanese The projector ...

Page 7: ... hot because of the hot air exhaust Be careful when handling Do not touch the cabinet near to the exhaust vent area and especially screws and metallic parts These parts will become hot while the projector is used FRONT OF THE PROJECTOR REAR OF THE PROJECTOR SPEAKER INFRARED REMOTE RECEIVER PROJECTION LENS REMOVABLE LENS COVER INFRARED REMOTE RECEIVER MAIN ON OFF SWITCH CARRY HANDLE POWER CORD CONN...

Page 8: ...ANCE Screen Size Max Zoom Min Zoom Distance 40 4 9 1 5 m 100 77 13 1 4 0 m 150 115 20 6 1 m 300 231 40 12 2 m 400 308 53 8 16 4 m THIS PROJECTOR SHOULD NEVER BE SET IN THE WAY INDICATED NEVER HANG THE PROJECTOR UPSIDE DOWN IT MAY RESULT IN FIRE HAZARD Two feet adjust the projection angle and leveling the projector The projection angle can be adjusted up to 4 degrees by rotating the two left and ri...

Page 9: ... cause damage to the projector To transport the projector through a courier or transport service use a Proxima recommended Case For a carrying or transportation cases contact a Proxima authorized dealer This projector is equipped with a cooling fan to protect it from overheating Pay attention to the following to ensure the ventilation and avoid a possible risk of fire and malfunction Do not cover ...

Page 10: ...ems having a grounded neutral conductor To reduce the risk of electrical shock do not plug into any other type of power system Consult your authorized dealer or service station if you are not sure what type of power is supplied to your building Connect the AC power supply cord supplied to the projector The socket outlet must be near this equipment and must be easily accessible INSTALLATION POWER R...

Page 11: ...he projector AUDIO MONITOR OUTPUT JACKS R and L Used to connect an audio input from audio equipment to the projector CONTROL PORT 1 CONNECTOR Used to connect a mouse cable to the projector CONTROL PORT 2 CONNECTOR Used to connect a mouse cable to the projector USB PORT 1 CONNECTOR Used to connect a computer to the projector USB PORT 2 CONNECTOR Used to connect a computer to the projector SERIAL PO...

Page 12: ... VHS video source to the projector AUDIO INPUT JACKS 1 R and L Used to connect an audio source to the projector VIDEO INPUT JACKS 2 BNC TYPE x 3 Used to connect a video source to the projector S VIDEO INPUT JACK 2 Used to connect a S VHS video source to the projector 14 15 16 17 18 AUDIO INPUT JACKS 2 R and L Used to connect an audio source to the projector VIDEO MONITOR OUTPUT JACKS BNC TYPE x 3 ...

Page 13: ... jacks using the BNC cables not provided Connect audio outputs from your computer to these jacks using the audio cable not provided If the audio input of the audio equipment is stereo be sure to connect the right and left channels to the respective right and left jacks If the audio input of the audio equipment is monaural connect it to the left jack When the computer is operated by projector s rem...

Page 14: ...er 2 Video 1 or Video 2 If you have selected program source Computer 2 the video signal connected to the Computer 2 input terminal will be available at the monitor output terminal An external monitor can be connected to the HDB15 pin VGA terminal on the projector Connect the monitor to this terminal using the VGA cable not provided R x D T x D Ground 1 2 3 4 5 6 7 8 9 SERIAL PORT DB9 PIN TERMINAL ...

Page 15: ... INPUT 1 or 2 CONTROL PORT OUTPUT 1 or 2 MOUSE CABLE FOR PS 2 PORT PROVIDED MOUSE CABLE FOR SERIAL PORT PROVIDED PS 2 PORT INPUT VGA CABLE PROVIDED L R R L Speaker L Speaker R Amp L R R L AUDIO INPUT SPEAKER OUT MONITOR OUTPUT BNC CABLE x 5 NOT PROVIDED COMPUTER AUDIO OUTPUT SERIAL PORT CABLE NOT PROVIDED SERIAL PORT OUTPUT COMPUTER AUDIO OUTPUT NOTE The hook up should be done as per the above ill...

Page 16: ...mp L R R L AUDIO INPUT SPEAKER OUT MONITOR OUTPUT COMPUTER AUDIO OUTPUT SERIAL PORT CABLE NOT PROVIDED SERIAL PORT OUTPUT COMPUTER AUDIO OUTPUT NOTE The hook up should be done as per the above illustration After hook up turn on the projector monitor computer in that order COMPUTER INPUT 1 DIGITAL CONNECTING AN IBM COMPATIBLE DESKTOP COMPUTER DIGITAL INPUT CONNECTION DIGITAL FLAT PANEL CABLE PROVID...

Page 17: ... 2 PC OUT SERIAL PORT OUTPUT COMPUTER COMPUTER OUTPUT DB15 PIN TYPE SERIAL PORT INPUT PS 2 PORT INPUT AUDIO CABLE NOT PROVIDED AUDIO CABLE NOT PROVIDED VGA CABLE PROVIDED MOUSE CABLE FOR PS 2 PORT PROVIDED MOUSE CABLE FOR SERIAL PORT PROVIDED R L R L Speaker L Speaker R Amp L R R L AUDIO INPUT SPEAKER OUT COMPUTER AUDIO OUTPUT COMPUTER AUDIO INPUT 1 CONTROL PORT OUTPUT 1 COMPUTER AUDIO OUTPUT SERI...

Page 18: ...AL PORT OUTPUT COMPUTER SERIAL PORT INPUT PS 2 PORT INPUT AUDIO CABLE NOT PROVIDED AUDIO CABLE NOT PROVIDED MOUSE CABLE FOR PS 2 PORT PROVIDED MOUSE CABLE FOR SERIAL PORT PROVIDED R L R L Speaker L Speaker R Amp L R R L AUDIO INPUT SPEAKER OUT COMPUTER AUDIO OUTPUT COMPUTER AUDIO INPUT 1 CONTROL PORT OUTPUT 1 COMPUTER AUDIO OUTPUT SERIAL PORT CABLE NOT PROVIDED COMPUTER INPUT 1 DIGITAL DIGITAL FLA...

Page 19: ... R L AUDIO INPUT SPEAKER OUT COMPUTER AUDIO OUTPUT SERIAL PORT CABLE NOT PROVIDED SERIAL PORT OUTPUT NOTE The hook up should be done as per the above illustration After hook up turn on the projector monitor computer in that order COMPUTER INPUT 1 ANALOG CONNECTING A MACINTOSH DESKTOP COMPUTER VGA CABLE PROVIDED COMPUTER AUDIO OUTPUT MONITOR OUTPUT ON 2 3 4 5 6 1 ON OFF VGA MAC ADAPTER SW1 SW6 Set ...

Page 20: ...L R L Speaker L Speaker R Amp R R L AUDIO INPUT SPEAKER OUT COMPUTER OUTPUT COMPUTER AUDIO OUTPUT COMPUTER AUDIO INPUT 1 CONTROL PORT OUTPUT 1 SERIAL PORT CABLE NOT PROVIDED COMPUTER AUDIO OUTPUT COMPUTER INPUT 1 ANALOG Set the dip switches as shown in the table below depending on the RESOLUTION MODE that you want to use before you turn on the projector and computer CONNECTING A MACINTOSH POWERBOO...

Page 21: ...f you have selected program source Video 2 the video signal connected to the Video 2 video input jack will be available at the video monitor output jacks If you select program source Computer 1 or Computer 2 the video signal connected to the Video 1 video input jack will be available at the video monitor output jacks Connect video input from AV equipment to these jacks using the BNC cables The Vid...

Page 22: ...ve illustration After hook up turn on the projector video equipment in that order VIDEO EQUIPMENT Video Cassette Recorder DVD Player Video Disc Player Satellite TV Tuner MONITOR AUDIO INPUT AUDIO OUTPUT S VIDEO OUTPUT S VIDEO INPUT SPEAKERS AUDIO AMP Video Camera Y OUTPUT BNC VIDEO OUTPUT BNC C OUTPUT BNC Cb B Y OUTPUT BNC Cr R Y OUTPUT BNC Y INPUT BNC VIDEO INPUT BNC C INPUT BNC Cb B Y INPUT BNC ...

Page 23: ...o m 22 memu mode auto image normal select volume zoom focus lens shift power 5 6 9 7 12 11 10 13 14 8 15 TOP CONTROLS FRONT INDICATORS FRONT INDICATORS TOP CONTROLS ready lamp lamp replace warning temp 1 2 3 4 BEFORE OPERATION CONTROLS AND INDICATORS ...

Page 24: ...POWER ON OFF BUTTON Used to turn projection lamp on or off MODE BUTTON Used to select source Computer 1 Computer 2 Video 1 or Video 2 Input AUTO IMAGE BUTTON Used to operate the AUTO IMAGE function MENU BUTTON This button will activate the MENU operation Use this button the POINT UP DOWN LEFT RIGHT buttons and the SELECT button to make adjustments to the projector s setting in MENU operation NORMA...

Page 25: ...ote control unit is not only able to operate the projector but also usable as a wireless mouse for a PC One pointing pad and two click buttons are used for wireless mouse operation Wireless mouse is usable when PC mouse pointer is displayed on the screen When the menu or indicator of the projector is displayed on the screen instead of the PC mouse pointer the wireless mouse cannot be used NOTE To ...

Page 26: ...nt preset by factory POINTING PAD POINT UP DOWN LEFT RIGHT BUTTON When in use as a remote for the projector To select an item on the MENU that you want to adjust To select an item move the arrow by pressing the pad upward downward leftward or rightward Used to operate power zoom lens power focus system or power lens shift by pressing the pad either upward or downward When in use as a wireless mous...

Page 27: ...oint the remote control toward the projector Receiver window whenever pressing the buttons Maximum operating range for the remote control is about 16 4 5m and 60 front and rear of the projector BEFORE OPERATION 16 4 5 m To insure safe operation please observe the following precautions Use 2 AA type alkaline batteries Change two batteries at the same time Do not use a new battery with a used batter...

Page 28: ...POINT UP DOWN LEFT RIGHT buttons and the SELECT button to make adjustments to the projector s setting in MENU operation POINT UP DOWN LEFT RIGHT BUTTONS To select an item on the MENU that you want to adjust To select an item move the arrow by pressing these buttons UP DOWN LEFT or RIGHT FREEZE NO SHOW BUTTON Used to freeze on screen image or change the screen into black image SELECT BUTTON This bu...

Page 29: ... pins in the compartment Point the remote control toward the projector Receiver window whenever pressing the buttons Maximum operating range for the remote control is about 16 4 5m and 60 front and rear of the projector To insure safe operation please observe the following precautions Use 2 AA type alkaline batteries Change two batteries at the same time Do not use a new battery with a used batter...

Page 30: ...EO COMPUTER VIDEO VOLUME and VOLUME and VOLUME and NOT AVAILABLE MUTE MUTE ZOOM and ZOOM and ZOOM POINT UP DOWN FOCUS and FOCUS and FOCUS POINT UP DOWN LENS SHIFT and LENS SHIFT and LENS SHIFT POINT UP DOWN NOT AVAILABLE D ZOOM SELECT REAR CLICK FRONT CLICK POINT UP DOWN LEFT RIGHT NOT AVAILABLE FREEZE NO SHOW FREEZE NO SHOW NOT AVAILABLE P TIMER P TIMER NOT AVAILABLE FREEZE NO SHOW FREEZE NO SHOW...

Page 31: ...T SELECT POINT UP DOWN SELECT MENU POINT LEFT RIGHT SELECT POINT UP DOWN SELECT MENU POINT LEFT RIGHT SELECT REAR CLICK POINT UP DOWN SELECT REAR CLICK MENU POINT LEFT RIGHT SELECT POINT UP DOWN SELECT MENU POINT LEFT RIGHT SELECT POINT UP DOWN SELECT MENU POINT LEFT RIGHT SELECT REAR CLICK POINT UP DOWN SELECT REAR CLICK TOP CONTROL OF THE PROJECTOR ADJUST ITEM WIRELESS WIRED REMOTE CONTROL VIDEO...

Page 32: ...ELECT MENU POINT LEFT RIGHT SELECT POINT UP DOWN SELECT MENU POINT LEFT RIGHT SELECT REAR CLICK POINT UP DOWN SELECT REAR CLICK MENU POINT LEFT RIGHT SELECT POINT UP DOWN SELECT MENU POINT LEFT RIGHT SELECT POINT UP DOWN SELECT MENU POINT LEFT RIGHT SELECT REAR CLICK POINT UP DOWN SELECT REAR CLICK TOP CONTROL OF THE PROJECTOR PICTURE POSITION MENU POINT LEFT RIGHT SELECT POINT LEFT RIGHT UP DOWN ...

Page 33: ...rojector will automatically turn off Wait at least 5 minutes before turning the projector on If the TEMPERATURE WARNING INDICATOR continued to flash follow the procedures below 1 Press LAMP POWER ON OFF button to OFF 2 Check the air filter for dust accumulation 3 Remove dust with vacuum cleaner See AIR FILTER CARE AND CLEANING section on page 53 4 Press LAMP POWER ON OFF button to ON If the TEMPER...

Page 34: ...ture size For a larger picture press and for a smaller picture press Use Wireless remote control unit Press the ZOOM button and press POINT UP DOWN button s to obtain your desired picture size The Zoom display will be displayed on the screen for a few seconds For a larger picture press UP and for a smaller picture press DOWN Use Top control and Wireless Wired remote control unit Press the FOCUS or...

Page 35: ... this function and will continue to run Press the FREEZE NO SHOW button on the remote control unit is twice The screen will change into black image and the NO SHOW is displayed on the screen for a few seconds This function is cancelled when the FREEZE NO SHOW button is pressed again or any other function button is pressed Press the P TIMER button on the remote control unit The timer display 00 00 ...

Page 36: ...ear 4 Move the arrow to the mode you want computer 1 computer 2 video 1 or video 2 to use by pressing the POINT UP DOWN BUTTON s and then press the SELECT REAR CLICK BUTTON MAIN MENU DISPLAY MODE DISPLAY MAIN MENU DISPLAY MODE DISPLAY P TIMER MENU AUTO IMAGE MUTE VOLUME COMPUTER ZOOM POWER LENS SHIFT NORMAL VIDEO FOCUS CURSOR FREEZE NO SHOW LASER D ZOOM WIRELESS REMOTE CONTROL UNIT TOP CONTROL OF ...

Page 37: ...isconnect the built in speaker point the arrow to Built in SP and then press the SELECT REAR CLICK BUTTON The display is changed Off from On and Internal speaker is disconnected 7 To mute the sound point the arrow to Mute and then press the SELECT REAR CLICK BUTTON The display is changed On from Off and mute the sound 8 To quit the MENU point to Quit and then press the SELECT REAR CLICK BUTTON A l...

Page 38: ...d PAL N COLOR SYSTEMs When the color system is set to Auto position this projector can receive color programs from one of 4 systems PAL SECAM NTSC or NTSC 4 43 automatically However if the video signal is not strong enough to detect the video format the projector may not reproduce the proper video image In case this happens this projector allows you to choose a specific broadcast signal format 1 C...

Page 39: ...6 To increase the level point the arrow to and then press the SELECT REAR CLICK BUTTON To decrease the level point the arrow to and then press the SELECT REAR CLICK BUTTON 7 You may want to store the settings in the memory so that you can recall them later To store the settings move the arrow to Stored and then press the SELECT REAR CLICK BUTTON When you have stored the settings OK is displayed fo...

Page 40: ... 1 Press the MENU BUTTON and the MAIN MENU DISPLAY dialog box will appear 2 Press the POINT LEFT RIGHT BUTTON s to select SCREEN and press the SELECT REAR CLICK BUTTON Another dialog box SCREEN ADJUST DISPLAY will appear 3 Press the POINT DOWN BUTTON and a red arrow will appear 4 To switch to Wide mode move the arrow to Wide by pressing the POINT UP DOWN BUTTON s and then press the SELECT REAR CLI...

Page 41: ...not discriminate or detect the input signal from the computer the Go PC adj display appears NOTE 2 If no input signal from the computer the No signal display appears NOTE 3 If the incoming signal is digital the D VGA D SVGA D XGA D SXGA or D UXGA display appears 3 Press the MENU BUTTON and the MAIN MENU DISPLAY dialog box will appear 4 Press the POINT LEFT RIGHT BUTTON s to select SYSTEM and press...

Page 42: ... 60 60 00 59 98 60 01 67 19 76 107 60 02 65 20 75 60 86 00 94 00 75 06 75 08 75 08 56 47 60 31 48 50 44 00 63 48 36 00 60 24 64 20 62 50 63 90 63 34 63 74 71 69 81 13 63 98 61 20 71 40 50 00 50 00 68 68 75 00 80 00 1024 x 768 1024 x 768 1024 x 768 1024 x 768 1024 x 768 1024 x 768 1024 x 768 1152 x 864 1280 x 1024 1280 x 1024 1280 x 1024 1280 x 1024 1280 x 1024 1280 x 1024 1280 x 1024 1152 x 900 11...

Page 43: ...the arrow by pressing the POINT UP DOWN BUTTON s to select Go and then press the SELECT REAR CLICK BUTTON The auto image function is started now It will take about 10 seconds 7 To store the settings move the arrow to Stored and then press the SELECT REAR CLICK BUTTON When you have stored the settings OK is displayed for confirmation 8 Move the arrow to Yes and then press the SELECT REAR CLICK BUTT...

Page 44: ...nge of the levels that you can adjust are summarized in the table below 4 Press the POINT DOWN BUTTON and a red arrow will appear 5 Move the arrow to an item that you want to adjust by pressing the POINT UP DOWN BUTTON s 6 To increase the level point the arrow to and then press the SELECT REAR CLICK BUTTON To decrease the level point the arrow to and then press the SELECT REAR CLICK BUTTON 7 You m...

Page 45: ...d then press the SELECT REAR CLICK BUTTON When you have stored the settings OK is displayed for confirmation 6 Move the arrow to Yes and then press the SELECT REAR CLICK BUTTON The stored settings are permanently held even if the MAIN ON OFF is switched off 7 To quit the MENU move the arrow to Quit and then press the SELECT REAR CLICK BUTTON 8 If you do not want to store the settings move the arro...

Page 46: ...es you to recall the setting for a specific computer when you need it 1 Press the MENU BUTTON and the MAIN MENU DISPLAY dialog box will appear 2 Press the POINT LEFT RIGHT BUTTON s to select PC ADJUST and press the SELECT REAR CLICK BUTTON Another dialog box Where to reserve will appear 3 In this dialog box you will select one of the memory areas from among Mode 1 to Mode 8 If parameters have been...

Page 47: ...o increase the level point the arrow to and then press the SELECT REAR CLICK BUTTON To decrease the level point the arrow to and then press the SELECT REAR CLICK BUTTON 11 If you want to store the settings in the memory move the arrow to Stored and press the SELECT REAR CLICK BUTTON When you have stored the settings OK is displayed for confirmation Move the arrow to Yes and then press the SELECT R...

Page 48: ...w to Yes and then press the SELECT REAR CLICK BUTTON 21 To recall the parameter data before setting move the arrow to Reset and then press the SELECT REAR CLICK BUTTON When you have reset the settings OK is displayed for confirmation Move the arrow to Yes and then press the SELECT REAR CLICK BUTTON You can adjust the settings again if needed 22 To quit the MENU move the arrow to Quit and then pres...

Page 49: ... the arrow to one of the Modes Stored position that you want to confirm by pressing the POINT UP DOWN BUTTON s Press the SELECT REAR CLICK BUTTON Another dialog box PC ADJUSTMENT DISPLAY will appear 5 To quit the MENU point to Quit and then press the SELECT REAR CLICK BUTTON 6 To modify the parameter data perform the steps 9 24 of PC ADJUSTMENT SECTION 7 To clear the parameter data move the arrow ...

Page 50: ... mode is 3 5 times as large as the screen size 1280 x 1024 When original image size is larger than the screen size 1280 x 1024 The minimum size in compress mode is the screen size 1280 x 1024 in SXGA or UXGA mode 1024 x 768 in XGA mode 800 x 600 in SVGA mode or 640 x 480 in VGA mode Panning function can work only when the image is expanded The normal Panning Operation may not function properly if ...

Page 51: ...or turned off When this function is in the On position on screen displays always appear when adjustments are made Although these on screen displays are very helpful these may spoil the view if adjustments are made during presentations To avoid this you can keep back certain displays by switching this function Off The followings are the displays that you can hide Wait Display Mode Display Volume Di...

Page 52: ...ECT REAR CLICK BUTTON 7 The settings are permanently kept even if the MAIN ON OFF is switched off REMOTE CONTROL Mode 1 or Mode 2 This projector can be received two types signal from the remote control unit One of the type is used the normal code Mode 1 other is used expand code Mode 2 Turn REMOTE CONTROL function Mode 2 in the SETTING menu The projector can be received the expand cord Change of t...

Page 53: ... and a red arrow will appear 4 Move the arrow by pressing the POINT UP DOWN BUTTON s to select Lamp age and then press the SELECT REAR CLICK BUTTON When you reset the lamp replace monitor lamp replace monitor reset is displayed for confirmation 5 Move the arrow to Yes and then press the SELECT REAR CLICK BUTTON OK is displayed for confirmation Move the arrow to Yes and then press the SELECT REAR C...

Page 54: ...d under the dusty or smoky conditions dust may accumulate on the liquid crystal panel and lens inside it and may resultantly be projected on the screen together with the picture When the above symptoms are noticed contact the place where your authorized dealer or service station for the cleaning TEMPERATURE WARNING INDICATOR AIR FILTER COVER AIR FILTER SPONGE AIR FILTER COVER The TEMPERATURE WARNI...

Page 55: ... cord to the projector 8 Reset the lamp replacement monitor timer See LAMP AGE section on page 52 NOTE Do not reset the LAMP REPLACEMENT MONITOR TIMER except after the lamp is replaced For continued safety replace with a lamp assembly of the same type Allow the projector to cool for at least 45 minutes before you open the lamp cover The inside of the projector can become very hot Do not drop the l...

Page 56: ...emicals might scratch the lens 2 Lightly wipe the cleaning cloth over the lens 3 If you don t intend to use the projector immediately replace the lens cover CLEANING THE LENS Problem No power Image is out of focus Try these Solutions Plug the projector into an AC outlet Turn the MAIN ON OFF button to ON Press the LAMP POWER ON OFF switch to ON Be sure the READY INDICATOR light is ON Wait one minut...

Page 57: ...ETTING section on pages 50 51 Remote control unit doesn t work Check the cable connection between the projector and the computer Check the mouse setting on your computer Turn on the projector before you turn on the computer Wireless mouse function does not work Try these Solutions APPENDIX If you still need help after checking the table above you should call your dealer s technical support line an...

Page 58: ... from 40 to 600 400 1 800 TV lines F2 0 2 3 lens with f 75 7 mm 97 5 mm Motor zoom and focus 760 mm on 100 screen 4 9 1 5 m 80 7 24 6 m Metal Halide 400 watt type Dichroic mirror and X prism system BNC Type Video Y C Cb B Y Cr R Y x 2 sets RCA Type Audio R and L x 2 sets and DIN 4 pin S Video x 2 sets RCA Type R and L x 2 sets Computer Output Jack Computer Audio Output Jack HDB15 pin Terminal RCA ...

Page 59: ...ima replace the entire unit This Limited Warranty does not extend to any Proxima product that has been damaged or been rendered defective a as a result of accident misuse or other abuse b by the use of parts not manufactured or sold by Proxima or c by modification of the product or d as a result servicing by non authorized personnel Warranty Limitation of Warranties The foregoing warranty is expre...

Page 60: ...e do not make any claim of copyright The copyright remains the property of their respective owners ABOUT PROJECTOR COM Projector com http www projector com is your review and buying guide resource for DLP and LCD video projectors Visit the site to read the latest projector news and reviews read and comment on projector specifications download user manuals and much more ...

Reviews: