background image

PW-DN551D 

300M Wireless N PCI Adapter 


24 


Figure 4-5 

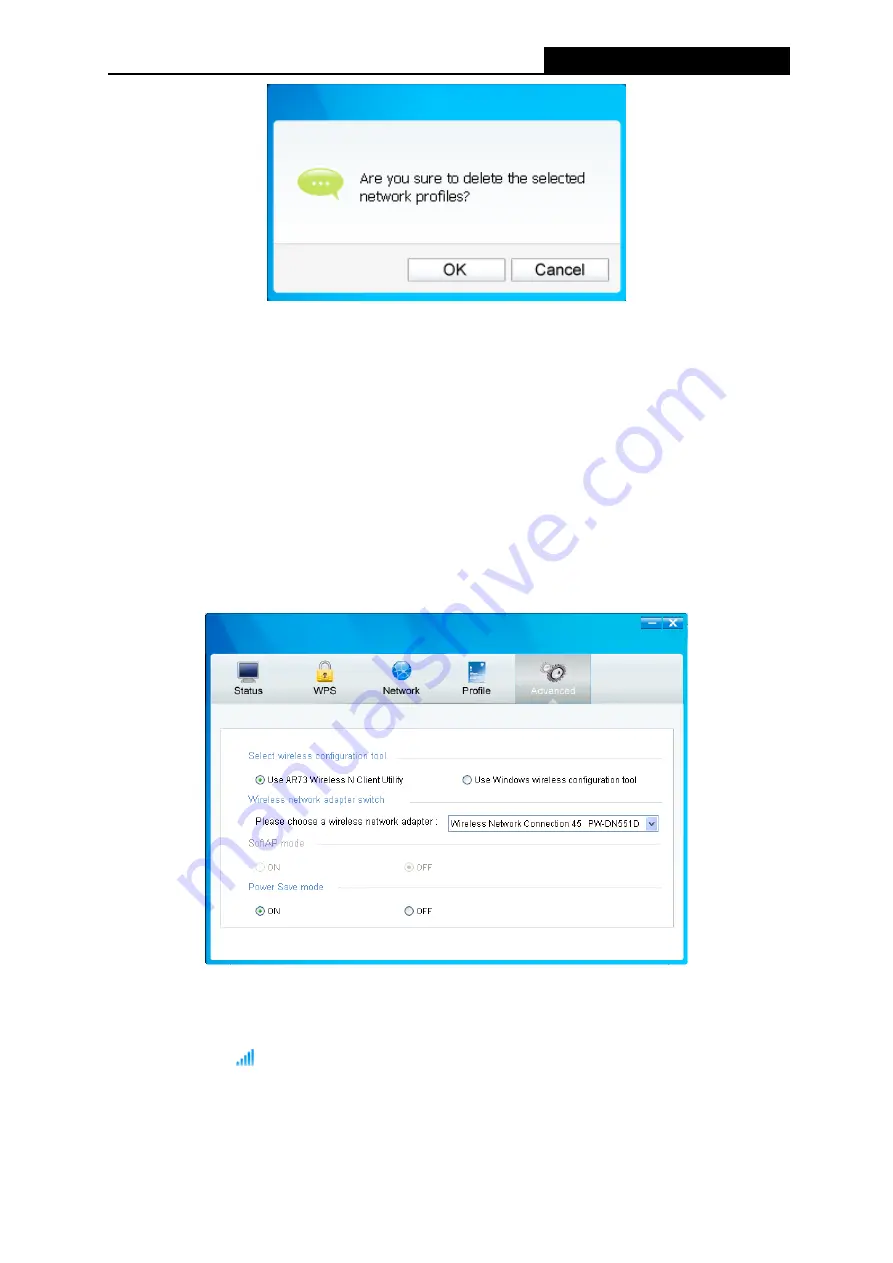
4.2  Advanced 

The following configurations can be made on the 

Advanced

 page: 

1)  To select wireless configuration tool.   

Here  you  can  decide  which  tool  to  use,  either  the  AWCU  or  the  Windows  wireless 
configuration tool. This option is available only in Windows XP.   

2)  To switch to another wireless network adapter.   

Here you can switch to another adapter installed in your computer. The adapters successfully 
installed in your computer will be listed in the drop-down menu if the adapters are supported 
by this utility.   

3)  To switch to SoftAP mode.   

Once  enabled,  the  adapter  will  be  able  to  work  as  an  AP.  This  option  is  only  available  in 
Windows 7.   

4)  To change the power save mode. The default option is 

ON

.   


Figure 4-6 

4.3  About   

The  About  screen  gives  you  information  about  the  Driver  and  Utility  versions  of  the  adapter. 

Right-click on the 

  icon in your system tray and select 

About

 from the list.   


Summary of Contents for PW-DN551D

Page 1: ...PW DN551D 300M Wireless N PCI Adapter Rev 1 0 0 1910020418 ...

Page 2: ...d radio TV technician for help This device complies with part 15 of the FCC Rules Operation is subject to the following two conditions 1 This device may not cause harmful interference 2 This device must accept any interference received including interference that may cause undesired operation Any changes or modifications not expressly approved by the party responsible for compliance could void the...

Page 3: ... outdoor use and public service France Outdoor use limited to 10 mW e i r p within the band 2454 2483 5 MHz Military Radiolocation use Refarming of the 2 4 GHz band has been ongoing in recent years to allow current relaxed regulation Full implementation planned 2012 Italy If used outside of own premises general authorization is required Luxembourg None General authorization required for network an...

Page 4: ...nfiguration method 11 3 2 2 PIN method 12 3 3 To connect using Windows built in wireless utility 15 3 3 1 In Windows 7 15 3 3 2 In Windows Vista 16 3 3 3 In Windows XP 18 Chapter 4 Management 21 4 1 Profile 21 4 1 1 Add a profile 21 4 1 2 Modify a profile 23 4 1 3 Delete a profile 23 4 2 Advanced 24 4 3 About 24 Chapter 5 AP Mode 26 Chapter 6 Uninstall Software 28 6 1 Uninstall the utility softwar...

Page 5: ...D including AR73 Wireless N Client Utility AWCU and Drivers User Guide Other Helpful Information Note Make sure that the package contains the above items If any of the listed items are damaged or missing please contact with your distributor Conventions The Adapter mentioned in this user guide stands for PW DN551D 300M Wireless N PCI Adapter without any explanations ...

Page 6: ...instructing you to quickly set up a wireless connection With unmatched wireless performance reception and security protection the PW DN551D is the best choice for easily adding or upgrading wireless connectivity to your desktop 1 2 Features Complies with IEEE 802 11n IEEE 802 11g IEEE 802 11b standards Supports WPA WPA2 data security TKIP AES encryption Supports high rate of up to 300Mbps for maxi...

Page 7: ...ave touched the slot s contacts Once the adapter has been firmly inserted screw its fastening tab Then close your PC case 4 Insert the power cable back into the computer and turn on your computer When the Found New Hardware wizard appears click Cancel 2 2 Software Installation The adapter s Setup Wizard will guide you through the installation procedures for Windows 7 Windows Vista and Windows XP T...

Page 8: ...Shield Wizard window will appear Click Next to continue Figure 2 2 3 Choose a setup type It is recommended to select Install AR73 Wireless N Client Utility and Driver Selecting Install Driver Only will only install driver Click Next to continue Figure 2 3 ...

Page 9: ...eless N PCI Adapter 5 4 Click Change to specify the destination location for the software or you can leave it default Click Next in the screen below to continue Figure 2 4 5 Click Install to continue the setup Figure 2 5 ...

Page 10: ...0M Wireless N PCI Adapter 6 6 The utility and drivers will install This may take 1 2 minutes Figure 2 6 7 If Windows XP warns about Windows Logo testing click Continue Anyway to continue the installation Figure 2 7 ...

Page 11: ...low Click Finish to complete the setup Figure 2 8 9 After installation the utility configuration page will automatically pop up as shown in the following figure and the icon will appear in your system tray To connect to a network please refer to Chapter 3 Connect to a Wireless Network Figure 2 9 ...

Page 12: ...brands Method Three To connect using Windows built in wireless utility Windows users may use the built in wireless utility to connect to a wireless network For specific operations please go to To connect using Windows built in wireless utility 3 1 To connect using AWCU 1 After installation the utility configuration page will automatically pop up on the screen If the utility page does not pop up yo...

Page 13: ...sword to your router or access point Figure 3 3 If there is a lock icon behind the SSID this means the wireless network is secure and the corresponding security type will display You must know the encryption key security settings to connect Input the password which can be found on the configuration page of your router or access point then click OK to continue Or push the QSS WPS button on your rou...

Page 14: ...essfully connected to your network Click Close to enjoy the Internet Figure 3 5 5 To view more information about the network currently connected click Status in the tools section and the page will display information such as the network type link quality and wireless mode ...

Page 15: ...ess connection between wireless card and router using either Push Button Configuration PBC method or PIN method Three WPS connection methods are listed in the following parts while the third method is only supported in Windows XP and Windows Vista 3 2 1 PBC Push Button Configuration method 1 Press the WPS QSS button on the back panel of the router 2 Open AWCU and click WPS tab Select Push the butt...

Page 16: ...er the PIN from your AP device 2 Enter a PIN into your AP device Following are detailed configuration procedures of each way 3 2 2 1 Enter the PIN from your AP device 1 Open AWCU and click WPS tab Select Enter the PIN of my access point or wireless router In the empty field beside PIN enter the PIN labeled on the bottom of the router here takes 13492564 for example If you have generated a new PIN ...

Page 17: ...essfully connected to the network 3 2 2 2 Enter a PIN into your AP device This method is only available in Windows XP and Windows Vista 1 Open AWCU and click WPS tab Select Enter the PIN of this device into my access point or wireless router In the field beside PIN you will see the PIN value of the adapter which is randomly generated Click Connect to continue ...

Page 18: ...d device and the following figure will appear Enter the PIN value of the adapter in the empty field beside PIN and then click Connect Figure 3 13 3 When Connect successfully appears on the screen the WPS configuration is complete Or you can view the adapter s utility page to see whether the connection has been successful as shown in Figure 3 15 Figure 3 14 ...

Page 19: ...ur area Highlight the wireless network displayed using the SSID to be connected and then click Connect Figure 3 16 2 If the network you would like to connect is security enabled enter the same security key or passphrase that is on your router Or push the WPS button other brands may call it QSS on the router or access point You will be prompted to push the button on the window if WPS QSS function i...

Page 20: ...cted to the network Figure 3 18 3 3 2 In Windows Vista Windows Vista users may use the built in wireless utility Follow the steps below 1 Open the wireless utility by right clicking on the wireless computer icon in your system tray as shown in the figure below Select Connect to a network ...

Page 21: ...ighlight the wireless network you would like to connect and then click Connect Figure 3 20 3 If the network you would like to connect is security enabled enter the same security key or passphrase that is on your router If the network to be connected is not secure the connection will be built without entering a key Figure 3 21 ...

Page 22: ...the steps below 1 Right click on the utility icon in your system tray lower right corner Select Switch to Windows wireless configuration tool Figure 3 23 Or double click the utility icon to load the utility configuration page Click Advanced in the tools section and then select Use Windows wireless configuration tool in the figure shown below Click OK when Figure 3 25 appears to continue ...

Page 23: ...t click on the wireless computer icon in your system tray lower right corner Select View Available Wireless Networks Figure 3 26 3 The utility will display any available wireless networks in your area Click on a network displayed using the SSID and click the Connect button ...

Page 24: ...0M Wireless N PCI Adapter 20 Figure 3 27 4 If the network is security enabled you will be prompted to enter the key as shown below If not you will connect to the network directly without entering a key Figure 3 28 ...

Page 25: ...ated to the adapter Double clicking on the icon on your desktop will start the utility 4 1 Profile Your wireless networks may vary in different places like home office or coffee shop With Profile management you can easily save and manage various networks to be connected saving you the trouble of having to repeat the same configurations Click Profile in the tools section the following page will app...

Page 26: ...PA2 PSK uses a passphrase or key to authenticate your wireless connection The key must be the exact same key entered on your wireless router or access point None stands for no security It is recommended to enable WPA PSK WPA2 PSK on your wireless router or access point before configuring your wireless adapter Encryption Type From the drop down menu select the encryption type that is the same as on...

Page 27: ...ge the profile name from test to test1 or you may want to specify another SSID for profile Home After all the changes click Save to make the changes take effect Figure 4 4 4 1 3 Delete a profile To delete an existing profile highlight the profile name and click Remove on the bottom of the screen or press the Delete button on your keyboard When the following figure appears click OK to continue ...

Page 28: ...u can switch to another adapter installed in your computer The adapters successfully installed in your computer will be listed in the drop down menu if the adapters are supported by this utility 3 To switch to SoftAP mode Once enabled the adapter will be able to work as an AP This option is only available in Windows 7 4 To change the power save mode The default option is ON Figure 4 6 4 3 About Th...

Page 29: ...PW DN551D 300M Wireless N PCI Adapter 25 Figure 4 7 ...

Page 30: ...ing you the trouble of having to get a separate access point or a router With this feature a computer can use a single physical wireless adapter to connect as a client to a hardware access point while at the same time acting as a software AP allowing other wireless capable devices to connect to it To switch to this mode right click on the utility icon in your system tray and select Switch to SoftA...

Page 31: ... is set to be WPA2 PSK which is based on 802 11i and uses Advanced Encryption Standard instead of TKIP It was designed to improve the security features of WEP WPA2 PSK uses a passphrase or key to authenticate your wireless connection You needn t make any configuration here Encryption Type The encryption type here is set to be AES Security Key Enter the Key in the field to make your AP security ena...

Page 32: ...om your PC 1 On the Windows taskbar click the Start button click All programs Wireless and then click Uninstall AR73 Wireless N Client Utility Figure 6 1 Uninstall Utility 2 Follow the Install Shield Wizard to uninstall the utility software from your PC Figure 6 2 3 Click Finish when the figure below appears ...

Page 33: ...tware from your PC 1 On the Windows taskbar click the Start button click All programs Wireless and then click Uninstall PW DN551D Driver Figure 6 4 Uninstall Driver 2 Click Uninstall shown in above Figure 6 4 the system will uninstall the driver software of the adapter from your PC ...

Page 34: ...BPSK 11g OFDM 11n QPSK BPSK 16 QAM 64 QAM Media Access Protocol CSMA CA with ACK Data Security WPA WPA2 WEP TKIP AES Frequency 2 4 2 4835GHz Spread Spectrum Direct Sequence Spread Spectrum DSSS Safety Emissions FCC CE Power Consumption Max 2 6W Environmental and Physical Working Temperature 0 40 32 104 Working Humidity 10 90 RH Non condensing Storage Temperature 40 70 40 158 Storage Humidity 5 90 ...

Page 35: ...uring transmission statistical techniques embedded in the receiver can recover the original data without the need of retransmission To an unintended receiver DSSS appears as low power wideband noise and is rejected ignored by most narrowband receivers However to an intended receiver i e another wireless LAN endpoint the DSSS signal is recognized as the only valid signal and interference is inheren...

Page 36: ...t determine the level of encryption The type of encryption determines the key length 128 bit encryption requires a longer key than 64 bit encryption Keys are defined by entering in a string in HEX hexadecimal using characters 0 9 A F or ASCII American Standard Code for Information Interchange alphanumeric characters format ASCII format is provided so you can enter a string that is easier to rememb...

Reviews: