background image


Installations 

RISK of damage to the unit 

Mechanically handling the unit may result in damage. Do not connect the unit to the 

power supply before or during assembly. Connect the unit as below instructed.   

  NO 

HOT 

PLUG 

AND 

CONNECT 

THE 

CABLE 

AS 

FOLLOWING STEPS.


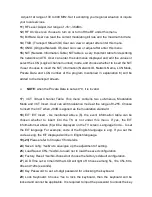
1. Mount  and  tighten  the  screws  and 

plugs  to  secure  the  unit  to  the  wall. 

Left 10 cm of free space around from 

each unit.


2. Connect  the  signal  input  in 

the  respective  connectors. 

The  signal  source  can  be 

from  a  surveillance  monitor, 

DVD, set-top  box,  CCTV  and 

etc. 

3. Optionally, 

connect 

the 

loop-through RF input


coaxial 

cable.   

4. Connect cable to RF output 

to STB/TV. 

5. Power supply connection: 

a)  Connect  the  earth 

cable;  b)  Connect  the 

power  plug  to  the  unit 

mains 

connector; 

c) 

Connect  the  power  plug 

to the mains socket. 


2

3

4

5

1

Summary of Contents for VECOAX MICROMOD MS

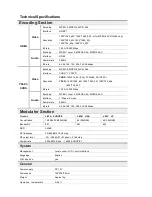
Page 1: ... also USB Recording and PLAY Capabilities 1080P input over both mpeg2 and mpeg4 modes low latency encoding and the newest mpeg4 h264 US TV standard mode VeCOAX Micromod MS Advanced Wall Mount HD Video Modulator REFERENCE GUIDE ...

Page 2: ...ence Directory CHAPTER 1 Product Introductions 3 General Description 3 Technical Specifications 4 CHAPTER 2 Safety Instruction and Installations 6 Safety Instructions 6 Installations 7 Chapter 3 Operations of TS Creator Software 10 Installation 10 Operations of Creator 11 File Management 13 CHAPTER 4 Operations and Management 14 Chapter 5 Operations of Record TS and Play TS through USB Disk 21 App...

Page 3: ...C H 264 HD SD encoding and modulating to convert video audio signals to DIGITAL CABLE RF out The signals source could be from satellite receivers closed circuit television cameras Blue ray players and ts files created on PC with our TS Creator exe Its output signal is to be received by DIGITAL CABLE TVs or DIGITAL CABLE STBs etc Control Buttons and LCD Window DC 12V Power in RF out Composite Video...

Page 4: ...720x480_60i NTSC YPbPr 1920 1080_60i 1920 1080_50i 1280 720_60p 1280 720_50P Bit rate 1 000 19 000 Mbps Audio Encoding MPEG1 Layer II MPEG2 AAC MPEG4 AAC Interface 1 Stereo 2 mono Sample rate 48KHz Bit rate 64 96 128 192 256 320 384kbps Modulator Section Standard J 83A EUROPE J 83B USA J 83C JP Constellation 16 32 64 128 256QAM 64 256QAM 64 256QAM Bandwidth 8M 6M 6M MER 43dB RF frequency 30 960MHz...

Page 5: ......

Page 6: ...ed correctly Do not cut the cord Avoid placing the device next to central heating components and in areas of high humidity Do not cover the device with elements that obstruct the ventilation slots If the VeCOAX Micromod has been kept in cold conditions for a long time keep it in a warm room minimum 2 hours before plugging into the mains Mount the device in vertical position with the connectors loc...

Page 7: ...and plugs to secure the unit to the wall Left 10 cm of free space around from each unit 2 Connect the signal input in the respective connectors The signal source can be from a surveillance monitor DVD set top box CCTV and etc 3 Optionally connect the loop through RF input coaxial cable 4 Connect cable to RF output to STB TV 5 Power supply connection a Connect the earth cable b Connect the power pl...

Page 8: ... TV signal Several VECOAX MICROMOD units can be cascaded in order to increase the capacity The maximum capacity of a series of N units is 1xN incorporated TV signals To cascade 2 or more units connect the RF output of the preceding unit to the TV input loop through of the next unit see right illustration ...

Page 9: ......

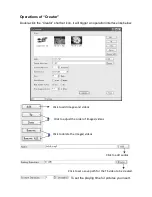
Page 10: ...VECOAX MICROMOD s USB port using our CREATOR software File format supported include Image JPG PNG BMP GIF Video MP4 WMV AVI MPG TS MKV Audio MP3 WAV Installation Download our creator software from www provideoinstruments com tsc zip 1 Download our TS Creator software package on your PC to get the installer and its auxiliary routine 2 Occasionally if your PC hasn t installed Net Frame 2 0 yet doubl...

Page 11: ...rigger an operation interface like below To set the playing time for pictures you insert Click to add audios Click to set a save path for the TS video to be created Click to add Images and videos Click to adjust the order of Images videos Click to delete the Images videos ...

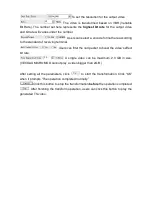
Page 12: ...eceiving terminal Users can filter the null packet to boost the video s effect bit rate A single video can be maximum 2 0 GB in size VECOAX MICROMOD cannot play a video bigger than 2GB After setting all the parameters click to start the transformation Click OK when it prompts The operation completed normally Click this button to stop the transformation before the operation completed After finishin...

Page 13: ...es before creating a new video to avoid covering the previous files If you rename FinalOutput 204 0 ts or FinalOutput 204 0 tsinfo always keep the names the same Extension excluded and then VECOAX MICROMOD can read them and play the video TS video and information files Users need to save the two files together in the USB memory and then MICROMOD can read them and play the video TS video for previe...

Page 14: ...hen the signal lose Left Right Up Down buttons Use these buttons to turn the screen pages shift the target items by moving the triangle or change the parameter settings in the program mode Enter Use this button to enter a submenu or save a new setting after adjustment press it to start adjusting the value of certain items with Up Down buttons when the corresponding underline flash Press it to acti...

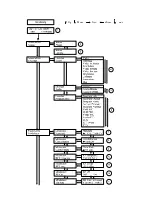
Page 15: ...e users to save present setting or not If not the LCD will display the current configuration state When the power is connected the LCD will start to initialize the program The LCD menu goes as below chart ...

Page 16: ......

Page 17: ......

Page 18: ... Select audio bit rate among 64 96 128 192 256 320 384 kbps Audio Format Select audio format among MPEG2 MPEG2 AAC and MPEG4 AAC 6 Program Information User can enable or disable the program output under menu Program Output User can also enter the other items to edit the Service Name Program Name Program Number and PIDs of PMT PCR Video and Audio and edit LCN Logical channel number EIT Event User c...

Page 19: ...hannel Table This menu contains two sub menus Modulation Mode and VCT Insert User can edit modulation mode at the range of 0 255 Choose to insert the VCT when J 83B is applied as the modulation standard 18 EIT EIT Insert As mentioned above 6 the event information table can be chosen whether to insert into the TS or not under this menu If yes the EIT information set above 6 will be displayed on the...

Page 20: ... User can view the serial number of this device It is read only and unique 31 Version It displays the version information of this device VeCOAX Micromod the name of the device SW software version number HW hardware version number User can also press ENTER again to view the published time of this device ...

Page 21: ...e file size is set as 1000M and the ts is recorded up to 1000M it automatically stops recording TS Segmented file For example when the file size is set as 1000M and the ts is recorded up to 1000M it automatically saves the files and continues to record TS and save it to next file until the USB memory is full Loop record it automatically saves the files and continues to record TS and save it to nex...

Page 22: ...d before playing the ts file When the ts is being playing VECOAX MICROMOD LCD will present a playing interface as shown below single loop play all loop all single file At this time the key board also plays a different rule 4 Disk Usage Users can enter this menu to view the USB disk s capacity left 5 Update Choose Yes to update the VECOAX MICROMOD with the update file stored in the USB disk ...

Page 23: ...6 Remove Device Choose Yes to safely remove the USB disk VECOAX MICROMOD will then automatically resume encoding and playing the program input from the encoder module ...

Page 24: ...BLE TELEVISION CHANNELS FREQUENCIES Channel Number QAM CDSREF Carrier MHz Subband T Channels Lowband 2 57 00 3 63 00 4 69 00 1 75 00 5 79 00 or 81 00 6 85 00 or 87 00 Midband 95 93 00 96 99 00 97 105 00 98 111 00 99 117 00 Midband ...

Page 25: ...00 16 135 00 17 141 00 18 147 00 19 153 00 20 159 00 21 165 00 22 171 00 Highband 7 177 00 8 183 00 9 189 00 10 195 00 11 201 00 12 207 00 13 213 00 Superband 23 219 00 24 225 00 25 231 00 26 237 00 27 243 00 28 249 00 ...

Page 26: ... 31 267 00 32 273 00 33 279 00 34 285 00 35 291 00 36 297 00 Hyperband 37 303 00 38 309 00 39 315 00 40 321 00 41 327 00 42 333 00 43 339 00 44 345 00 45 351 00 46 357 00 47 363 00 48 369 00 49 375 00 50 381 00 51 387 00 ...

Page 27: ... 54 405 00 55 411 00 56 417 00 57 423 00 58 429 00 59 435 00 60 441 00 61 447 00 62 453 00 63 459 00 64 465 00 Ultraband 65 471 00 66 477 00 67 483 00 68 489 00 69 495 00 70 501 00 71 507 00 72 513 00 73 519 00 74 525 00 ...

Page 28: ...77 543 00 78 549 00 79 555 00 80 561 00 81 567 00 82 573 00 83 579 00 84 585 00 85 591 00 86 597 00 87 603 00 88 609 00 89 615 00 90 621 00 91 627 00 92 633 00 93 639 00 94 645 00 Jumboband 100 651 00 101 657 00 102 663 00 ...

Page 29: ...0 106 687 00 107 693 00 108 699 00 109 705 00 110 711 00 111 717 00 112 723 00 113 729 00 114 735 00 115 741 00 116 747 00 117 753 00 118 759 00 119 765 00 120 771 00 121 777 00 122 783 00 123 789 00 124 795 00 125 801 00 126 807 00 ...

Page 30: ...0 130 831 00 131 837 00 132 843 00 133 849 00 134 855 00 135 861 00 136 867 00 137 873 00 138 879 00 139 885 00 140 891 00 141 897 00 142 903 00 143 909 00 144 915 00 145 921 00 146 927 00 147 933 00 148 939 00 149 945 00 150 951 00 ...

Page 31: ...151 957 00 152 963 00 153 969 00 154 975 00 155 981 00 156 987 00 157 993 00 158 999 00 ...

Reviews: