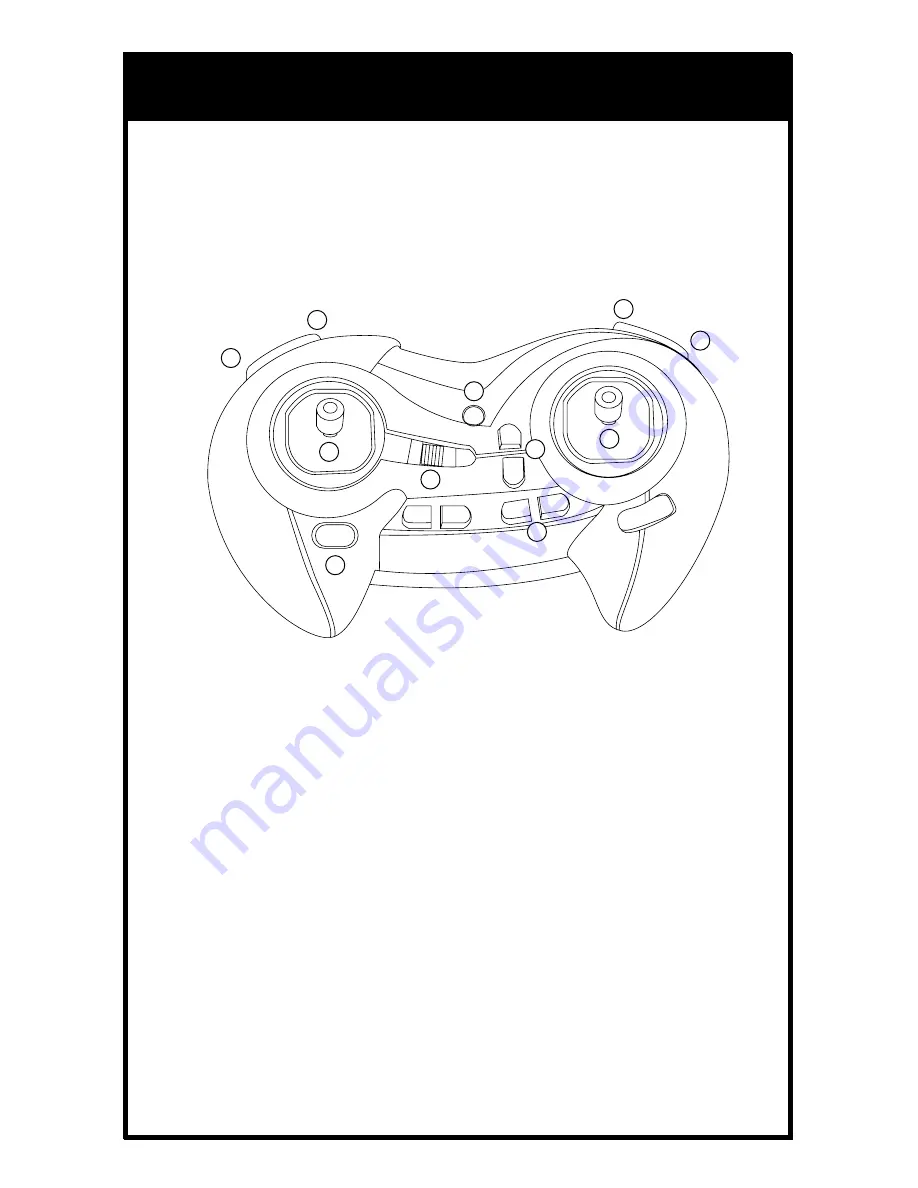
background image

REMOTE

1.  Indicator Light
2. Flip
3.  Direction Lever
4.  Trim Forward/Backward
5.  Trim Bank Left/Right
6. Throttle
7.  ON/OFF Switch
8.  High/Med/Low Speed Selector
9.  Auto Take-Off
10.Auto Landing
11.Unlock/Emergency Stop

SPARE PARTS INCLUDED

-  Replacement Blades

PARTS

3

1

2

11

4

10

3

6

5

9

7

8

Summary of Contents for neo-drone AP

Page 1: ...INSTRUCTION MANUAL NEO DRONE AP MINI RC STUNT DRONE...

Page 2: ......

Page 3: ...has to offer We strongly recommend that you take the time to read this manual thoroughly It contains many tips and instructions on how to get the most out of this aircraft and maintain it for a long l...

Page 4: ...Installation 05 Charging the Drone 06 Start Up Procedure 07 Operation 09 Tips on 3D Stunt Tumbling 11 Speed Modes 12 Trim Adjustment 13 Troubleshooting 14 Flying Outdoors Training Loop 15 Replacement...

Page 5: ...n period between flights Use only the charger and or charging cable that is suplied with this item Do not strike cut or pierce the internal battery or subject it to hard impacts Do not mix old and new...

Page 6: ...PARTS DRONE 1 Canopy 2 Blade Guard 3 Blade 4 Landing Gear 5 Charging Jack 2 1 2 4 3 5...

Page 7: ...on Lever 4 Trim Forward Backward 5 Trim Bank Left Right 6 Throttle 7 ON OFF Switch 8 High Med Low Speed Selector 9 Auto Take Off 10 Auto Landing 11 Unlock Emergency Stop SPARE PARTS INCLUDED Replaceme...

Page 8: ...es carefully 2 Do not mix old and new batteries 3 Do not mix different types of batteries Take out the cover Install 3 x AAA battery according to the correct polarities Replace the cover REMOTE BATTER...

Page 9: ...ter flight charge after cooling down for higher efficiency 5 Do not strike or subject battery to hard impacts or sharp surfaces 6 Do not use any other charger than that which is supplied with this ite...

Page 10: ...o Idle mode The blades will rotate but the drone will not lift OPERATION INSTRUCTIONS ON THE NEXT PAGE 1 Turn on the drone and place it on an even surface The white lights are at the front of the dron...

Page 11: ...s until the altitude sensor gets a good fix on the position Some drift is normal TAKE OFF 1 Press the take off button The remote will beep and the drone will hover a few feet off the ground Then gentl...

Page 12: ...right the drone turns to the left or right FIRST TIME FLYERS TAKE YOUR TIME GO SLOW Practice hovering until you are comfortable with flight before attempting any other maneuvers Make small movements l...

Page 13: ...eet press the Flip button The remote will beep and you are ready to execute a flip LEFT FLIP Push the direction stick to the left and the drone will perform a 360 flip in that direction RIGHT FLIP Pus...

Page 14: ...the direction stick forward and the drone will perform a 360 flip in that direction BACKWARD FLIP Push the direction stick backward and the drone will perform a 360 flip in that direction TIPS ON 3D...

Page 15: ...40 Medium is at 70 and High is at 100 Choose the speed based on flight experience and level of comfort Press the Speed button to change speed The remote control indicator will beep once for low speed...

Page 16: ...out RESETTING THE TRIM To set the trim buttons back to default push the throttle to the lower left corner and the direction stick to the lower right corner at the same time and hold for three seconds...

Page 17: ...aft and controller 2 Reset the trim buttons on the controller and re trim flight controls Allow 15 minutes to pass between full flights as this will give the motors a chance to cool down Failure to do...

Page 18: ...nd testing until it is obvious when you reach the point where the signal is not controlling the drone This will be the control limit for the conditions in which you are flying Distance does vary somew...

Page 19: ...nd easy We stand behind all of our products and warrant this to be free from defects in workmanship and materials for 30 days from the date of purchase The warranty does not cover transportation damag...

Page 20: ......

Reviews: