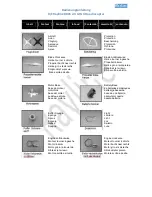
background image

REPLACEMENT PARTS

Thank you for your purchase of Protocol’s 

Air Hover Racer

.  We know that  

accidents can sometimes happen and that is why we offer spare parts kits  
on our website: 

ProtocolNY.com.

At Protocol, we’re dedicated to bringing you innovative and well-designed  
products that make living fun and easy.  We stand behind all of our products  
and warrant this to be free from defects in workmanship and materials for 30 
days from the date of purchase.  The warranty does not cover transportation  
damage, misuse, accident, or similar events.  Specific legal rights pertaining  
to this warranty may vary by state.
For service claims or questions please consult our website  

www.ProtocolNY.com.

LIMITED WARRANTY

16

Summary of Contents for AIR HOVER RACER

Page 1: ...AIR HOVER RACER R C DRONE RACER...

Page 2: ......

Page 3: ...has to offer We strongly recommend that you take the time to read this manual thoroughly It contains many tips and instructions on how to get the most out of this aircraft and maintain it for a long l...

Page 4: ...04 Remote Battery Installation 05 Charging the Drone 06 Start Up Procedure 08 Operation 10 Stunts 11 Performance Modes 12 Trim Adjustment 13 Troubleshooting 15 Flying Outdoors 16 Replacement Parts Lim...

Page 5: ...d between flights Use only the charger and or charging cable that is supplied with this item Do not strike cut or pierce the internal battery or subject it to hard impacts Do not mix old and new batte...

Page 6: ...s 4 Charging Port 5 Power Switch 6 Indicator Light INSTALLING THE RACER TO THE BIKE You have the option to fly the bike with or without the racer Follow the diagram above to secure the racer to the bi...

Page 7: ...anding 3 Forward Backward 4 Bank Left Right 5 Throttle 6 Turn Left Right 7 Stunt 1 8 Stunt 2 9 Trimmer push in 10 Performance Selector 11 Compass Mode SPARE PARTS INCLUDED Replacement Blades PARTS 1 2...

Page 8: ...l batteries carefully 2 Do not mix old and new batteries 3 Do not mix different types of batteries Remove battery cover from controller Insert 3 x AAA batteries according to indicated polarities Repla...

Page 9: ...ght charge after cooling down for higher efficiency 5 Do not strike or subject battery to hard impacts or sharp surfaces 6 Do not use any other charger than that which is supplied with this item 7 Do...

Page 10: ...3 Both indicators on the drone and the remote will flash while they are syncing 4 Pull the throttle down to sync You will hear 2 beeps and the lights will go steady to indicate the drone has synced 5...

Page 11: ...for the user to be able to tell the orientation Follow the below instructions to change to Compass Mode 1 It is easiest to set up Compass Mode before flight Sync and turn on the engines 2 Make sure y...

Page 12: ...desired height and release The drone will hover at that height LANDING 1 Press the landing button to lower the drone to the ground OR 2 Push down on the throttle until the drone is on the ground UP D...

Page 13: ...er to the left or right the drone banks to the left or right FIRST TIME FLYERS TAKE YOUR TIME GO SLOW Practice hovering until you are comfortable with flight before attempting any other maneuvers Make...

Page 14: ...advanced maneuvers At a height of at least 10 feet press the stunt button and drone will perform tricks STUNT 1 Push the stunt button and the drone will fly and rotate 720 STUNT 2 Push the stunt butto...

Page 15: ...and level of comfort At high speed the drone will pitch more than at low speed Air Hover Racer is quite fast at its high speed and requires more piloting skills to fly competently For safety take time...

Page 16: ...tionally you can correct it by pushing in the throttle and moving the direction stick in the opposite direction until it evens out RIGHT MOVEMENT LEFT MOVEMENT FORWARD BACKWARD NOTE Trim adjustments a...

Page 17: ...starting and trimming it still is unstable you have the option to re calibrate the drone 1 Turn on the drone and then the remote and sync 2 Push and hold the direction stick to the lower right corners...

Page 18: ...he aircraft was not on level ground during synchronization 2 Trim settings are incorrect 1 Re synchronize aircraft and controller 2 Recalibrate the Altitude Sensor 3 Re trim flight controls Allow 15 m...

Page 19: ...ng on and syncing the drone and walking away while testing the engines Keep walking and testing until it is obvious when you reach the point where the signal is not controlling the drone This will be...

Page 20: ...d well designed products that make living fun and easy We stand behind all of our products and warrant this to be free from defects in workmanship and materials for 30 days from the date of purchase T...

Page 21: ......

Page 22: ......

Reviews: