background image

3

MAINTENANCE :

a. Maintenance 

1. Clean and lubricate the bed of the treadmill every 20 hours of use or monthly, which ever


comes first ( SEE TREADMILL LUBRICATION INSTRUCTIONS ). Daily cleaning to the sides


of the running mat will prevent much of the dirt from getting underneath the mat.

2.  Prevent the build up of dust beneath the motor cover and under the treadmill body ( any work 

involving the removal of the motor cover should be carried out by a qualified technician ). The


surface around and beneath the treadmill should be cleaned weekly. Less dust and dirt
underneath the machine means that less gets into it. Select a floor covering that is not 
subject to the build up of dust and also protects the original floor surface.

3.  Ensure that fluids are not spilt on the treadmill console or running mat.
4.  Have the treadmill serviced. Call your dealer for assistance. 

b. Treadmill clean and lubrication instruction

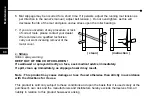
1.  Using a clean towel, slide it between the running mat and the bed of the treadmill, at the motor


end, so that one end of the towel hangs over each side of the machine.

2.  Grasp each end of the towel and gradually pull it back towards the rear of the machine. ( make
 

sure the mat does not move ).

3.  When you reach the rear roller, push the MAT and towel to the motor end so the towel is back 

near the motor cover. Repeat steps 2 and 3 twice. This action cleans the mat and deck of the

 treadmill.

4.  Take the container of lubricant and apply to the treadmill bed.
5.  Walk on the treadmill for two minutes at about 5 km/h, to spread the lubricant.

02

M

a

in

te

n

a

n

c

e

Summary of Contents for LDT-8850

Page 1: ......

Page 2: ...Geratesicherheits Gesetz This label ensures products strictly meet the technical safetyrequirements as stipulated by the GSG and the current production line is audited Features of product with GS TUV...

Page 3: ...Assembly Assembly Air Pressure Shaft Assembly Monitor Assembly Cover Folding Adjust The Machine Mat Alignment Incline Pulse LDT 8850 Monitor Monitor Functions About Display Operation Instructions Pro...

Page 4: ...e the power cord is not damaged Place the treadmill on a solid level surface with the rear and side away from any objects Keep hands away from moving parts Do not place any liquids on or near the trea...

Page 5: ...and also protects the original floor surface 3 Ensure that fluids are not spilt on the treadmill console or running mat 4 Have the treadmill serviced Call your dealer for assistance b Treadmill clean...

Page 6: ...val of the motor cover c Silicon Silicon spray warning KEEP OUT OF REACH OF CHILDREN If swallowed or sprayed directly on face seek medical advice immediately If spilt clean up immediately as slippage...

Page 7: ...spec Machine size 190 x 85 x 159cm Electric spec AC 110V 60Hz 220V50Hz Folded size 113 x 85 x 159cm Speed range 1km h 18 km h Running surface 50 x 140cm Motor 2 5HP 4000RPM Thickness of running belt 1...

Page 8: ...asher 52 18 Round headed screw 6 19 Running board 1 Parts List No Description Q ty No Description Q ty 20 Side rail 2 21 Running belt 1 22 Rear complete cover 1 23 Front complete cover 1 24 Side Rail...

Page 9: ...ircle Hex Screw 11 54 Nut jacket 2 55 Console combined plate 2 56 Round headed spider screw 4 57 Console assembly 1 58 Semicircle Hex Screw 8 59 Console elbow 1 60 Monitor case 1 61 Monitor 1 62 Safet...

Page 10: ...8 80 Plastic washer 2 81 Foam grip 2 82 PROTEUS plate 1 83 Fix base for pulse wire 1 84 Sensor shaft 1 A Control wires in upright tube 1 B Elevation wires in upright tube 1 C Hand pulse sensor wires...

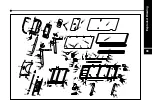
Page 11: ...42 38 60 17 71 61 40 39 41 33 73 70 57 10 58 81 62 79 17 17 17 17 23 19 24 17 28 63 25 27 26 29 36 51 34 35 52 72 45 75 80 74 76 49 48 50 64 36 34 66 67 44 47 65 68 46 21 20 53 34 69 72 1 2 16 14 15...

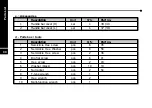
Page 12: ...rts box tools 1 Semicircle Hex screw pcs 6 35 2 Semicircle Hex Washer pcs 8 58 3 Semicircle Hex screw pcs 2 36 4 Big flat screw pcs 6 41 5 Hex screw pcs 2 43 6 Washer black pcs 10 10 7 Nut jacket pcs...

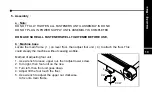
Page 13: ...frame 1 on level floor then adjust foot unit 4 to attach the floor This could steady the machine without causing wobble Method of adjusting foot unit 1 Use wrench to loose upper nut then adjust lower...

Page 14: ...in onto elevation control wire B 3 pin on upright tube unit right Assemble upright tube unit 33 onto frame assembly 51 pre fix with screw 35 and 36 then assemble upright tube unit 32 onto frame assemb...

Page 15: ...lick sound pull spring pin 66 and move up slightly to match up the air pressure position Then press the air pressure shaft to complete the assembly After complete the assembly move the machine down to...

Page 16: ...right control wires A inside the upright tube assembly 5 pin onto console control wire D on console assembly 5 pin Connect the upright tube elevation wire B inside upright tube 3 pin onto console ele...

Page 17: ...y with screw 41 Put left handle bar cover 37 38 onto upright tube left 32 tighten firmly with screw 41 g Final adjustment Press monitor to upright tube unit left and right to close together with outsi...

Page 18: ...spring pin 66 out hold the end machine folding the machine up till the spring pin lock into support shaft there is click sound CAUTION The elevation motor should be at horizontal position while foldi...

Page 19: ...ng with an uneven stride the mat should return to center after exercise 3 Maintain the correct mat tension In principle the belt was adjusted by the belt adjusting screw in the back of the machine if...

Page 20: ...t bolt clockwise 1 2 a turn 2 If more adjustment is necessary turn the right hand adjustment bolt counter clockwise 1 2 a turn 3 If more adjustment is required repeat steps 1 and 2 Any final adjustmen...

Page 21: ...urpose pull out the safety key while not using the machine While using pulse equipment and hold the pulse sensor stay calm and quiet Do not running and testing pulse at the same time Otherwise the pul...

Page 22: ...tomers understanding all the operations and functions before printing this manual In the mean time due to our R D department keeps improving the quality PROTEUS reserves the right to revise specificat...

Page 23: ...e monitor is designed for motorized treadmills and introduced in the following categories Key Functions About Displays Operation Instructions Error Massage Troubleshooting LDT 8850 MONITOR LDT 8850 Mo...

Page 24: ...using the warm up program before exercise It can get you energized for more strenuous exercise A warm up is almost universally used at the beginning of an exercise or activity session to improve perf...

Page 25: ...rate and the minimum speed in the P1 to P9 3 During creating the speed profile press this button to confirm your SPEED PROFILE in the U1 and U2 RESET FUNCTION 1 During the stop status hold this button...

Page 26: ...H To speed up the increment hold this button for more than 2 seconds 3 In the U1 and U2 use this button to set up the profile of speed program SPEED 1 In the preset status press this button to decreas...

Page 27: ...cise The main aim of the cool down is to promote recovery and return the body to a pre exercise status or pre work out level The cool down performed properly will assist your body in its repair proces...

Page 28: ...start mode press the QUICK SPEED button in any time and the motorized treadmill will change the speed immediately to the speed you desired speed was selected by you Note The QUICK SPEED buttons canno...

Page 29: ...ll count up and the range of time value is 0 00 to 99 00 x 1 26 ABOUT DISPLAY A PROGRAM AND MANUAL PROFILE DISPLAY Display the profile of Manual P1 P2 P3 P4 P5 P6 P7 P8 P9 U1 U2 60 MAX H R and 85 MAX...

Page 30: ...value the calorie will count up and the range of distance value is 0 0Kcal to 999 Kcal x 3 27 x 2 C DISTANCE Display Shows the distance with counting up or down In the setting mode press SPEED or SPEE...

Page 31: ...ing your exercise Once your heart rate is more than your setting value the monitor will glitter to inform you x 5 28 E SPEED Display a During the start status shows the speed that the treadmill is pro...

Page 32: ...er minute The range of pulse value is from 60 to 240 bpm b Press the incline or button this window will switch pulse function to incline level display 6 seconds and then come back to the pulse functio...

Page 33: ...display for one second the program will start from manual function Press the start stop button to begin excercise Notice that the machine does not work without the Safety Key attached ON LED DISPLAY o...

Page 34: ...ill will stop at once to avoid further injury QUICK START a Press the mode button to select one of the programs from Manual P1 P2 P3 P4 P5 P6 P7 P8 P9 U1 and U2 b Press Start button to begin exercise...

Page 35: ...n Press the Enter button b TIME window will glitter Press the SPEED or SPEED to set up the desired time to do the exercise Press ENTER to confirm the value of TIME c DISTANCE window will glitter Press...

Page 36: ...Press the ENTER to confirm your desired speed profile f And then the PULSE window will glitter and the PROGRAM PROFILE window will show ENTER TARGET HEART RATE Press SPEED or SPEED button to setting t...

Page 37: ...the monitor will count up the value b Without setting the function of Speed Difficulty the motorized treadmill will follow our initial speed profile c Without setting the function of TARGET HEART RAT...

Page 38: ...olumn reach the top of the window the profile will not change anymore even you press the SPEED button When press the SPEED button the chart of speed profile will decrease one level Once the lowest col...

Page 39: ...r setting value the PULSE window will flash to remind you slow down l Press the START STOP button to begin exercise n During the exercise you can adjust current speed by press the SPEED or SPEED or QU...

Page 40: ...s SPEED or SPEED button to set up the desired calorie to be burned h Press ENTER button to confirm the setting value of Calories and then the speed window and first column of the LED matrix will glitt...

Page 41: ...ill not keep the data of preset values Time Distance Calorie and Target heart rate for use b Without setting the function of TIME DISTANCE and CALORIE the monitor will count up the value c Without set...

Page 42: ...your exercise And then press ENTER to go to next setting value f TIME window glitter user SPEED or SPEED to set up the desire TIME to do the exercise g Press ENTER to confirm the value of TIME and the...

Page 43: ...et function You do not need to set up all of these functions before exercise You can just choose one of them or two of them or all of them Note a Without input your Age and confirm the target heart ra...

Page 44: ...VEL P8 18 14 12 10 8 6 4 2 P7 LEVEL 18 14 12 10 8 6 4 2 KM H P4 18 14 12 10 8 6 4 2 KM H P5 18 14 12 10 8 6 4 2 LEVEL P6 18 14 12 10 8 6 4 2 KM H P3 18 14 12 10 8 6 4 2 KM H P2 18 14 12 10 8 6 4 2 KM...

Page 45: ...nctioning well It indicates the INC signals in the yellow and green wires in the cable are good b Check the wires to the incline motor and see if they are open circuit disconnected or the positive and...

Page 46: ...nce HAM STRING STRETCH Sit with one leg extended Bring the sole of the opposite foot toward you resting it against the extended leg s inner thigh Stretch toward your toe as far as possible hold for 15...

Page 47: ...ll up your foot Bring your heel as close to your buttocks as possible Hold for 15 counts Repeat Stretches Quadriceps Hip Muscles CALF ACHILLES STRETCH With one leg in front of the other and arms out l...

Page 48: ......

Reviews: