background image


PRF-911 Concentric Ring


10


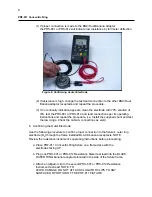
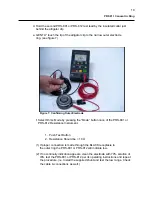
d. Hold the second PRS-801 or PRS-812 test lead by the insulated collar just 

behind the alligator clip. 


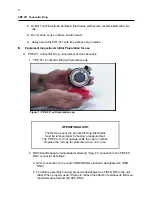
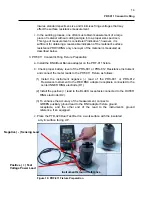
e. GENTLY touch the tip of the alligator clip to the narrow outer electrode 

ring. (see figure 7) 


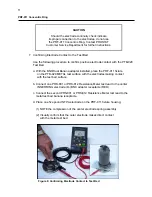
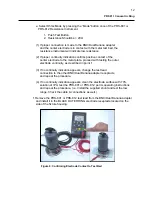
f. Select Ohms Mode by pressing the “Mode” button once of the PRS-801 or 

PRS-812 Resistance Instrument. 


1.  Push Test Button 
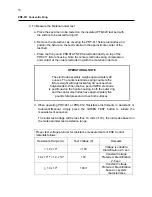
2.  Resistance Should be < 10 

Ω


(1) If proper connection is made through the BLACK receptacle to 

the outer ring the PRS-801 or PRS-812 will indicate low. 
 

(2) If no continuity indication appears, clean the electrode with 70% solution of 

IPA, test the PRS-801 or PRS-812 per its operating instructions and repeat 
the procedure. (i.e. Install the supplied shunt and test the low range. Check 
the cable & connections as well.) 


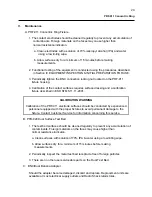
Figure 7: Confirming Outer Electrode

Summary of Contents for PRF-911

Page 1: ...P R O F E S S I O N A L S T A T I C C O N T R O L P R O D U C T S Operations Manual Concentric Ring PRF 911 ...

Page 2: ...in the United States of America No part of this manual may be used or reproduced in any manner whatsoever without written permission For information contact PROSTAT Corporation 1072 Tower Lane Bensenville IL 60106 PROSTAT is the registered trademark of PROSTAT Corporation ...

Page 3: ... 2 TABLE OF CONTENTS PROSTAT PRF 911 CONCENTRIC RING Title Page I Introduction 3 II Cautions Warnings 3 III Equipment Inspection Initial Preparation for use 5 IV General Operation 13 V Maintenance 20 General Specifications 21 ...

Page 4: ... one order of magnitude 3 The fixture connections allow the device to be used for making Volume Resistivity measurements generally described in ASTM D 257 and ESD STM 11 12 2000 Volume Resistance Measurements The fixture correction for the area of its center electrode D1 is 6 9 cm2 B The PTB 920 Dual Test Bed consists of a four inch metal test bed laminated to an insulated test bed 1 The insulated...

Page 5: ...ment repair and test personnel should exceed the 100 volt operation guideline and do so only under controlled conditions using precautions against personnel shock 3 Never exceed 100 volts during instrument test or repair C DO NOT USE THE PRF 911 CONCENTRIC RING if it fails to function during its continuity inspection test CAUTION Should the continuity check indicate improper connection to the elec...

Page 6: ... over the Concentric Ring Electrodes must be removed prior to making a measurement The PRF 911 will not operate while the cap is in place Replace the red cap for protection when not in use 2 BNC Dual Banana terminal adapter allowing plug in connection to the PRF 911 BNC connector as follows a Direct connection to the center INNER RING electrode designated D1 RED BNC b The fixture assembly housing ...

Page 7: ...e 3 Dual Test Bed Fixture 1 Before inspecting the PRF 911 Concentric Ring confirm the calibration of your resistance instrument Performing low Resistance Calibration on the Prostat PRS 801 and PRS 812 Resistance Instruments 1 Insert Reference Shunt 2 Select Ohms Mode by pressing Mode once 3 Press Test to measure shunt Indication should be 1 02 Ω 0 002 Ω 4 Press Reset to enter data in memory 5 Pres...

Page 8: ...xture on a flat surface with the electrodes facing UP b Plug one PRS 801 or PRS 812 Resistance Meter test lead to the BLACK BNC Dual Banana adapter receptacles c Attach an alligator clip to the second PRS 801 or PRS 812 test lead NOTE TO AVOID DAMAGE DO NOT ATTACH ALLIGATOR CLIPS TO ANY SURFACE OR PORTION OF THE PRF 911 FIXTURE d Gently touch the tip of the clip to the metal collar of the BNC adap...

Page 9: ...test lead the RED BNC Dual Banana adapter receptacle c Attach an alligator clip to the second PRS 801 or PRS 812 test lead NOTE TO AVOID DAMAGE DO NOT ATTACH ALLIGATOR CLIPS TO ANY SURFACE OR PORTION OF THE PRF 911 FIXTURE d Hold the second PRS 801 or PRS 812 test lead by the insulated collar just behind the alligator clip e GENTLY touch the tip of the alligator clip to the spring loaded center el...

Page 10: ...able connections as well 6 Confirming the Outer Electrode Use the following procedure to confirm proper connection to the fixture s outer ring electrode D2 through the frame installed BLACK banana receptacle NOTE Review the resistance instrument s operating instructions before proceeding a Place PRF 911 Concentric Ring fixture on a flat surface with the electrodes facing UP b Plug one PRS 801 or P...

Page 11: ...or PRS 812 Resistance Instrument 1 Push Test Button 2 Resistance Should be 10 Ω 1 If proper connection is made through the BLACK receptacle to the outer ring the PRS 801 or PRS 812 will indicate low 2 If no continuity indication appears clean the electrode with 70 solution of IPA test the PRS 801 or PRS 812 per its operating instructions and repeat the procedure i e Install the supplied shunt and ...

Page 12: ... the PRF 911 fixture on the PTB 920 METAL test surface with the electrodes making contact with the test bed surface b Connect one PRS 801 or PRS 812 Resistance Meter test lead to the center INNER RING electrode D1 BNC adapter receptacle RED c Connect the second PRS 801 or PRS 812 Resistance Meter test lead to the metal test bed banana receptacle d Place one five pound NFPA electrode on the PRF 911...

Page 13: ...uter electrode continuity as described in point f 3 If no continuity indication appears change the test lead connection to the other BNC Dual Banana adapter receptacle and repeat the procedure 4 If no continuity indication appears clean the electrode surface with 70 solution of IPA test the PRS 801 or PRS 812 per its operating instructions and repeat the procedure i e Install the supplied shunt an...

Page 14: ...ure replaces surface resistivity measurements of electrostatic discharge control materials previously conducted using ASTM D 257 The following procedure is used to measure surface resistance in ohms and convert it to ohms square if necessary 1 Items necessary for this procedure a PRF 911 Concentric Ring Fixture b BNC Dual Banana Adapter c PTB 920 Dual Test Bed d PRS 801 or PRS 812 Resistance Instr...

Page 15: ...roper battery level of the PRS 801 or PRS 812 Resistance Instrument and connect the meter leads to the PRF 911 Fixture as follows 1 Install the instrument negative lead of the PRS 801 or PRS 812 Resistance Instrument to the RED BNC adapter receptacle connected to the center INNER RING electrode D1 2 Install the positive lead to the BLACK receptacle connected to the OUTER RING electrode D2 3 To enh...

Page 16: ...approximately 30 ounces when fullyextended When the five pound NFPA electrode is positioned on the fixture housing both the outer ring and the center electrodes have approximately five pounds total pressure across both surfaces d When operating PRS 801 or PRS 812 Resistance Instruments in Automatic or Automatic Manual simply press the GREEN TEST button to initiate the measurement sequence The init...

Page 17: ...face Resistance Measurement Ohms multiply the measurement results by 10 To accomplish this simply increase the order of magnitude exponent by 1 For example a If the recorded ESD STM 11 11 2001 Surface Resistance measurement is 2 0x105 Ohms increase the 105 exponent to 106 to obtain 2 0x106 Ohms square b If the recorded ESD STM 11 11 2001 Surface Resistance measurement is 5 0x108 Ohms increase the ...

Page 18: ...wever it is sufficient for obtaining a reasonable indication of the material s volume resistance 3 PRF 911 Concentric Ring Fixture Preparation a Install the BNC Dual Banana adapter on the PRF 911 fixture b Check proper battery level of the Resistance Instrument and connect its leads to the PRF 911 Fixture as follows 1 Install the negative lead of the PRS 801 or PRS 812 Resistance Instrument to the...

Page 19: ...e spring compression and contact of the outer electrode ring with the material under test OPERATIONAL NOTE The electrode assembly weighs approximately 28 ounces The center electrode spring counters the fixture weight with approximately 30 ounces when fully extended When the five pound NFPA electrode is positioned on the fixture housing the outer ring and center electrodes have approximately five p...

Page 20: ...ument is less than 1 0x106 Ohms record the indicated measurement in Ohms after approximately 2 to 5 seconds of electrification 2 If the indicated measurement on the PRS 801 or PRS 812 Resistance Instrument is greater than 1 0x106 Ohms a Select 100 Volts on the test instrument if using PRS 801 or PRS 812 Resistance Instruments They will automatically shift to 100 Volts b After instrument s electrif...

Page 21: ...escribed in ESD STM S11 11 2001 CALIBRATION WARNING Calibration of the PRF 911 electrode surfaces should be conducted by experienced personnel equipped with the proper fixtures to avoid permanent damage to the fixture Contact Customer Service for information concerning this service B PTB 920 Dual Surface Test Bed 1 The test bed surfaces should be cleaned regularly to prevent any accumulation of co...

Page 22: ...d Correction Fixture Weight Approximately 28oz 0 79 kg without BNC Banana adapter or connections Connections Fixture installed BNC for Inner Disc D1 connection and fixture assembly ground dual BNC Banana plug adapter supplied Fixture installed standard banana receptacle for Outer Ring D2 connection Dual Test Bed Diameter 4 0 inches 10 16 cm Lamination of 1 8 inch acrylic plastic and 3 8 inch stain...

Page 23: ......

Page 24: ...Copyright 2001 2007 Prostat Corporation Printed in U S A 1072 Tower Lane Bensenville IL 60106 USA www prostatcorp com ...

Reviews: