Page 6
3.3 Connecting an Expression Pedal to the Foot Controller
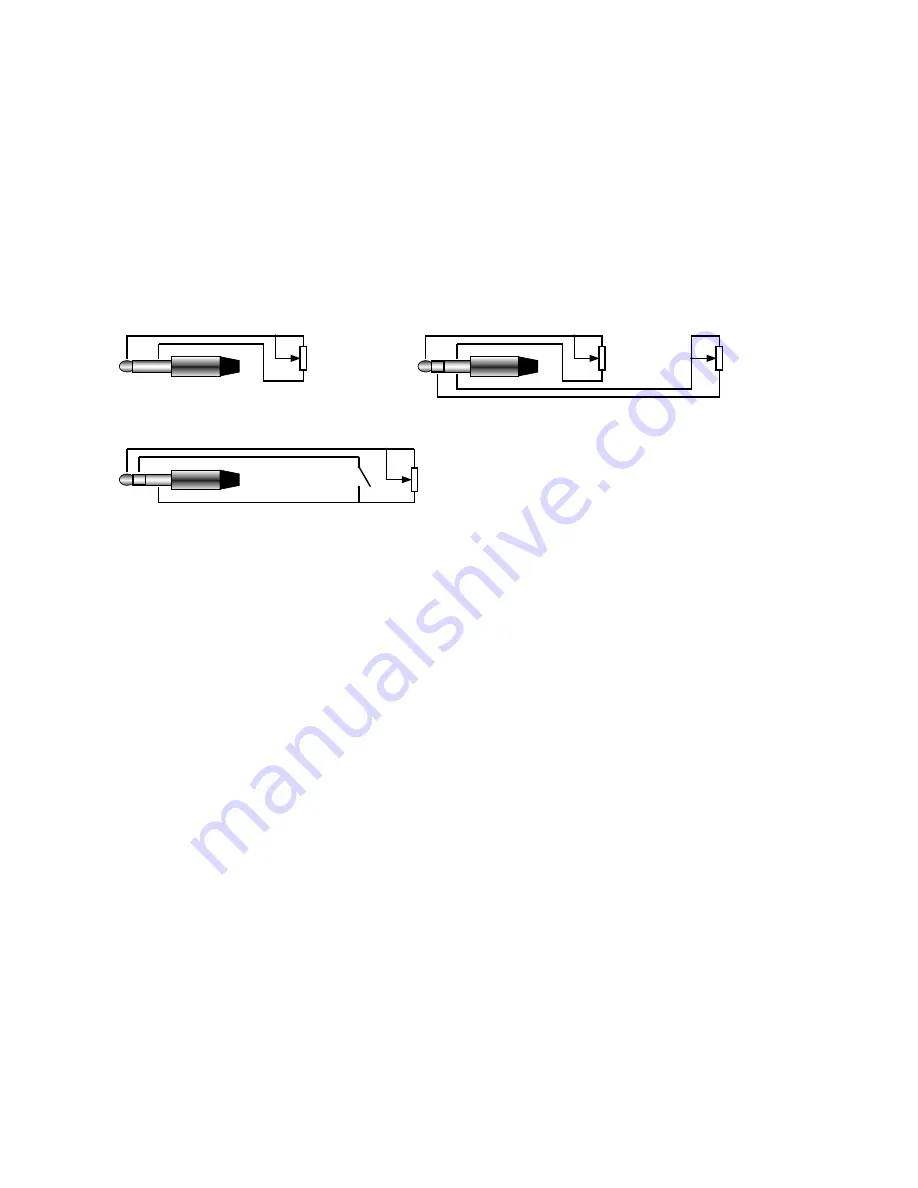
You can connect a standard expression pedal to the jack socket of the foot controller. Simply connect your
expression pedal to the foot controller by a short mono jack cable.
If you like to use two expression pedals, you will need a Y-cable - also called insert cable. An insert cable has two
mono plugs on one end. Plug one into each expression pedal. The other end of the cable has a stereo jack. Plug this
into the expression pedal connector of the X07. (For the technology enthusiasts among you: the potentiometer of
expression pedal # 1 is located between “tip “ and “shield“. The potentiometer of expression pedal # 2 is between
“ring“ and “shield“. (The top of a stereo jack cable is called "tip", the center ring is called, “ring“ ). Custom cables
are available from Prostage.
You can also use a volume pedal as an expression pedal. In this case, you have to connect the output of the volume
pedal to the foot controller. You will get the best resolution if you use a pedal made for keyboards, with a 10k
ohm or a 20k ohm potentiometer.
One expression pedal:
Two expression pedals (Y-Cable):
Exp. Pedal 1
Exp. Pedal 2
Exp. Pedal 1
Expression pedal with switch (e.g. to control the Remote WahWah):
=> The switch is connected as “expression pedal 2”
Switch
Exp. Pedal
Hence, the Control Change assignment for the
switch is set under “CC No. Exp. Pedal 2”.
Instead of an expression pedal, you can also connect a switch, to use it as “Tap” for example.
IMPORTANT =>
In order to use the expression pedal(s), you have to calibrate them first. You have to repeat the
following process each time you connect a different expression pedal. Even switches must be calibrated!
3.4 Calibration of the Expression Pedal
Calibration of Expression Pedal No.1
(connected to Tip):
• On the foot controller, simultaneously press the buttons [4] and [7] for approx. three seconds until the three
lower LEDs light up. You are now in calibration mode.
• Move the expression pedal to the position (dead stop) where you like to have the MIDI value 0 (low).
• Press the [1]-button (Pressing any other switch will abort the calibration process).
• Now the four upper LEDs light up.
• Move the expression pedal to the other dead stop, which is the position where you like to have the MIDI value
127 (loud).
• Press the [1]-button again.
• LED 2,5,6 lights up.
• Move the expression pedal to the center position.
• Press the [1]-button again. The calibration is now complete.
=> If you don’t want to calibrate a middle position, or if you calibrate a switch, you can cancel the center position
calibration (last two steps) by pressing any other button than the [1]-button. Then the expression pedal is calibrated
linear. You can also calibrate a logarithmic motion curve if you position the pedal a little bit away from the middle
when calibrating the center position. However, the middle position must differ at least 10% from 0 and 10% from
127. Otherwise, your chosen center position will be ignored and the expression pedal is calibrated linear.
You can easily check if the expression pedal is calibrated correctly: Move the pedal while watching the red LED on
the XDS | XLS | XTMpro, which flickers when the expression pedal is sending MIDI commands. If the LED flickers
throughout the complete motion from top to bottom, the pedal is calibrated correctly.
Calibration of Expression Pedal No.2
(connected to Ring):
Basically, this works like the calibration of pedal No. 1. But you have to press the buttons [4] and [6] for approx.
three seconds to enter the calibration mode.


