Prosharp AS 2001-Allpro Original Instructions Manual Download Page 14


page 14 


rotates over the whole template the skate has been profiled from the whole  


7. 

Radius profiling. 

Choose a radius template and put the template into the right  

position. Adjust the guide-roll so that it will profile the desired surface of the  
blade. At least 50% of the blade from the middle should be profiled. Follow the  
points 5 & 6 to see how the grinding wheel will run against the blade. 


8. 

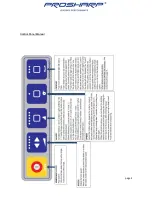
Choose the desired blade profiling distance by using the “points” on the skate- 

holder. Push the “PROFILE” button            twice and one light will go on and the  

skate-holder 

will drive between the two “one point marks” in the skate-holder.  

Press 3 times

 2 lights will go on and the skate-holder will drive between the two  

“two point marks”. Press 4 times

 3 lights will go on and the skate-holder will  

drive between the “3 point marks”. If you don’t choose the distance the skate- 
holder will drive the whole distance from left to right. 
 

9. 

Choose the profiling cycles from “SHARP”          . 1 push is worth of 5 cycles, 2  

pushes is worth of 10 cycles, 3 pushes = 15 cycles, 4 pushes = 20 and 5 pushes  
= 25 cycles. Press the button again during the profiling = reset. You can also turn  
the skate-holder device manually during 5 cycles (1 light) by pushing the  
“SHARP” button in a place where you want to turn the skate-holder back. Also  
when all lights are shut down you can turn the skate-holder by pushing the  
“SHARP” button. 
 

10. During the profiling you can adjust the speed of the skate-holder by pushing  

the arrows from “SPEED”         . 


11. 

IMPORTANT! Never unclamp the skate before the profiling is finished!


12. Do the same operation for the other blade but make sure that the profiling will  

happen in the same distance than for the first blade. Remember to adjust the  

guide-roll height as for the first blade. 


13. Take off the contouring template and adjust the guide-roll down. 


14. After the both skates are profiled they need to be sharpened. First you need  

to dress the grinding wheel and then the blades should be sharpened at least 5-7  

times (cycles) after profiling so that the turn-marks on the blades will disappear.  

See instructions for sharpening and for dressing of the grinding wheel from pages  

9 & 10. 

(chosen) length of the blade.


Summary of Contents for AS 2001-Allpro

Page 1: ...UCTIONS Read the installation and operating instructions carefully before using the machine Usage that is not in accordance with the instruction manual and or disregard safety instruction may cause in...

Page 2: ...tton will start to blink Test the grinding wheel by pushing once the DRESS button Grinding wheel should now run steadily Push the button again and the wheel will stop Dress the grinding wheel for desi...

Page 3: ...ed in this instruction manual Have defective switches replaced by an authorized service centre Do not use the machine if the switch does not turn it on and off 11 Store the machine properly in a dry l...

Page 4: ...page 4 Control Panel Manual...

Page 5: ...he machine 300W Hazards The skate sharpening machine AS 2001 Portable is equipped with grinding tools which may cause injury Children and visitors must be kept away from the machine and be at a safe d...

Page 6: ...this dust must be taken away Clean the machine between every grinding Engagement For information regarding the grinding machine the responsible operator must inform other users about safety and mainte...

Page 7: ...ruction manual Technical Data Voltage 1 x 100 240 VAC Cycles 50 60 Hz Power Pmotors 300W Poutlet 200W Ptotal 2300W Power outlet for the vacuum cleaner MAX 2000W Weight 48kg including the transportatio...

Page 8: ...anced ProSharp grinding wheels After 800 1000 pairs Check the dressing tool The diamond must be pointed and even for best grinding result Use only special centered dressing tool NDT1 or NDT3 for exact...

Page 9: ...page 9 Test run without grinding until there is no slippage After 3000 5000 pairs Service should be made by an authorized service technician 1 2 seasons Please contact us for support about the machine...

Page 10: ...e 3 4 Lock the grinding wheel arm See Picture 4 5 Adjust the dressing tool as close as possible to the grinding wheel without making any contact 6 Push the DRESS button once and the grinding wheel sta...

Page 11: ...ine will start after choosing the amount of cycles Important Never start the machine without a skate unless you are dressing the grinding wheel Grinding is finished when the skate is in home position...

Page 12: ...er device will drive back and forth several times before it will automatically stop to the home position Now the machine is calibrated for figure skate sharpening Follow the next points to sharpen the...

Page 13: ...he two rolls so that the pivot point mark is in the middle of the two rolls The heel of the blade has to be always towards the grinding wheel 4 Put in the contouring template and make sure that the te...

Page 14: ...shes is worth of 10 cycles 3 pushes 15 cycles 4 pushes 20 and 5 pushes 25 cycles Press the button again during the profiling reset You can also turn the skate holder device manually during 5 cycles 1...

Page 15: ...ext label is towards you and tighten it moderately 4 Adjust the wheel sideways 5 full rounds anti clockwise to 3 0 mm 5 Now switch on the power After changing the grinding wheel you have to reset the...

Reviews: