


page 13
8.
Important! If you wish to reset the grinding push quickly 2 times the “SHARP”
button when the skate-holder is going from left to right. When the skate-
holder is moving from right to left only one push is needed
for “reset”. Never start
the machine without a skate unless you are dressing the grinding wheel!
9. Check the result and the skate is finished. For more detailed instructions how to
use the electronics and adjustments please take a look at the electronics manual
(Page 4.)
Radius and Gliding surface profiling
1. Choose radius- or gliding surface template.
2. Mark on the skate the desired middle of the ice surface contact.
3. Put the skate into the skate-holder and make sure that the skate lies on both
rolls. Adjust the middle mark on the skate to be in line with the black
pivot point
on the machine.
Important:
Check the thickness of the blade and the hollow radius. Also make
sure that the skate-holder is centered sideways over the two rolls so that the pivot
point mark is in the middle of the two rolls. The heel of the blade has to be always
towards the grinding wheel.
4. Put in the contouring template and make sure that the template is in the correct
position and lying in the top of the guide-roll (see pictures 10 & 11). Measure the
thickness of the blade and adjust the blade thickness nut to right thickness (See
the picture 1). Remember to measure both blades because there are sometimes
differences between the blades even in the same pair! HTC-tool is perfect for
this!
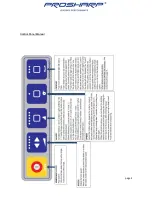
5.
Push the “PROFILE”-button once. First yellow light will start to flash.
Push
the “SHARP”-button - now the skate runs without grinding. Push
again and the skate-holder will turn back. Now you can see which part of the
blade the machine is profiling.
6.
Gliding surface profiling.
Adjust the template guide-roll height so that the
grinding-wheel just about reaches the part of the skate that you will profile and so
that about 50% of the blade will be profiled. When the guide-roll is rotating the
machine is not profiling. Guide-roll not rotating = profiling. When the guide-roll
Picture 10.
guide-roll
Picture 11.


