


Rail Bull
This document is protected by copyrights.
Copying, using, or distributing without permission of PROMOTECH is prohibited.
9
3. STARTUP AND OPERATION
3.1. Assembling the track
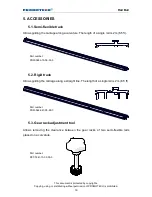
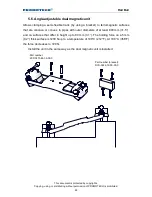
Connect dual magnetic units to the rail, and position it on the workpiece. Use the
4 mm hex wrench to attach additional rails (
1
, Fig. 3), and then switch the levers of
the magnetic units to the position ‘I’, which will clamp the track to the surface.
When working in PC/2G welding position, place the track so that the teeth of the
gear racks are directed downward.
Fig. 3.
Interconnecting the rails and clamping the magnetic units to the surface
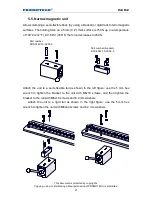
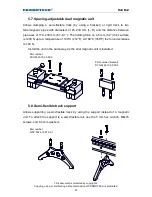
Before attaching additional rails to a semi-flexible rail placed on a curvature, use the
4 mm hex wrench to loosen the screws of the connecting plates (
1
, Fig. 4) and of
the gear racks (
2
). Next, attach the rails, clamp them with levers, and then tighten the
connecting plates. Place the gear rack adjustment tool (not included) into the hole (
3
),
rotate the tool to the left (
4
) to remove the gap (
5
) between the gear racks, and then
tighten the leftmost screw and the rightmost screw of each gear rack (
2
).
1
2


