3
See operating voltage range in clause 5.2. Avoid supply of increased voltage.
Ensure a reliable electric contact. To prevent short-circuit, insulate places of
connection.
Minimum pause between
pulses, s
not rated
Lock weight (max.), kg
0.02
Latch holding force (min.), kg
100
6. INSTALLATION AND CONNECTION
6.1 LOCK AND LATCH MOUNTING
1. Install the latch in the area designed for installation.
2. Insert the latch into the lock and fix the lock so that the latch enters it until click.
3. Connect the lock (see cl. 6.2) and function test by applying supply voltage. The lock must
unlock the latch. Open the door so that the latch disengages with the lock.
4. If the latch is not unlocked when power is supplied, push the door in the area of lock fixation
and apply voltage. Then adjust the latch length providing for the necessary free play and
alignment.
6.2 CONNECTING PROCEDURE
The lock operation is controlled by supplying and blocking power. For this purpose a controller
(control board) or a switch (button) is generally used. The controller is mounted in accordance
with its certificate.
Connect the lock power wires adhering to the following polarity:
White
– positive pole of the power supply;
Black
– negative pole of the power supply;
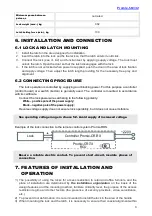
Reverse voltage supply does not ensure lock operability, but it does not cause its failure.
Example of the lock connection to the remote control system Promix-RDS.
7.
FEATURES OF INSTALLATION AND
OPERATION
1) The possibility of using the locks for access restriction to retail and office furniture and the
place of installation are determined by
the
installation organization
on the basis of the
design features and the mounting method, furniture criticality level, the purpose of the access
restriction regime and other factors (the presence of security providers, video surveillance,
etc.).
2) To prevent door deformation, it is recommended to install the lock in the area of the handle.
3) When mounting the lock and the latch, it is necessary to ensure their coaxial alignment within
Lock
Controller Promix-CR.RX
Promix-CR.TX
RCU
~220V


