Promix-SM112
4
5.2
OPERATING CONDITIONS
The lock operation environment must be explosion-safe, free of current-conducting dust or
gases that cause metal corrosion and destroying insulation of current conductors and electric
elements, free of current-carrying dust or water vapor, and preventing ingress of water, steam,
fuel and lubricants.
Climatic conditions of operation
– У3.1 as per GOST 15150-69 with extended temperature
range:
ambient temperature: from -
30 to +50 °С;
Relative air humidity: not higher than 98% at 25°С or lower temperatures without moisture
condensation and hoar-frost formation;
installation indoors or outdoors excluding ingress of moisture, dust, dirt, etc. inside the lock.
6.
INSTALLATION AND CONNECTION
6.1 LOCK AND LATCH MOUNTING
1. Mount the latch on the door
(see Fig.1 or 2
).
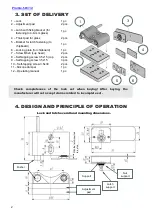
2. Leave one door opened, insert the latch in the lock
1
and fix the lock on the base so that the
latch is inserted up to the stop.
3. To adjust the height of the lock
1
position, use adjustment pads
2
– put one or two pads
under the lock (see Figs. in sections 3 and 4)
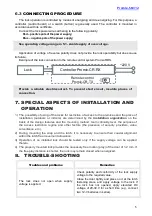
4. Connect the lock(see
6.3
) and test its operability by applying supply voltage. Press on the
door to make the latch enter the lock up to the stop. The lock must unlock the latch. Pull the
latch out of the lock.
5. If, on application of supply voltage, the latch does not become unlocked, adjust position of
the lock to ensure alignment.
6.2 RE-INSTALLATION OF THE LATCH AND
ADJUSTMENT OF THE LATCH BAR LENGTH
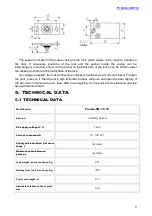
To take the latch off the bracket (or to adjust the latch bar length,) fix the latch support using a
12-mm wrench (not included in the delivered set) and unscrew the latch nut (see Fig. in section
4). After re-installation of the latch (and provision of the necessary latch bar length),
the latch nut
must be screwed on up to the stop and tightened reliably.
Fig. 1
Fig. 2
3
7
11
8
5
9
6


