background image

9

Custom Settings

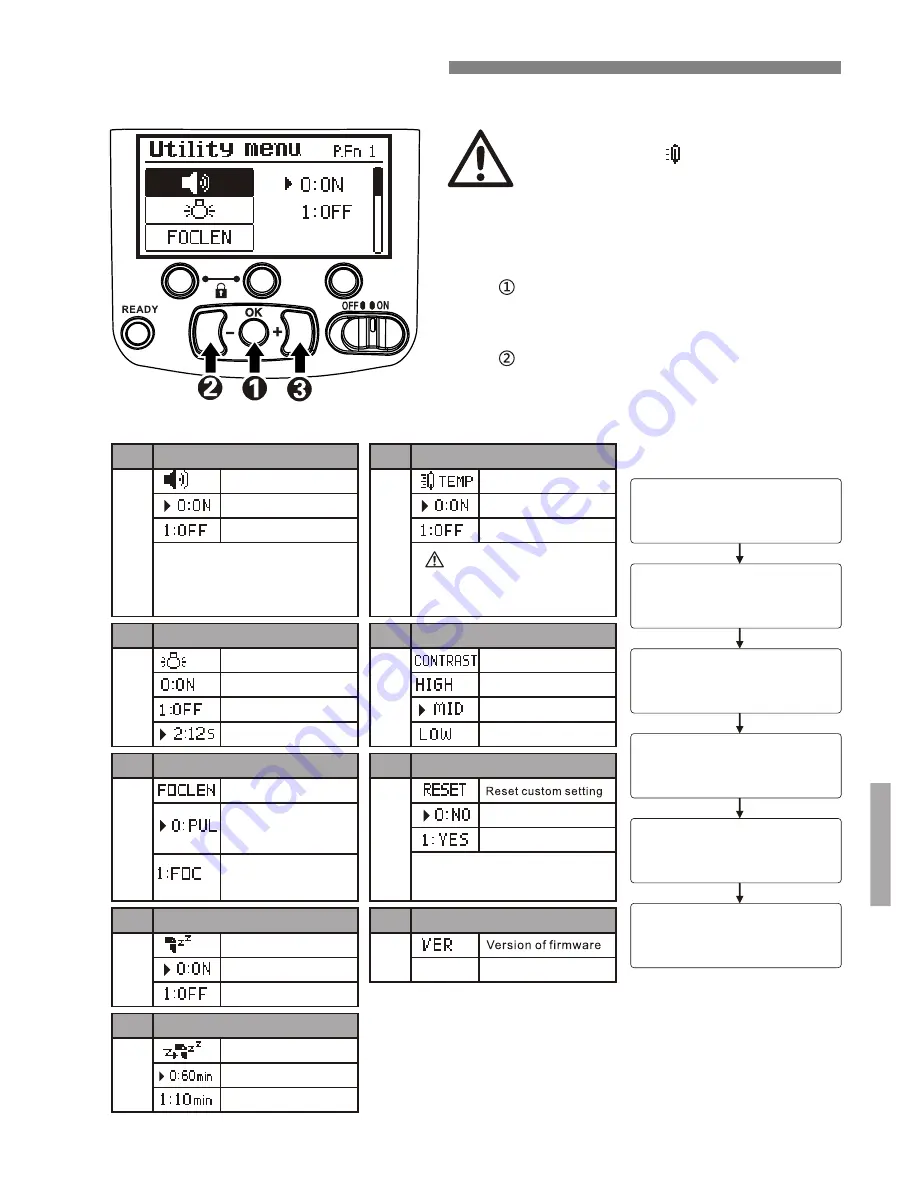
When [TEMP] is  turned on and 

temperature 

of  the 100SL hits level 4, the icon will be 
flashing and the speedlight will not operate. 
Give it 15 minutes to cool down

the 

When [TEMP] is turned off the, and the 
temperature hits level 4, the icon will  be 
flashing, and speedlight will be extend  its 
Recycle Time to try to avoid heat damage. 

If the temperature of the unit becomes 
too high, this icon     in the LCD will 
appear full to show the temperature has 
risen to a dangerously high level. The 
icon has 4 levels with number 4 being 
the highest.There are 2 options in the 
Utility menu for handling high 
temperature. 

NO.

NO.

NO.

Specification

Specification

Specification

Turn on

Turn off

Sound prompt 

When turned ON, the Sound Prompt 
will work for the following:powering on 
the speedlight, pressing a button, low 
battery power, high temperature 
warning, flash firing, and flash ready   

LCD backlight

Remains on 

Remains off

After operating 12 sec., 

backlight will turn off. 

Focus display

Displays the focal 

length of the 

speedlight's flash 

head

Displays the focal 

length of the 

camera's lens

P

.

Fn


01

P

.

Fn


02

P

.

Fn


03

NO.

Specification

Standby(aprox.  90 sec.)

Turn on standby mode

Turn off standby mode

P

.

Fn


04

NO.

Specification

Standby(in Slave mode)

Standby begins 

after 60 minutes
Standby begins 

after 10 minutes

P

.

Fn


05

v x.x

NO.

NO.

Specification

Specification

Thermal Cut-out

Turn on

Turn off

         Warning: If you turn off the 
Thermal Cut-out, you can damage 
the 100SL  by overheating the unit.

Version NO.

NO.

Specification

Reset

NO

Reset will change the 100SL to
factory settings.

NO.

Specification

Display contrast

High-contrast 

Low-contrast 

Middle(Default)

P

.

Fn


06

P

.

Fn


07

P

.

Fn


08

P

.

Fn


09

Utility Menu Setting

Press the <OK> button for 
approx. two seconds to 
display the Utility Menu

Press the <Left> button to 
highlight a setting 
(P.Fn01~P.Fn09)

Press the <Right> button to 
enter the highlighted setting.

Press the <Right> button 
again to change that setting

Press the <OK> button to 
save the setting

Press the <OK> button for 
approx. two seconds to exit 
the Utility Menu

Summary of Contents for 100SL

Page 1: ......

Page 2: ......

Page 3: ...erting The Batteries 6 9 Icons 10 LCD Panel 11 11 22 12 13 Repeat Mode 14 16 17 18 19 TTL Mode M Manual Mode Wireless Modes Slave Mode F1 F2 Advanced Applications Adjusting The Flash Coverage Bounce Flash Operation Troubleshooting Guide Operation LED Video Light 21 LED Catchlights Key Lock 20 23 Appendix 24 Specifications On Camera Interface Slave Mode ...

Page 4: ...may become warm or hot This is normal however you should be careful when handling these batteries 6 Always switch the speedlight off before changing batteries 7 Do not fire the speedlight from a short distance directly into the eyes of people or animals This can cause damage to the retina and may even lead to blindness 8 Avoid corrosive or flammable substances when cleaning this speedlight 9 To pr...

Page 5: ...l the exposure R T mode The 100SL fires repeatedly to create stroboscopic multiple exposure effects in RPT mode This operation is useful when shooting fast moving subjects HSS High Speed Sync High Speed flash synchronization occurs at the compatible camera s highest shutter speed This is useful when you want to use a wider aperture to achieve shallow depth of field to blur the background or create...

Page 6: ...y puts the 100SL in standby mode to conserve battery power after a period of inactive use Thermal Cut out protection This function protects the 100SL from high operating temperatures If the temperature of the unit rises to a certain level the 100SL will switch to protective shutdown mode Sound monitor Receive audible feedback each time a button is pressed and when the 100SL reaches a full charge i...

Page 7: ...n 12 8 9 Tilting angle scale 10 Rotating angle scale 11 LCD display Mode button Set button 13 14 LED light button Right button Flash head Micro USB 15 16 Power switch Confirm button 17 18 Left button 19 Lock release button 20 Ready light test button 21 Soft Case 22 Mini stand 23 Tripod mount Mounting foot s locking lever Parts Identification ...

Page 8: ...atteries be sure to turn off the speedlight 6 Basic Operation Open the cover Slide it in the direction of the arrow and flip open Install the batteries Make sure the and battery contacts are properly oriented as shown inside the battery compartment Close the cover Close the battery compartment cover by flipping it down pressing and sliding it closed Inserting The Batteries ...

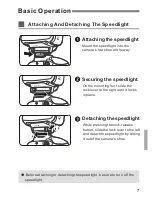
Page 9: ...a s hot shoe all the way Securing the speedlight On the mounting foot slide the lock lever to the right until it locks in place While pressing the lock release button slide the lock lever to the left and detach the speedlight by sliding it out of the camera s shoe Detaching the speedlight Attaching And Detaching The Speedlight Basic Operation ...

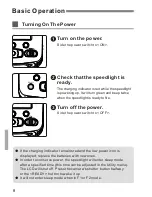
Page 10: ...the camera s shutter button halfway or the READY button to wake it up It will not enter sleep mode when in F1 or F2 mode displayed replace the batteries with new ones Basic Operation Turn on the power S de the power switch to ON i Check that the speedlight is ready The charging indicator is red while the speedlight is powering up It will turn green and beep twice when the speedlight is ready to fi...

Page 11: ...ff After operating 12 sec backlight will turn off Focus display Displays the focal length of the speedlight s flash head Displays the focal length of the camera s lens P Fn01 P Fn02 P Fn03 NO Specification Standby aprox 90 sec Turn on standby mode Turn off standby mode P Fn04 NO Specification Standby in Slave mode Standby begins after 60 minutes Standby begins after 10 minutes P Fn05 v x x NO NO S...

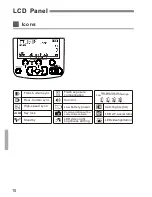
Page 12: ...D AF assist lamp LED video light turn on LED video light brightness setting Flash exposure compensation Low battery power Communicating with a compatible camera Key lock High speed sync Rear Curtain sync Front Curtain sync Standby LOCKED LCD Panel 10 ...

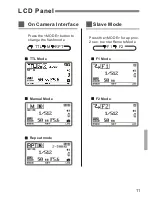
Page 13: ...Camera Interface TTL Mode Manual Mode Repeat mode Press the button to change the flash mode MODE TTL M RPT Slave Mode F1 Mode F2 Mode Press the MODE for approx 2 sec to enter Remote Mode F1 F2 LCD Panel 11 ...

Page 14: ...ult flash exposure compensation is 0 Press the MODE button and set the flash mode to TTL Press the left right buttons to decrease increase the flash exposure compensation Set the flash exposure compensation changes in 1 3 steps between 5 0 and 5 0 However the range of exposure compensation may be limited by the particular camera The flash exposure compensation Operation 12 ...

Page 15: ...e left right buttons to decrease increase the flash output level The flash output level changes in 1 3 steps between 1 512 and 1 1 Set the flash output level M Mode You can set the 100SL to manual mode and choose a power level between 1 1and 1 512 Operation 13 ...

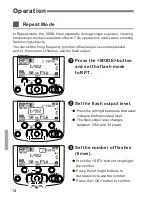
Page 16: ... Hz the number of flashes and the flash output Set the number of flashes times Press the SET button to highlight the number decrease increase the number Press the OK button to confirm Press the left right buttons to Press the MODE button and set the flash mode to RPT Set the flash output level Press the left right buttons to decrease increase the flash output level The flash output level changes b...

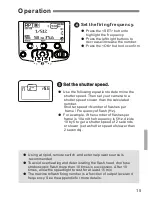
Page 17: ... slower than 2 seconds Set the firing frequency highlight the frequency decrease increase the number Press the OK button to confirm Press the SET button to Press the left right buttons to Using a tripod remote switch and external power source is recommended To avoid overheating and deteriorating the flash head don t use stroboscopic flash more than 10 times in succession After 10 times allow the s...

Page 18: ...choose slave mode starting with F1 Set the flash output level Press the left right to decrease increase the flash output level The flash output level changes in 1 3 steps between 1 512 and 1 1 Press and hold the MODE button for 2 seconds to exit F1 Slave mode buttons When the speedlight is in F2 mode it will fire in sync but requires power settings to be manually adjusted First Then press the MODE...

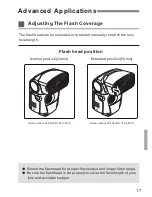
Page 19: ...he focal length of your lens and avoid dark edges Normal position 24mm Extended position 50mm Guide number 23 75 ISO 100 in M ft Guide number 30 100 ISO 100 in M ft Adjusting The Flash Coverage The flash head can be extended or retracted manually to match the lens focal length Flash head position Advanced Applications 17 ...

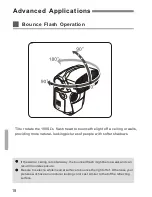
Page 20: ...er shadows If the wall or ceiling is too far away the bounced flash might be too weak and can result in underexposure Be sure to select a white neutral surface to bounce the light off of Otherwise your pictures will have an unnatural looking color cast similar to that of the reflecting surface Bounce Flash Operation Advanced Applications 18 ...

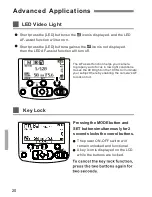
Page 21: ...teries The LED light will not turn on when the 100SL may be to Slave Mode LED light Advanced Applications The LED light is ideal for shooting video Press SET Press and hold the LED button for 2 seconds to turn on the LED light The Icon will be displayed Press and hold the LED button for 2 seconds to turn the LED light off button the icon will be displayed You can press the left right button to cha...

Page 22: ...d Applications LED Video Light Short press the LED button so the icon is displayed and the LED AF assist function will turn on Short press the LED button again so the icon is not displayed then the LED AF assist function will turn off 20 The AF assist function helps your camera to properly auto focus in low light conditions It uses the LED light on the 100SL to illuminate your subject thereby enab...

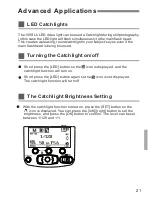
Page 23: ...urned on press the SET button so the icon is displayed You can press the left right button to set the brightness and press the OK button to confirm The level can be set between 1 128 and 1 1 Advanced Applications LED Catchlights The 100SL s LED video light can be used a Catchlight during still photography In this case the LED light will flash simultaneously to the main flash head This creates a pl...

Page 24: ...electrical contacts of the speedlight and or camera are dirty Solution Carefully clean the contacts The Test Button READY Does Not Respond Possible cause The control buttons are locked Solution Look at the LCD display if the key icon appears unlock the controls Possible cause The LED light may be on Solution Turn off the LED light The flash cannot fire while the LED is on The Slave Unit Does Not F...

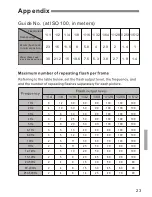
Page 25: ...50 50 45 30 30 25 100 100 100 100 100 90 80 70 70 60 60 50 45 40 100 100 100 100 100 100 100 100 90 90 90 90 80 70 100 100 100 100 100 100 100 100 100 100 100 90 90 90 12 10 8 7 6 5 5 5 5 5 5 4 4 4 Appendix Guide No at ISO 100 in meters 1 1 1 4 1 8 1 16 1 32 1 64 1 128 1 256 1 512 1 2 23 11 5 8 5 8 4 2 9 2 1 4 1 16 30 15 10 6 7 5 5 3 3 8 2 7 1 9 1 4 21 2 Flash Output Flash Coverage 24mm flash head...

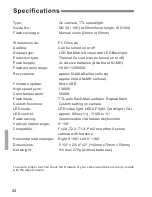
Page 26: ...pdate Micro USB High speed sync 1 8000 Color temperature 5600K Flash mode TTL auto flash Manual flash Repeat flash Custom functions Custom setting on camera LED mode LED video light LED AF light Catchlight CA LED control approx 80lux 1 1 1 128 to 1 1 Power saving Customizable via the standby function Vertical rotation angle 0 90 Compatible Fuji X T2 X T1 X Pro2 and other X series camera with hot s...

Page 27: ......

Page 28: ......

Reviews: