15
10.3
Cutting Tool Setup
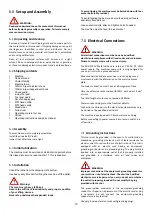
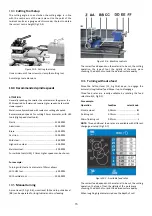
The cutting angle is correct when the cutting edge is in line
with the centre axis of the work piece. Use the point of the
tailstock centre as a gauge and shims under the tool to obtain
the correct centre height (Fig 10‐5).
Figure 10‐5: Cutting tool setup
Use a minimum of two screws to clamp the cutting tool.
Avoid large tool extensions.
10.4 Recommended spindle speeds
ATTENTION:
Generally speaking, the smaller the cut diameter, the greater the
RPM required. Soft materials require higher speeds; hard metals
slower speeds.
Metal is usually machined with coolant or cutting oil applied.
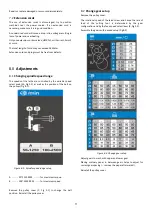
Recommended speeds for cutting 10mm diameter, with HSS
tools (High speed steel tools):
Plastic: .............................................................. 2500 RPM
Aluminium: ....................................................... 2500 RPM
Brass: ................................................................ 1000 RPM
Cast iron: .......................................................... 1000 RPM
Mild steel: ........................................................... 800 RPM
High carbon steel: .............................................. 600 RPM
Stainless steel: .................................................... 300 RPM
For carbide tools (HM), 5 times higher speeds can be chosen.
For example:
Turning mild steel at a diameter of 20mm allows
With HSS tool ...................................................... 400 RPM
With carbide tool. ............................................. 2000 RPM
10.5
Manual turning
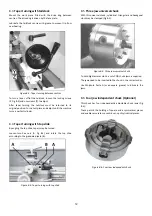
Apron travel (Z, Fig 10‐6), cross travel (AA) and top slide travel
(BB) can be operated for longitudinal and cross feeding.
Figure 10‐6: Machine controls
The correct feed depends on the material to be cut, the cutting
operation, the type of tool, the rigidity of the work piece
chucking, the depth of cut and the desired surface quality.
10.6
Turning with auto feed
Move the half‐nut lever (CC, Fig 10‐6) down, to engage the
automatic longitudinal feed. Move it up to disengage
Three feed rates are readily available by rotating the feed
select knob (R, Fig 9‐1).
For example:
Operation
feed/rev
select knob
Stock removal
0,28mm ................................
III
Finishing cut
0.14mm .................................
II
Micro finishing cut
0.07mm ..................................
I
NOTE:
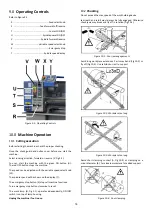
Three additional feed rates are available with different
change gear setup (Fig 10‐7).
Figure 10‐7: Available feed rates
The correct feed depends on the material to be cut, the cutting
operation, the type of tool, the rigidity of the work piece
chucking, the depth of cut and the desired surface quality.
When roughing big diameters reduce the depth of cut !
Summary of Contents for PBD-2555V
Page 18: ...18 15 0 Replacement Parts PBD 2555V Assembly Breakdown 1...
Page 20: ...20 PBD 2555V Assembly Breakdown 2...
Page 22: ...22 PBD 2555V Assembly Breakdown 3...
Page 24: ...24 PBD 2555V Assembly Breakdown 4...
Page 26: ...26 PBD 2555V Assembly Breakdown 5...
Page 28: ...28 PBD 2555V Assembly Breakdown 6...
Page 30: ...30 PBD 2555V Assembly Breakdown 7...
Page 32: ...32 PBD 2555V Assembly Breakdown 8...
Page 34: ...34 16 0 Wiring Diagrams PBD 2555V 1 230V PE 50Hz...


