


-1- DP20
0-1725-7/04
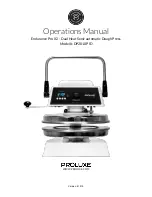
Congratulations!
Your selection of the
Proluxe
DP20
1
0
is a sound business decision. Whether
your intended use is to press or par bake
dough for pizzas, tortillas, mushi skins
or other appropriate dough products, rest
assured that you have made a wise
choice.
Proluxe
equipment is a result of the
highest quality engineering and time-
tested design. Your machine, combined
with
Proluxe
’s reputation of
innovation in dough press equipment
manufacturing, insures the continuing
capability of delivering the best-
decorated product possible.
This manual describes installation,
operation, and maintenance procedures
for your new model DP20
1
0.
Your model DP20
1
0 machine will have
a long trouble-free life. Read this
manual carefully and keep it with your
machine; it’s your key to proper
operation and lasting service.
Included with your shipment:
•
5 Rubber Feet
•
Platen Saver **If your unit has
polished platens**
Installation
DOMESTIC
Use a separate
30
amp AC
circuit. Only industrial extension
cords with proper wire size
should be used; size 16/3 wire for
distance up to 25 feet, and size
14/3 for distance up to 50 feet.
INTERNATIONAL
Use a designated
30
amp AC
circuit. Only industrial extension
cords with proper wire size (2.5
sq. mm) shall be used.
Make sure there is a proper electrical
wall outlet located within reach of the
cord and plug attached to the press.
Then place the press in an area that
allows for “swing clearance”. Note that
the upper platen rotates up to 90°, in a
backward rotation, to facilitate removal
of the dough product after the press
cycle has been completed. Also note
that the machine requires a vertical, clear
space of 33” from the bottom of the
machine to the top of the pull handle.
Limited Machine Warranty
Proluxe
warrants this dough press
machine, when operated under normal
conditions, to be free from
manufacturing defects in material and
workmanship for a period of one year on
parts and
from the invoice date.
This warranty will be effective only
when
Proluxe
authorizes the original
purchaser to return the product to the
Factory in Perris, California
Summary of Contents for DP2010PID
Page 13: ......


