


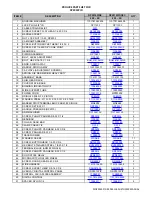


PROLUXE PARTS LIST FOR
DP2010PID
DP2010PIDE
DP2010PIDCEC
208 ~ AC
220 ~ AC
ITEM #
DESCRIPTION
QTY.
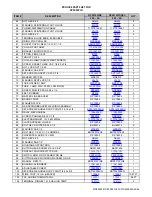
52
NUT, HEX 6-32
8
53
WASHER, #6 INTERNAL TOOTH LOCK
8
54
POWER DISTRIBUTION CABLE
11017815467
11017815467
1
55
WASHER, #8 INTERNAL TOOTH LOCK
4
56
NUT, HEX 8-32
4
57
TERMINAL BLOCK BASE, #5 DOUBLE
1
60
ORING, POST/COLLAR
1
61
SOCKET CAP SCREW, 1/4-20 X 1-1/4
1
62
COLLAR POST ARM
1
63
BRACKET, MICRO SWITCH
1
64
FITTING, ZERK 1/4-28
1
65
THRUST PLATE
1
66
COLLAR CLAMP (ADJUSTMENT SCREW)
1
67
SCREW, SOCKET HEAD CAP, 1/4-20 x 3/4
3
68
NUT, LOCK NUT 1/2-20
1
69
WASHER, SAE 5/16"
4
70
SET SCREW SOCKET 1/4-20 X 7/8
2
71
MARKER STRIP #5
MS6015
MS6015
1
72
WASHER, SPLIT LOCK 1/2
2
73
FUSE HOLDER 1 AMP
1
74
FUSE, 1 AMP, 250V, 250W, LOW BLOW
1
75
SCREW PHILLIPS PAN 2-56 x 1/4
1
76
FEET, RUBBER
5
77
MASTER LINK BRACKET
DP10603
DP10603
1
78
MAGNET POST
DP10602
DP10602
1
79
WASHER PLATE
1
80
GAS SPRING BRACKET WELDING ASSEMBLY
DP12803
DP12803
1
81
SET SCREW KNURLED CUP POINT 5/16-18 x 3/8
3
82
RELAY, MECHANICAL
1
83
SCREW, PAN HEAD 6-32 X 1/4
6
84
ELECTROMAGNET, 12V 36W 600lbs.
1
85
PLATEN SPACER, LOWER
DP12802
DP12802
1
86
BOLT HEX SLOTTED 8-32 X 1/4
BH83214
BH83214
6
87
WASHER, SAE 1/2
1
88
BOLT HEX, 1/2-20 X 1-1/4 GRADE 5
BH1220114G5
BH1220114G5
1
89
CONVERTER, AC/DC 12V 50W
DP16502
DP16502
1
90
NUT, HEX 4-40
2
91
WASHER, SAE 1/4"
1
92
HOUSING SUPPORT ROD
DP10605
DP10605
1
93
BUTTON HEAD SCREW 3/8-16 X 3/4"
SB381634
SB381634
2
94
CONTACT N/O SCREW TYPE, GE
1
95
SWITCH, MOM P/S OP SCREW ON GE
1
96
BUTTON BLACK MUSHROOM SCREW ON GE
1
97
MANUAL, DP2010
MDP2010PIDE
MDP2010PIDE
1
98
BUSHING, ALIGNMENT
1
99
ADJUSTABLE SCREW
1
100
SET SCREW KNURLED CUP POINT 1/4-20 x 3/8
SST142038KN
SST142038KN
3
102
WIRE, TGGT, 14 GA. (HEATER)
10.67 FT.
103
TFE, SHRINK TUBING 7AWG
.66 FT.
104
TERMINAL, RING #6 14-16 GA HIGH TEMP
2
PLDP2010PID RC 032118 CUSTOMER MANUAL
Summary of Contents for DP2010PID
Page 13: ......


