Proluxe DP2000FPE Operation Manual Download Page 4


-3- DP2000-1725-7/04 


WARNING 

In case of power cord damage, 
do not attempt to repair or 
replace the power cord.  Contact 
the manufacturer or the local 
distributor. 


WARNING


Avoid touching hot surfaces 
while operating the machine. 


CAUTION 

During normal operation, the 
base of the machine must be 
installed or placed above the wall 
socket. 


 CAUTION 

When servicing or cleaning the 
machine, make sure that the 
power cord is removed from the 
wall socket. 


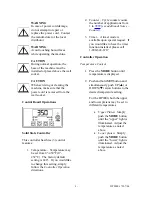
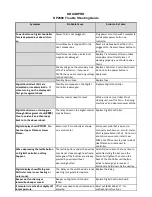
Control Board Operations 


Solid State Controller 

 
This controller has three (3) control 
features: 
 

1.


Temperature – Temperature may 
be set from 

0

°-450°F (

0

°-

232°C).  The factory default 
setting is 2

40

°.  If you would like 

to change this setting, simply 
follow the 

Controller Operation


directions. 


2.


Counter – Cycle counter counts 
the number of applications from 
1 to 

9999


(see additional Notes – 

Counter).


3.


Timer – A timer mode is 
available upon special request.  If 
you would like to have the timer 
function installed, please call     
1-800-624-6717 

 
Controller Operation 
 

Temperature Control 


1.


Press the 

MODE 

button until 

temperature is displayed. 


2.


Push and hold 

SET

 button and 

simultaneously push UP (

V

) or 

DOWN (

W

) arrow buttons to the 

desired temperature setting. 


For the DP2000, both the upper 
and lower platens may be set to 
different temperatures. 


Upper Platen:

  Simply 

push the 

MODE 

button 

until the “upper” light is 
illuminated.  Adjust the 
temperature as noted 
above.   


Lower platen:

  Simply 

push the 

MODE

 button 

until the “lower” light is 
illuminated.  Adjust the 
temperature as noted 
above. 


Summary of Contents for DP2000FPE

Page 1: ...formerly DOUGHPRO New Name Same Quality Superior Service proluxe com Operations Manual Model DP2000FPE Flaming Pizza Manual Press...

Page 2: ...rate 30 amp AC circuit Only industrial extension cords with proper wire size should be used size 16 3 wire for distance up to 25 feet and size 14 3 for distance up to 50 feet INTERNATIONAL Use a desig...

Page 3: ...antability and fitness for a particular use and is accepted such by the purchaser in taking delivery of this product Specifications Electrical 208V 50 60Hz 4600W 22 11Amps Requires 30 AMP outlet Inclu...

Page 4: ...to change this setting simply follow the Controller Operation directions 2 Counter Cycle counter counts the number of applications from 1 to 9999 see additional Notes Counter 3 Timer A timer mode is...

Page 5: ...fferent products require different temperature settings In order to determine the right temperature setting for your product refer to the following table simply as a guide for starting To achieve cons...

Page 6: ...reen or in a pan Since the shape of the dough may be altered slightly in the transfer process some hand fitting may be required Add toppings if desired and now you are ready to bake ADDITIONAL NOTES T...

Page 7: ...should be followed Daily Care 1 Platens These platens should only be cleaned with mild soap and warm water then wiped off with a clean soft cloth or soft sponge Never use steel wool or harsh abrasives...

Page 8: ...on the right side of the vertical post Machines with swing away upper heads have two grease ports one on the right side of the vertical post and one on the back of the vertical post All other machines...

Page 9: ...hrough LED segment check 8888 then to version and then loops back to to the above reboot The relay driver on the digital control may be blown Replace Digital Controller Digital display shows PROB No h...

Page 10: ...alse reading as well Replace Relay If the Controller s heat on LED is not lit indicating the controller is working properly If this is not the issue replace sensor Dough not having same thickness acro...

Page 11: ...1 OF 2 106 14 15 87 60 3X 76 34 38 35 40 4X 76 6X 86 113 4X 71 38 57 55 95 4X 56 42 56 28 18 62 A2 A1 A3 20 A4 108 38 100 95 104 83 96 94 2X 10² 95 103 101 55 2X 96 94 98 97 97 102 103 22 83 97 94 95...

Page 12: ...53 4X 52 4X 50 53 4X 26 4X 84 79 51 3X 66 65 29 5 25 70 17 67 2X 31 44 69 35 38 8 34 17 70 5 33 17 33 A5 17 112 72 2X 35 43 41 42 27 81 56 79 55 56 38 55 36 74 75 38 73 43 10 78 19 47 35 4X 16 4X 64 3...

Page 13: ...1 DETENT PLUNGER SPRING 3 8 16 MPSP134 1 22 WASHER SAE 6 WSAE6 2 24 POWER CORD 12 3 SJTOW 105c NEMA 6 30P 30 AMP 110573175 1 25 ORING 2 238 N 70 PISTON 238N70 1 26 WASHER STEEL 311 O D X 150 I D X 20...

Page 14: ...EW 110230031 1 67 SCREW SOCKET HEAD CAP 1 4 20 x 3 4 SSH142034 3 68 BUSHING FLANGE 212NN01420000 1 69 FITTING ZERK 1 8 B610 1 70 SET SCREW SOCKET 1 4 20 X 1 SST14201 2 71 MARKER STRIP 5 MS6015 1 72 SC...

Page 15: ...0949110 2 103 SCREW SET 3 8 16 X 1 2 SST381612 5 104 SLEEVING PVC WIRE OPVC1050 1 33 FT 105 WASHER SAE 5 16 WSAE516 8 106 TFE NON SHRINK TUBING 110133 50 FT 107 TERMINAL 6 RING x 18 22 GA 2202 2 108 D...

Page 16: ......

Page 17: ...pany s products the following instructions must be adhered to First contact our customer service department for approval and a return authorization number Please have the serial number of your item av...

Reviews: