Proluxe 2.0-B Operation Instruction Manual Download Page 14

- 14 - 


Fig 13 


Cleaning the Housing 

WARNING

: Always switch off the appliance and disconnect it from the outlet before cleaning it. See section "Switching 

Off and Retracting Power Cord.” 

ATTENTION

:  Do  not  use  Alcohol,  cleaning  or  scouring  agents  to  clean  your  machine,  as  these  may  damage  the 

appliance. Clean the outside of the housing using only a slightly damp washcloth. 

Troubleshooting 


WARNING

:      Never  use  a  defective  appliance.  Always  switch  off  the  appliance  and  disconnect  it  from  the  outlet  or 

remove the battery before you start to troubleshoot. 
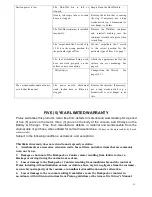
 
Fault 

Possible Cause(s) 

Solution 


The vacuum will not turn on. 

The battery is not charged. 

Make  sure  the  battery  is  fully 
charged  by  plugging  the  battery 
into  the  charger,  then  plug  the 
charger  into  your  wall  outlet  and 
keep  the  battery  plugged  into  the 
charger until the charger light turns 
Green. 


The  battery  is  not  fully  inserted 
into the vacuum. 

Make sure to insert the battery into 
the vacuum, making sure the raised 
center channel of the battery aligns 
with  the  notch  inside  the  battery 
compartment of the vacuum. Place 
battery  all  the  way  down  into  the 
vacuum  and  press  firmly  until  top 
of  battery  is  flush  with  top  of  the 
battery compartment. 


Switch is in the “off” position. 

Turn  the  on/off  switch  to  the  “on” 
position. Refer to page 9-10 in this 
manual. 

Summary of Contents for 2.0-B

Page 1: ...1 PROLUX 2 0 BAGLESS BACKPACK VACUUM CLEANER MODEL 2 0 B Operation Instruction Read all instructions before using this appliance...

Page 2: ...less backpack vacuum with the new Prolux 2 0 Bagless Technology that makes it 40 more powerful than current bagless vacuums Large companies use backpack vacuums because they literally cut your cleanin...

Page 3: ...nly weighs 8 lbs 8 lbs w o battery 11 lbs with battery Powerful deep cleaning motor with an amazing 52 Cubic Feet per Minute of Airflow most battery powered vacuums have 20 Dependable Motor Bypass val...

Page 4: ...ents 5 Do not use with damaged cord or plug If vacuum cleaner is not working as it should has been dropped damaged left outdoors or dropped into water take it to a service center before use 6 Do not p...

Page 5: ...sive materials there is danger of fire or explosion Never use the appliance outdoors there is danger of rain and dirt destroying the appliance Never stick objects into the appliance s openings it coul...

Page 6: ...n or instruction of a responsible person Packing materials are not toys There is danger of suffocation KEEP OUT OF REACH OF CHILDREN GETTING TO KNOW YOUR BACK PACK VACUUM 1 Main motor unit 2 Flexible...

Page 7: ...e Dusting Brush is used for all types of furniture Fig3 CREVICE TOOL Use for cleaning radiators cracks crevices along corners and baseboards and in between cushions Fig4 PET HAIR REMOVAL BRUSH The Pet...

Page 8: ...3 to the bottom end of the telescopic tube Fig 3 4 NOTE Shove all the way together and firmly twist to the right to connect pieces 3 Adjust the length of the telescopic tube Press down the release la...

Page 9: ...y in place the unit could fall off your back causing damage or injury 4 Turn the unit on off by pressing the switch located near the base of unit Fig 9 Fig 8 Fig 8A Fig 8B Fig 9 HOW TO CHARGE THE BATT...

Page 10: ...the cord 8 DO NOT handle the charger s cord plug with wet hands when inserting into electrical outlet 9 Keep sparks and flames away from batteries Do not smoke near batteries or charger 10 DO NOT cha...

Page 11: ...voltage level the electronics will shut off the battery Once the battery shuts off it must be recharged PREPARING BATTERY PACK FOR CHARGING 1 Turn off the power switch Confirm the switch is on the off...

Page 12: ...1 Switch the vacuum cleaner to the Off position and disconnect the plug from the wall outlet 2 Release the dust container by pressing down the release button Fig 10 3 Pull the dust container away fro...

Page 13: ...ressed air or using warm water then allow the filter to air dry completely Once the filter has completely air dried then assemble the filter back into the container Or if the filter is too dirty or in...

Page 14: ...Possible Cause s Solution The vacuum will not turn on The battery is not charged Make sure the battery is fully charged by plugging the battery into the charger then plug the charger into your wall o...

Page 15: ...do this FIVE 5 YEAR LIMITED WARRANTY Prolux warranties this product s motor free from defects in material and workmanship for a period of five 5 years on the motor three 3 years on the body of the va...

Page 16: ...ending unit back for warranty work contact your authorized PROLUX retailer you bought the unit from first Unauthorized warranty claims may be sent back Authorized Warranty claims PROLUX shall be respo...

Reviews: