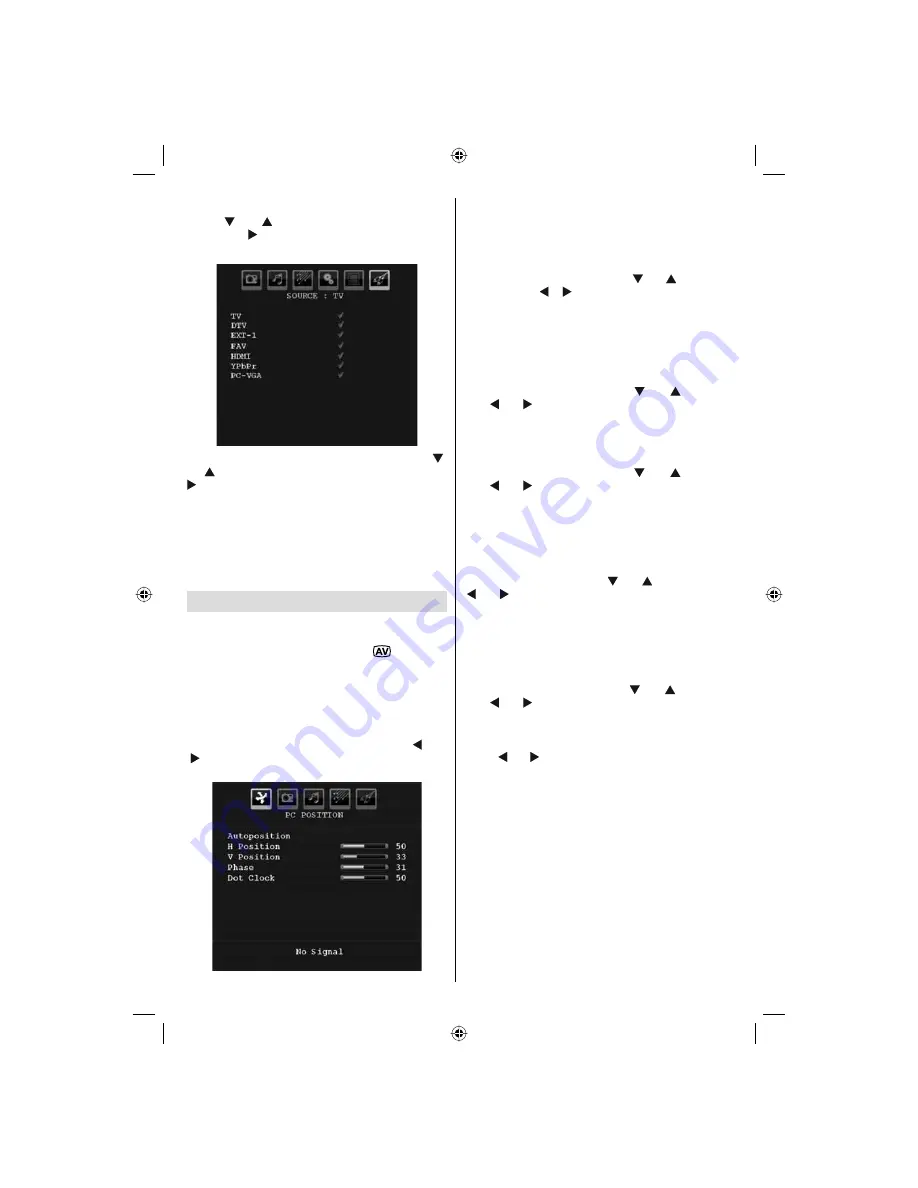
Proline LD1922D2 Operating Instructions Manual Download Page 25

English   

- 24 -

  Source Menu 

 Press “

” or “

” button and select the sixth icon. 

Then press “ ” or  “

OK

”  button. Source menu appears 

on the screen: 


 In source menu, highlight a source by pressing “

” 

or “

” button and switch to that mode by pressing “

” button. Source options are;  

TV ,  DTV ,  EXT-1 ,      FAV ,   

 HDMI  , YPbPr  

and

  PC-VGA . 

  Note : Once you have connected optional equipment systems 
to your TV, you should select the required input to view 
pictures from that source.  

Note: YPbPr mode can be use only when you connect a 
device that has a YPbPr output through the PC input with 
YPbPr to PC cable (YPbPr cable is not supplied).


    PC Mode Menu System 

 See “

Connecting the LCD TV to a PC

” section for 

connecting a PC to the TV set.

For switching to 

PC

 source, press “

/SOURCE

”  

button on your remote control and select PC input. You 
can also use “

Source

” menu to switch to 

PC

 mode. 

 Note that PC mode menu settings are available only while 
the TV is in PC source. 

 PC Position Menu 

 S e l e c t   t h e   f i r s t   i c o n   b y   p r e s s i n g   “

”   o r 

“ ” button. 

PC Position

 menu appears on the screen: 


 Autoposition 

 If you shift the picture horizontally or vertically to an 
unwanted position, use this item to put the picture 
into correct place automatically. This setting therefore 
automatically optimises the display.

Select Autoposition item by using “

” or “

” buttons. 

Press “

OK

” or “ ”, “ ” button. 

  Warning : Please ensure auto adjustment is performed 
with a full screen image to ensure best results. 

 H (Horizontal) Position 

 This item shifts the image horizontally to right hand 
side or left hand side of the screen.

Select  

H Position

  item by using “

” or “

” button. 

Use “ ” or “ ” button to adjust the value. 

 V (Vertical) Position 

 This item shifts the image vertically towards the top 
or bottom of the screen.

Select  

V Position

  item by using “

” or “

” button. 

Use “ ” or “ ” button to adjust the value. 

 Phase 

 Depending on the resolution and scan frequency that 
you input to the TV set, you may see a hazy or noisy 
picture on the screen. In such a case you can use this 
item to get a clear picture by trial and error method.

Select  

Phase 

 item by using “

” or “

” buttons. Use 

“ ” or “ ” button to adjust the value. 

 Dot Clock 

 Dot Clock adjustments correct the interference 
that appear as vertical banding in dot intensive 
presentations like spreadsheets or paragraphs or 
text in smaller fonts.

Select  

Dot Clock 

 item by using “

” or “

” buttons. 

Use “ ” or “ ” button to adjust the value. 

 PC Picture Menu 

 For adjusting PC picture items, do the following:

Press “ ” or “ ” button to select the second icon. PC 
Picture menu appears on the screen.

Brightness

Contrast, Colour

 and 

Colour 

Temperature 

settings in this menu are identical to 

settings defi ned in TV picture menu under “Analogue 
TV Menu System”. 

  Note : If you set Colour Temp as User, you can defi ne R, G, 
B settings manually.

Sound,Feature and Source settings are identical to the 
settings explained in Analog Tv menu system. 

A01_[GB]_MB45_1055UK_PANEUIDTV_BRONZE11_19822_10065707_50156721.indd   24

A01_[GB]_MB45_1055UK_PANEUIDTV_BRONZE11_19822_10065707_50156721.indd   24

27.10.2009   16:59:16

27.10.2009   16:59:16

Summary of Contents for LD1922D2

Page 1: ...LD1922D2 19 LCD TV TV LCD 47 cm AVEC TUNER TNT INTEGRE OPERATING INSTRUCTIONS MANUEL D UTILISATION...

Page 2: ...5 Warning 5 Overview of the Remote Control 6 LCD TV and Operating Buttons 7 Back Connectors 7 Side Connectors 8 Power Connection 8 Aerial Connection 8 Connecting the LCD TV to a PC 9 Connecting to a...

Page 3: ...or have the power lead assembly replaced if the fuse cover is lost Symbols Safe use and care of your television We have designed and made this television to meet European safety standards but as with...

Page 4: ...vision Protect the mains lead You must ensure the mains lead cannot be walked on crushed chafed cut trapped Avoid harsh conditions such as wet or damp places high humidity strong vibration extremely h...

Page 5: ...ences Preparation For ventilation leave a free space of at least 10 cm all around the set To prevent any fault and unsafe situations please do not place any objects on top of the set Use this device i...

Page 6: ...open flames and sources of intense heat such as an electric heater Ensure that no open flame sources such as lighted candles are placed on top of the TV Batteries should not be exposed to excessive he...

Page 7: ...ramme up Page down in DTV mode 23 Programme down Page up in DTV mode Info 24 AV Source 25 Numeric buttons 26 Standby 27 Only available for EU country options Only available for UK Note Buttons that ar...

Page 8: ...a device that has component output Connect the YPbPr to PC cable between the PC INPUT on the TV and the component video outputs of your device YPbPr cable is not supplied HDMI 3 HDMI input HDMI Input...

Page 9: ...puts Note If you connect a device to the TV via the VIDEO or PC YPbPr cable YPbPr cable is not supplied you should also connect your device with an audio cable to the AUDIO INPUTS of the TV to enable...

Page 10: ...Power off both the TV and the device before making any connections Note Cables shown in the illustration are not supplied If your DVD player has an HDMI socket you can connect via HDMI When you connec...

Page 11: ...volume settings can result in hearing damage Ecouteurs et casques audio doivent tre en conformit avec la directive EN 50332 2 afin d assurer une protection permanente contre les niveaux sonores exces...

Page 12: ...tion Once you have connected external systems to your TV you can switch to different input sources Press SOURCE button on your remote control for directly changing sources or Select Source option from...

Page 13: ...EU countries transmission channels searching for digital terrestrial TV broadcasts and displaying the names of channels found This process will take about a few minutes After Automatic Search is comp...

Page 14: ...creen for UK only Digital Teletext for UK only Press the button The digital teletext information appears Operate it with the coloured buttons cursor buttons and OK button The operation method may diff...

Page 15: ...r a number by using the numeric buttons on the remote control and press OK to confirm Note If you enter the same programme number of the channel that you want to move channel services will be replaced...

Page 16: ...vourite List F icon indicates that a channel is added to Favourite List Removing a Channel from Favourite List Highlight the channel that you want to remove from the favourite list and press OK button...

Page 17: ...in this menu are given as the following Configuration You can configure the settings of your TV Select Configuration from Setup menu and press OK to view this menu Press the EXIT button on the remote...

Page 18: ...rite it down and keep it safe Time Settings In the configuration menu highlight the Time Settings item by pressing or buttons Press OK and Time Settings sub menu will be displayed on the screen Curren...

Page 19: ...the Language Settings menu will function as described below Language Settings In the configuration menu highlight the Language Settings item by pressing or buttons Press OK and Language Settings subm...

Page 20: ...d then press OK The following OSD message will be displayed on the screen Press OK to cancel Select Yes by pressing or button and press OK to delete all of the channels First Time Installation The use...

Page 21: ...eature On or Off Turn this feature on when you are watching films to see the fast motion scenes clearly Game Mode Optional Select Game Mode by pressing or button Use or button to set Game Mode as On o...

Page 22: ...to set the AVL as On or Off Store Press or button to select Store Press or OK button to store the settings Stored will be displayed on the screen Feature Menu Sleep Timer Press or button to select Sle...

Page 23: ...on to select Ext Out Use or button to set the Ext Out as On or Off Note For copying from a DVD or VCR device you should choose desired source from source menu and turn On to EXT Out from feature menu...

Page 24: ...ters By pressing the RED button you can store the name Move Select the programme which you want to move by navigation buttons Press the GREEN button By navigation buttons move the selected programme t...

Page 25: ...H Horizontal Position This item shifts the image horizontally to right hand side or left hand side of the screen Select H Position item by using or button Use or button to adjust the value V Vertical...

Page 26: ...hows the aspect ratio of the picture is included in the broadcast signal or the signal from an external device the TV automatically changes the ZOOM mode according to the WSS signal When the AUTO mode...

Page 27: ...a page Note Most TV stations use code 100 for their index pages Coloured Buttons RED GREEN YELLOW BLUE Your TV supports both FASTEXT and TOP text systems When these systems are available the pages are...

Page 28: ...6 9 4 3 5 800 600 60 37 9 VESA 16 9 4 3 6 800 600 70 43 8 16 9 4 3 7 800 600 72 48 1 VESA 16 9 4 3 8 800 600 75 46 9 VESA 16 9 4 3 9 832 624 75 49 7 MAC 16 9 4 3 10 1024 768 60 48 4 VESA 16 9 4 3 11 1...

Page 29: ...Hz O 1080I 50Hz O 1080I 60Hz O 1080P 24Hz X 1080P 25Hz X 1080P 30HZ X 1080P 50HZ X 1080P 60HZ X X Not Available O Available Note In some cases a signal on the LCD TV may not be displayed properly The...

Page 30: ...Video MP ML PAL 4 3 16 9 Audio MPEG Layer I II 32 44 148kHz NUMBER OF PRESET CHANNELS 200 CHANNEL INDICATOR On Screen Display RF AERIAL INPUT 75 Ohm unbalanced OPERATING VOLTAGE 220 240V AC 50 Hz AUD...

Page 31: ...end of life Contact your local authority to learn about disposal and recycling The product and if applicable its batteries should be taken to your local collection point for recycling Some collection...

Page 32: ...r la TV 42 R glages initiaux 43 Fonctionnement g n ral 44 Bandeau d information 44 Guide de programme lectronique EPG 44 Affichage des sous titres 44 T l texte num rique seulement pour le Royaume Uni...

Page 33: ...r bleue doit tre connect au terminal marqu de la lettre N Aucun c ble ne doit tre connect au terminal de terre marqu de la lettre E ou Vous devez vous assurer que le c ble est fermement fix sous le se...

Page 34: ...de Les piles laiss es dans l quipement peuvent causer des dommages par d t rioration et fuite corrosive invalidant la garantie Pour prot ger l environnement utilisez l installation locale de recyclage...

Page 35: ...re cet appareil doit tre solidement fix au mur ou au support fourni conform ment aux instructions d installation Fatigue visuelle Lorsque vous utilisez cet appareil comme cran d ordinateur les sp cial...

Page 36: ...appropri e de votre t l viseur Avant d utiliser le t l viseur lisez ce manuel minutieusement Veuillez conserver ce manuel dans un endroit s r pour future r f rence Pr paration Pour la ventilation lais...

Page 37: ...mit de la machine laver N exposez pas cet quipement la pluie ou l eau ceci pouvant s av rer dangereux et ne placez aucun objet empli de liquide comme un vase par exemple au dessus Ne pas exposer des s...

Page 38: ...ionner en mode DTV 22 Programme pr c dent 23 Page suivante en mode DTV Programme suivant Page pr c dente en mode DTV Info 24 Source AV 25 Touches num riques 26 Veille Standby 27 Disponible uniquement...

Page 39: ...vez utiliser une entr e PC pour connecter YPbPr un appareil dot d une sortie du composant Connectez le c ble YPbPr sur celui du PC entre l ENTREE PC du t l viseur et les sorties vid o composante de vo...

Page 40: ...emarque Si vous branchez un p riph rique au t l viseur via l ENTR E VID O ou le c ble PC YPbPr c ble YPbPr non fourni vous devez galement brancher votre p riph rique l aide d un c ble audio aux ENTR E...

Page 41: ...le t l viseur et l appareil avant d effectuer les branchements Remarque Les c bles pr sent s dans l illustration ne sont pas fournis Si votre lecteur de DVD est dot d une prise HDMI vous pouvez le br...

Page 42: ...ns casques peut entra ner des troubles auditifs Ecouteurs et casques audio doivent tre conformes la directive EN 50332 2 afin d assurer une protection permanente contre les niveaux sonores excessiveme...

Page 43: ...veille Pour teindre compl tement le t l viseur d branchez le cordon d alimentation de la prise murale S lection d entr e Une fois les quipements externes connect s votre TV vous pouvez commuter entre...

Page 44: ...eur est con ue pour contr ler toutes les fonctions du mod le s lectionn Les fonctions seront d crites conform ment au syst me de menu de votre TV Les fonctions du syst me de menu sont d crites dans le...

Page 45: ...rogrammes dans les moindres d tails Boutons num riques Sauter aller directement la cha ne pr f r e via des boutons num riques OK Affichage de diffusions en cours rappel de programmes venir P P saute s...

Page 46: ...ffichera l cran Syst me de menu IDTV TNT Appuyez sur le bouton MENU Le menu principal s affichera Liste des cha nes En utilisant le bouton ou de la t l commande assurez vous que la premi re rubrique L...

Page 47: ...des cha nes Le verrouillage de cha ne apporte un acc s prot g par mot de passe aux cha nes s lectionn es par les parents Pour verrouiller une cha ne vous devez conna tre le mot de passe de contr le pa...

Page 48: ...MENU pour afficher le menu principal puis utilisez la touche ou pour s lectionner la ligne Acc s conditionnel et appuyez sur OK Certaines cha nes terrestres num riques fonctionnent la carte Ces cha ne...

Page 49: ...pour s lectionner Cha ne crypt e et pressez ensuite le bouton ou pour activer ou d sactiver ce param tre Mise niveau du r cepteur T l chargement hertzien OAD Cette option vous aide conserver la mise j...

Page 50: ...que AUTO est s lectionn les options Heure et Fuseau horaire ne seront pas disponibles pour tre r gl es Si l option MANUEL est s lectionn e comme param tre de fuseau horaire le fuseau horaire peut tre...

Page 51: ...Dans le Menu Configuration mettez en surbrillance la rubrique Param tres linguistiques en appuyant sur les boutons ou Appuyez sur OK et le sous menu Param tres linguistiques sera affich l cran Utilise...

Page 52: ...nlande Utilisezcetteoptionpoureffacerlescha nesm moris es Appuyez sur la touche ou pour s lectionner l option Effacer la liste des cha nes puis appuyez sur OK L OSD suivant s affichera l cran Appuyez...

Page 53: ...it Appuyez sur le bouton ou pour s lectionner l option R duction de bruit Appuyez sur la touche ou sur le bouton pour s lectionner partir de l une de ces options Faible Moyen Haut ou D sactiv Mode Fil...

Page 54: ...ance peut tre r gl entre 32 et 32 Casque d coute Appuyez sur le bouton ou pour s lectionner le Casque Pressez le bouton pour afficher le menu Casque Les options du sous menu Casque sont d crites ci de...

Page 55: ...le bouton ou pour s lectionner l option Arri re plan du menu Vous pouvez r gler le niveau du fond du menu en appuyant sur la touche ou R tro clairage S lectionnez Lumi re de fond en appuyant sur la t...

Page 56: ...u pour modifier le r glage Recherche Appuyez sur le bouton ou pour s lectionner Recherche Utilisez le bouton ou pour d marrer la recherche de programme Vous pouvez galement saisir la fr quence d sir e...

Page 57: ...to programmation APS appara t l cran Appuyez sur la touche ou pour s lectionner votre pays Si vous voulez quitter la fonction A P S pressez le bouton BLEU Quand vous appuyez sur la touche OK ou ROUGE...

Page 58: ...isez le bouton ou pour r gler la valeur Fr quence pilote Les r glages de la fr quence pilote corrigent les interf rences qui apparaissent comme des lignes verticales dans l image pour des pr sentation...

Page 59: ...r un autre ZOOM 16 9 Ceci tend uniform ment les c t s gauche et droit d une image normale format d image 4 3 pour remplir l cran de T l vision Pour les images de format 16 9 qui ont t press es en une...

Page 60: ...une page Remarque La plupart des stations TV utilisent le code 100 pour leurs pages d index Boutons color s ROUGE VERT JAUNE BLEU Votre TV supporte la fois les syst mes FASTEXT et TOP text Lorsque ce...

Page 61: ...0 600 56 35 2 VESA 16 9 4 3 5 800 600 60 37 9 VESA 16 9 4 3 6 800 600 70 43 8 16 9 4 3 7 800 600 72 48 1 VESA 16 9 4 3 8 800 600 75 46 9 VESA 16 9 4 3 9 832 624 75 49 7 MAC 16 9 4 3 10 1024 768 60 48...

Page 62: ...1080I 50Hz O 1080I 60Hz O 1080P 24Hz X 1080P 25Hz X 1080P 30HZ X 1080P 50HZ X 1080P 60HZ X X Non disponible O Disponible Remarque Dans certains cas un signal sur l cran de la TV LCD peut ne pas s affi...

Page 63: ...16 9 Audio MPEG Layer I II 32 44 148kHz NOMBRE DE CANAUX PR R GL S 200 INDICATEUR DE CHA NE Affichage l cran ENTR E D ANTENNE RF radio 75 Ohms Non quilibr TENSION D EXPLOITATION 220 240V secteur 50 H...

Page 64: ...vie Contactez les autorit s locales pour vous informer sur la mise au rebut et le recyclage L appareil et le cas ch ant les piles doivent tre d pos es votre point de collecte locale pour recyclage Cer...

Page 65: ...50156721...

Reviews: