background image

1

CYBER 4

TABLE OF CONTENTS


• 

CYBER4

• 

External 12V DC 500mA adapter

• 

User manual

Packing content:

Safety

General instructions

Warnings and installation precautions

General information

1     Introduction

1. 1 Description

1. 2 Technical specifications

1. 3 Operating elements and connections

2     Installation/ Connections

2. 1 Installation

2. 2 Connection of the DMX line

2. 3 Construction of the DMX termination

3     Addressing

3. 1 Projector addressing

4     Functions  and settings

4. 1 Basic

4. 2 Operating modes

4. 3 Operating functions

5     Maintenance

5. 1 General Troubleshooting

Warranty

2

2

3

4

4

5

6

6

7

8

8

8

10

12

Summary of Contents for CYBER4

Page 1: ...EN IT Manuale Utente User Manual CYBER4 DMX LED CONTROLLER...

Page 2: ...arziale per propri scopi commerciali vietata Al fine di migliorare la qualit dei prodotti la Music Lights S r l si riserva la facolt di modificare in qualunque momento e senza preavviso le specifiche...

Page 3: ...fiche tecniche 1 3 Elementi di comando e di collegamento 2 Installazione connessioni 2 1 Installazione 2 2 Collegamenti della linea DMX 2 3 Costruzione del terminatore DMX 3 Indirizzamento 3 1 Indiriz...

Page 4: ...ci L unit non per uso domestico solo per uso professionale Evitare di utilizzare l unit in luoghi soggetti ad eccessiva umidit in luoghi soggetti a vibrazioni o a possibili urti in luoghi a temperatur...

Page 5: ...lle Condizioni Generali di Garanzia Si prega dopo l acquisto di procedere alla registrazione del prodotto sul sito www musiclights it In alternativa il prodotto pu essere registrato compilando e invia...

Page 6: ...2 con 16 canali di funzionamento Gestione indipendente fino ad un massimo di 4 proiettori con funzionamento a 4ch RGBW o RGBA Ogni proiettore pu eseguire contemporaneamente diverse modalit playback Au...

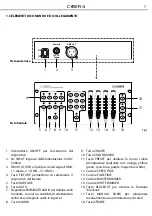
Page 7: ...bilit di adattamento dello show al segnale audio in ingresso 8 Tasto SOUND 9 Tasto CHASES 10 Tasto COLOR MACRO 11 Tasto PRESET per abilitare le macro colore preimpostate pulsante red orange yellow gre...

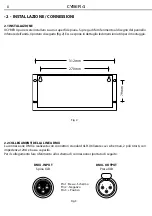
Page 8: ...e in dettaglio le dimensioni utili per il montaggio Fig 2 270 mm 312 mm 79 mm DMX OUTPUT Presa XLR DMX INPUT Spina XLR Pin1 Massa Schermo Pin2 Negativo Pin3 Positivo Fig3 2 2 COLLEGAMENTI DELLA LINEA...

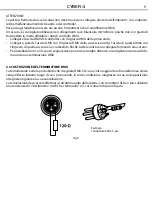
Page 9: ...uest ultima con l ingresso di quella successiva e via dicendo finch tutte le unit sono collegate formando una catena Per installazioni in cui il cavo di segnale deve percorrere lunghe distanze consigl...

Page 10: ...ntata tramite l alimentatore in dotazione il quale non deve essere mai collegato ad unit dimmer pack 4 2 MODALIT DI FUNZIONAMENTO Il CYBER4 dispone di diverse modalit di funzionamento Selezionare uno...

Page 11: ...nzioni STROBE BLACKOUT non siano attive Le unit collegate che operanoin questa modalit non avranno gli stessi colori ogni unit operer su una sequenza di colori casuale La funzione SOUND pu essere atti...

Page 12: ...odalit Sound Questa funzione permette di far partire un banco di scene programmate in sequenza a tempo di mu sica tramite un microfono integrato Premere il tasto SOUND il relativo indicatore LED posiz...

Page 13: ...e di colori utilizzando i cursori rosso verde blu e bianco Premere il tasto MANUAL RGBW il relativo indicatore LED posizionato sopra il tasto si accender Attraverso i cursori RED GREEN e BLUE possibil...

Page 14: ...oiettore non risponde al DMX Indirizzamento DMX errato Cavo di segnale DMX difettoso Errata polarit sul controller Interfaccia DMX difettosa PCB principale difettosa Controllare il pannello di control...

Page 15: ......

Page 16: ...by any means for any commercial use In order to improve the quality of products Music Lights S r l reserves the right to modify the characteristics stated in this instruction manual at any time and w...

Page 17: ...1 Description 1 2 Technical specifications 1 3 Operating elements and connections 2 Installation Connections 2 1 Installation 2 2 Connection of the DMX line 2 3 Construction of the DMX termination 3...

Page 18: ...fessional applications Never use the fixture under the following conditions in places subject to excessive humidity in places subject to vibrations or bumps in places with a temperature of over 40 C M...

Page 19: ...www musiclights it Please remember to register the piece of equipment soon after you purchase it logging on www musiclights it The product can be also registered filling in and sending the form avail...

Page 20: ...ocol with 16ch Independent control of 4 luminaires 4ch each RGBW or RGBA Each fixture can be set in different playback modes simultaneously Auto mode Library of built in automated show Sound activated...

Page 21: ...UT 12V DC 500mA 3 DMX OUT 3 pole XLR 1 ground 2 DMX 3 DMX 4 FIXTURE button allow to select the desired device 5 RGB FADE button 6 AUTO button 7 SOUND SENSITIVITY adjustment knob 8 SOUND button 9 CHASE...

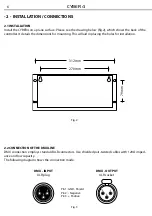
Page 22: ...the connection mode DMX OUTPUT XLR socket DMX INPUT XLR plug Pin1 GND Shield Pin2 Negative Pin3 Positive Fig 3 2 INSTALLATION CONNECTIONS 2 1 INSTALLATION Install the CYBER4 on a plane surface Please...

Page 23: ...of the following unit Connect again the output to the input of the following unit until all the units are connected in chain When the signal cable has to run longer distance is recommended to insert...

Page 24: ...or dimmer circuit even if the rheostat or dimmer channel is used solely for a 0 to 100 switch Before applying power to a fixture check that the source voltage matches the fixture s requirement This i...

Page 25: ...e Strobe and Blackout functions are not overriding the controls The fixtures in this mode will not be the same color EACH fixture will operate on random color Sound will function in AUTO Mode Chases O...

Page 26: ...E Please be sure that the Strobe and Blackout functions are not overriding the controls This mode applies the same color to all fixtures Sound will not function in COLOR MACRO Mode Sound Operation Thi...

Page 27: ...or combination by simply using the Red Green Blue and white faders However MANUALRGBW must first be pressed Please see the instructions below for this operation Press MANUAL RGB until the appropriate...

Page 28: ...nel and unit addressing Check DMX cables Check polarity switch settings on the controller Check cable connections Replace DMX input Replace Main PCB Loss of signal Non DMX cables Bouncing signals Long...

Page 29: ...conseguenti sono a carico del possessore dell apparecchio A tutti gli effetti la validit della garanzia avallata unicamente dalla presentazione del certificato di garanzia The guarantee covers the un...

Page 30: ...ate Data acquisto FORM TO BE FILLED IN AND MAILED CEDOLA DA COMPILARE E SPEDIRE FORM TO BE FILLED IN AND KEPT CEDOLA DA COMPILARE E CONSERVARE PROV ZIP CODE C A P MODEL MODELLO SERIAL N SERIE N Purcha...

Page 31: ......
Page 32: ...39 0771 721955 www musiclights it info musiclights it Music Lights S r l entertainment technologies ISO 9001 2008 Certified Company 2013 Music Lights S r l PROLIGHTS un brand di propriet della Music L...

Reviews: