background image

24

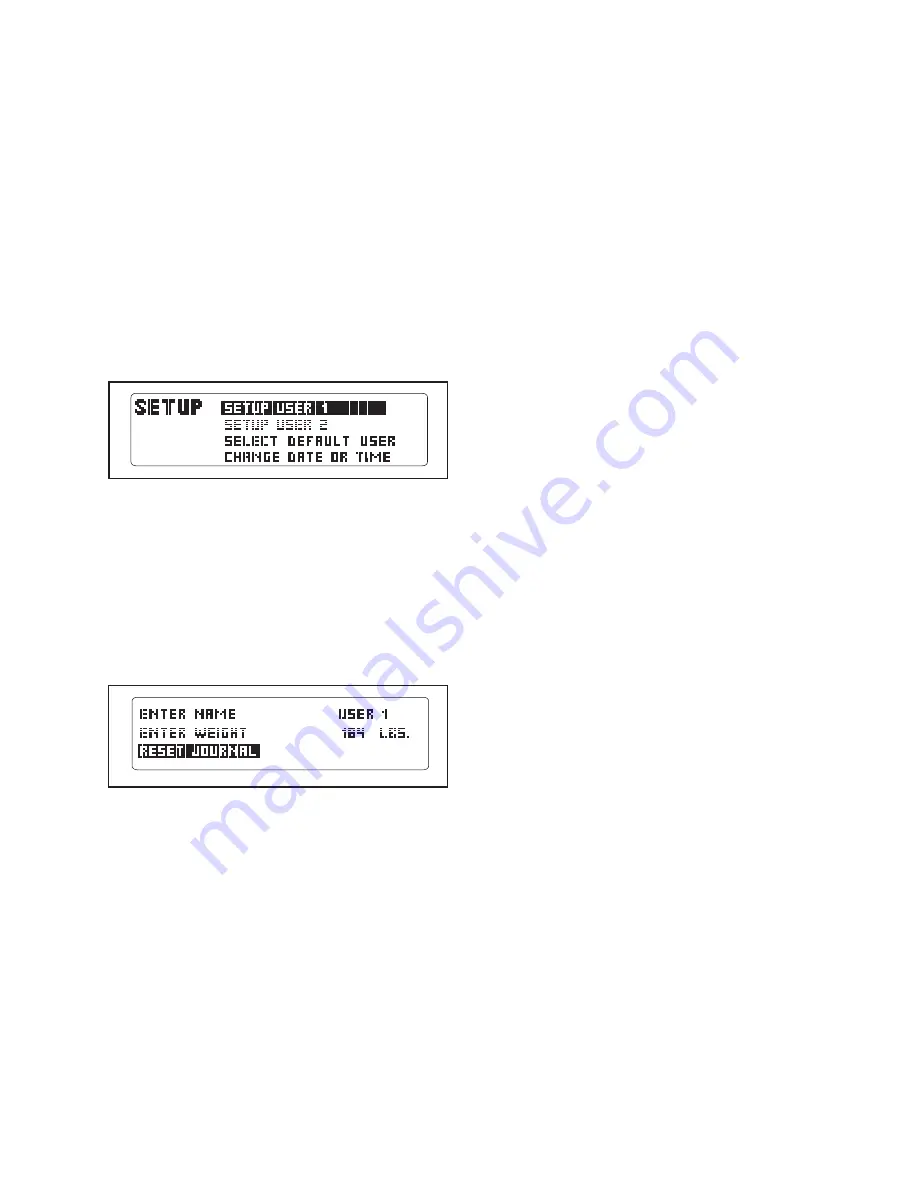
HOW TO RESET THE FITNESS JOURNAL

1. Select the user mode.

See step 1 on page 16.

2. Reset the fitness journal.

To delete exercise information stored in the fitness

journal, first highlight the SETUP option and then

press the Enter button. The setup menu will then

appear in the display.

Next, highlight the SETUP USER 1 or SETUP

USER 2 option and press the Enter button. The

user information menu will then appear in the dis-

play.

Then, highlight the RESET JOURNAL option and

press the Enter button. A confirmation request will

appear in the display. To delete the information

stored in the fitness journal, use the left and right

Navigation buttons to highlight the RESET JOUR-

NAL option and press the Enter button. To retain

the information stored in the fitness journal, high-

light the CANCEL option and press the Enter but-

ton.

After you press the Enter button, the user informa-

tion menu will again appear in the display.

3. Exit the user mode.

Press the Back button repeatedly until you have

exited the user information menus.

HOW TO USE THE SOUND SYSTEM

To play music or audio books through the consoleʼs

sound system while you exercise, you must connect

your iPod

®

, CD player, or personal audio player

through the audio jack or through the Integrated

Universal Dock for iPod

®

.

To use the audio jack, plug an audio cable (not includ-

ed) into the jack on the console and into a jack on

your iPod, MP3 player, or CD player.

Make sure that

the audio cable is fully plugged in.

This product has been designed specifically to work

with iPod and has been certified by the developer to

meet Apple performance standards. To use the

Integrated Universal Dock for iPod, you need an iFit

®

Universal iPod

®

Connector. Plug one end of the includ-

ed iFit Universal iPod Connector into the Integrated

Universal Dock for iPod and plug the other end into

your iPod.

Make sure that the iFit Universal iPod

Connector is fully plugged in.

Next, press the play button on your iPod, CD player,

or personal audio player. Adjust the volume on your

iPod, CD player, or personal audio player or press the

Volume increase and decrease buttons on the con-

sole.

Summary of Contents for 980 C8E

Page 1: ...S MANUAL QUESTIONS As a manufacturer we are commit ted to providing complete customer satisfaction If you have questions or if parts are damaged or missing DO NOT CONTACT THE STORE please contact Cust...

Page 2: ...TS Back Cover LIMITED WARRANTY Back Cover 2 WARNING DECAL PLACEMENT This drawing shows the location s of the warning decal s If a decal is missing or illegible see the front cover of this manual and r...

Page 3: ...hing more than 300 lbs 136 kg 8 Wear appropriate exercise clothes when exercising do not wear loose clothes that could become caught on your elliptical exer ciser Always wear athletic shoes for foot p...

Page 4: ...ront cover of this manual To help us assist you note the product model number and serial number before con tacting us The model number and the location of the serial number decal are shown on the fron...

Page 5: ...ons Place all parts of the elliptical exerciser in a cleared area and remove the packing materials Do not dispose of the packing materials until assembly is completed In addition to the included tool...

Page 6: ...1 backward attach the Front Stabilizer to the Frame with the two M10 x 120mm Patch Screws 78 6 2 Identify the Right Handlebar 36 which is marked with an R sticker Attach the Right Handlebar 36 to the...

Page 7: ...Cover not shown near the top of the Frame 1 See the inset drawing Locate the wire tie in the Upright 3 Tie the lower end of the wire tie to the Wire Harness 46 Next pull the upper end of the wire tie...

Page 8: ...Pulse Wire 112 Insert the excess wire downward into the Upright Tip Avoid pinching the wires Attach the Console 4 to the Upright 3 with four M4 x 16mm Screws 90 6 90 112 4 Pulse Wire 5 Slide the Upri...

Page 9: ...not overtighten the Bolts 7 84 103 103 27 55 2 8 Cut and remove the wire tie that holds the Link Tube 30 inside the left Link Arm 25 Leave the Link Tube inside the left Link Arm and then position the...

Page 10: ...ht Pedal Bracket 39 10 25 25 77 100 27 9 9 Insert the axle of the Roller 27 through the right Link Arm 25 make sure that the Roller is on the inner side of the Link Arm Attach the Roller 27 with an M1...

Page 11: ...s the Ramp Cover onto the Ramp 55 Attach the Ramp Cover with six 8 x 1 2 Screws 92 11 92 92 66 92 55 7 12 If there is a shipping bracket not shown insert ed into the underside of the Frame 1 remove an...

Page 12: ...CORD on page 13 IMPORTANT If the elliptical exerciser has been exposed to cold tempera tures allow it to warm to room temperature before plugging in the power cord If you do not do this the console di...

Page 13: ...uch as a properly grounded outlet box cover Whenever the adapter is used it must be held in place by a metal screw Some 2 pole receptacle outlet box covers are not grounded Contact a qualified electri...

Page 14: ...lliptical exerciser does not have a free wheel the pedals will continue to move until the flywheel stops When the pedals are stationary step off the higher pedal first Then step off the lower pedal HO...

Page 15: ...hange the resistance of the pedals to keep your heart rate near target heart rate settings while you exercise The console features a fitness journal which automati cally records and stores your exerci...

Page 16: ...e user mode at any time press the Back button repeatedly until the manual mode is selected see page 18 To re enter the user mode from the manual mode press the Enter button 2 Enter user information To...

Page 17: ...ANGE DATE OR TIME option in the setup menu and press the Enter button The date setting will then appear in the display To set the date first press the left and right Navigation buttons to highlight th...

Page 18: ...ke a moment for the ramp to reach the selected incline level 5 Follow your progress with the display As you exercise the display can show the follow ing workout information The elapsed time Note When...

Page 19: ...hands are positioned as described Be careful not to move your hands excessively or to squeeze the metal contacts too tightly For opti mal performance clean the metal contacts using a soft cloth never...

Page 20: ...next segment of the profile If a different resistance level and or target rpm is programmed for the next segment the resistance level and or target rpm will flash in the display for a few seconds to...

Page 21: ...t a heart rate work out the words SELECT TARGET HEART RATE and the number 110 will appear in the display Press the up and down Navigation buttons to enter the desired target heart rate setting and the...

Page 22: ...arget heart rate IMPORTANT When the current segment of the workout ends the pedals will automatically adjust to the resistance level for the next seg ment The workout will continue in this way until t...

Page 23: ...View exercise information by month After a few seconds the view month menu will appear in the display To view exercise information by month press the up and down Navigation buttons to highlight the d...

Page 24: ...button repeatedly until you have exited the user information menus HOW TO USE THE SOUND SYSTEM To play music or audio books through the console s sound system while you exercise you must connect your...

Page 25: ...direct sunlight CONSOLE TROUBLESHOOTING If the console does not turn on make sure that the power supply is fully plugged in If the console does not display your heart rate when you hold the hand grip...

Page 26: ...ur goal is to strengthen your cardiovascular system you must perform aerobic exercise which is activity that requires large amounts of oxygen for prolonged periods of time For aerobic exercise adjust...

Page 27: ...lles Stretch With one leg in front of the other reach forward and place your hands against a wall Keep your back leg straight and your back foot flat on the floor Bend your front leg lean forward and...

Page 28: ...wer Harness 48 1 Left Pedal Bracket 49 1 Front Stabilizer 50 2 Stabilizer Cap 51 1 Transformer 52 1 Control Board 53 1 Control Box 54 1 Control Box Cover 55 1 Ramp 56 1 Lift Bracket 57 1 Lift Motor 58...

Page 29: ...M10 Locknut 104 2 8 x 5 16 Screw 105 2 M10 Hex Locknut 106 1 M8 x 78mm Patch Screw 107 2 Pedal Insert 108 2 M6 x 18mm Patch Screw 109 4 M6 Locknut 110 2 Ground Wire 111 6 Upper Body Bushing 112 1 Puls...

Page 30: ...30 EXPLODED DRAWING A Model No PFEL99808 0 R1208B 4 5 6 7 33 35 40 86 94 86 86 86 86 92 92 86 86 95 3 85 85 90 64 65 66 67 86 70 69 70 104 69 92 92 70 70 86 94 94 17 92 92...

Page 31: ...45 46 47 14 49 50 50 71 72 72 73 73 93 93 80 80 76 76 75 75 78 101 101 102 103 103 102 77 77 109 80 80 89 89 96 96 82 82 98 98 100 100 81 74 81 97 75 19 19 101 101 101 101 98 98 98 98 103 80 27 27 79...

Page 32: ...ty the customer will be responsible for a minimal handling charge For in home service the customer will be responsible for a minimal trip charge This warranty does not extend to any damage to a produc...

Reviews: