6
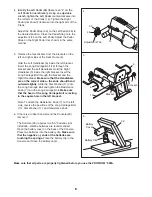
4. Identify the Left Pedal (48) (there is an ÒLÓ on the
Left Pedal for identification). Using an adjustable
wrench, tighten the Left Pedal
counterclockwise
into
the left arm of the Crank (14). Tighten the Right
Pedal (not shown)
clockwise
into the right arm of the
Crank.
Adjust the Pedal Strap (30) on the Left Pedal (48) to
the desired position. Press the Pedal Strap onto the
adjustment tab on the Left Pedal. Adjust the Pedal
Strap on the Right Pedal (not shown) in the same
manner.
5. Remove the four stickers from the brackets on the
left and right sides of the Seat Frame (2).
Hold the Left Handlebar (6) inside the left bracket.
Insert the Long Carriage Bolt (13) through the
bracket and the Left Handlebar. Hold the Right
Handlebar (5) inside the right bracket. Insert the
Long Carriage Bolt through the bracket and the
Right Handlebar.
Make sure that the Handlebars
are on the correct sidesÑthe ends should bend
outward slightly.
Slide the Star Washer (11) onto
the Long Carriage Bolt and tighten the Resistance
Knob (7) onto the Long Carriage Bolt.
Make sure
that the head of the Long Carriage Bolt is resting
in the square hole in the left bracket.
Note: To attach the Resistance Knob (7) on the left
side, reverse the positions of the Long Carriage Bolt
(13), Star Washer (11), and Resistance Knob.
6. If there is a rubber band around the Console (29),
remove it.
The Console (29) requires two ÒAAÓ batteries (not
included)Ñalkaline batteries are recommended.
Open the battery cover on the back of the Console.
Press two batteries into the battery clip.
Make sure
that the negative (Ð) ends of the batteries are
touching the springs.
Place the battery clip in the
Console and close the battery cover.
4
5
48
Adjustment Tab
30
6
13
Bracket
Bracket
11
7
2
5
14
Make sure that all parts are properly tightened before you use the PROFORM
¨
990S.
6
29
Battery Clip
Battery
Cover
Summary of Contents for 831.288300
Page 13: ...13 NOTES ...


