background image

15

EXERCISE FREQUENCY

To maintain or improve your condition, complete three
workouts each week, with at least one day of rest be-

tween workouts. After a few months of regular exer-
cise, you may complete up to five workouts each week
if desired. 

The key to success is to make exercise a

regular and enjoyable part of your everyday life.

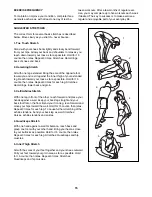
SUGGESTED STRETCHES

The correct form for several basic stretches is described
below. Move slowly as you stretchÑnever bounce.

1. Toe Touch Stretch

Stand with your knees bent slightly and slowly bend forward
from your hips. Allow your back and shoulders to relax as you
reach down toward your toes as far as possible. Hold for 15
counts, then relax. Repeat 3 times. Stretches: Hamstrings,
back of knees and back.

2. Hamstring Stretch

Sit with one leg extended. Bring the sole of the opposite foot
toward you and rest it against the inner thigh of your extended
leg. Reach toward your toes as far as possible. Hold for 15
counts, then relax. Repeat 3 times for each leg. Stretches:
Hamstrings, lower back and groin.

3. Calf/Achilles Stretch

With one leg in front of the other, reach forward and place your
hands against a wall. Keep your back leg straight and your
back foot flat on the floor. Bend your front leg, lean forward and
move your hips toward the wall. Hold for 15 counts, then relax.
Repeat 3 times for each leg. To cause further stretching of the
achilles tendons, bend your back leg as well. Stretches:
Calves, achilles tendons and ankles.

4. Quadriceps Stretch

With one hand against a wall for balance, reach back and
grasp one foot with your other hand. Bring your heel as close
to your buttocks as possible. Hold for 15 counts, then relax.
Repeat 3 times for each leg. Stretches: Quadriceps and hip
muscles.

5. Inner Thigh Stretch

Sit with the soles of your feet together and your knees outward.
Pull your feet toward your groin area as far as possible. Hold
for 15 counts, then relax. Repeat 3 times. Stretches:
Quadriceps and hip muscles.

1

2

3

4

5

Summary of Contents for 525 E

Page 1: ... HOT LINE The trained techni cians on our customer hot line will provide immediate assis tance free of charge to you CUSTOMER HOT LINE 1 800 999 3756 Mon ÐFri 6 a m Ð6 p m MST Model No PFTL49100 Serial No Write the serial number in the space above for future reference CAUTION Read all precautions and instruc tions in this manual before using this equipment Save this manual for future reference Ser...

Page 2: ...ing when using the treadmill Do not wear loose cloth ing that could become caught in the treadmill Athletic support clothes are recommended for both men and women Always wear athletic shoes Never use the treadmill with bare feet wearing only stockings or in sandals 10 When connecting the power cord see page 7 plug the power cord into a surge suppressor not included and plug the surge suppressor in...

Page 3: ...e that the storage latch is fully closed 21 Inspect and tighten all parts of the treadmill every three months 22 Never drop or insert any object into any opening 23 DANGER Always unplug the power cord immediately after use before cleaning the treadmill and before performing the maintenance and adjustment procedures de scribed in this manual Never remove the motor hood unless instructed to do so by...

Page 4: ...99 3756 Monday through Friday 6 a m until 6 p m Mountain Time excluding holidays To help us assist you please note the product model number and serial number before calling The model number of the treadmill is PFTL49100 The serial num ber can be found on a decal attached to the treadmill see the front cover of this manual for the location Before reading further please familiarize yourself with the...

Page 5: ...ormal condition and does not affect treadmill performance If there is lubricant on top of the walking belt simply wipe off the lubricant with a soft cloth and a mild non abrasive cleaner 5 2 Insert one of the Extension Legs 34 into the treadmill as shown Make sure that the Base Pad 40 is on the indicated side Note It may be helpful to tip the Uprights 11 in the direction shown by the arrow as you ...

Page 6: ...ot overtighten the Screws Thread the Cable Tie 16 through the Clamp 61 around the two Wires 21 and through the end on the Cable Tie Pull the Cable Tie tight and cut off the end 33 Plastic Tie Cable Tie 21 Connectors 46 11 5 3 Attach the Weight Rack 90 to the Uprights 11 with the two Rack Washers 41 and Rack Bolts 89 Note If nec essary spread the Uprights apart to align the holes in the Weight Rack...

Page 7: ...a grounding plug Plug the power cord into a surge suppressor and plug the surge suppressor into an appropriate outlet that is properly installed and grounded in accordance with all local codes and ordinances Important The treadmill is not compatible with GFCI equipped outlets This product is for use on a nominal 120 volt circuit and has a grounding plug that looks like the plug illus trated in dra...

Page 8: ...lkaline batteries are recommended To in stall batteries open the battery cover as shown below Press the batteries into the battery compartment with the negative Ð ends of the batteries touching the springs Close the battery cover push up on the tab and then push the tab forward as shown Be sure that the tab locks into place STEP BY STEP CONSOLE OPERATION Before operating the console make sure that...

Page 9: ...nsor is used see step 4 The displays can be reset if desired by pressing the ON RESET button Measure your pulse if desired To measure your pulse stand on the foot rails and place your thumb on the pulse sensor as shown The pulse sensor is pressure ac tivatedÑfully press it down Do not press too hard or the circu lation in your thumb will be restricted and your pulse will not be detected Next raise...

Page 10: ...over the catch Make sure that the storage latch is fully engaged over the catch To protect the floor or carpet from damage place a mat under the treadmill Keep the treadmill out of direct sunlight Do not leave the treadmill in the stor age position in temperatures above 85 Fahrenheit Engaged 10 Storage Latch Catch HOW TO USE THE HAND WEIGHTS To exercise your upper body as you walk on the treadmill...

Page 11: ...atched Storage Latch HOW TO MOVE THE TREADMILL Before moving the treadmill convert the treadmill to the stor age position as described above Make sure that the stor age latch is closed fully over the catch 1 Hold the upper ends of the handrails Place one foot on the base as shown 2 Tilt the treadmill back until it rolls freely on the front wheels Carefully move the treadmill to the desired loca ti...

Page 12: ... circuit breaker has tripped To reset the circuit breaker wait for five minutes and then press the switch back in PROBLEM The power turns off during use SOLUTION a Check the circuit breaker located on the treadmill frame near the power cord see the drawing above If the circuit breaker has tripped wait for five minutes and then press the switch back in b Make sure that the power cord is plugged in ...

Page 13: ...CORD Using the allen wrench turn the left rear roller adjustment bolt clockwise and the right bolt counterclockwise 1 4 of a turn each Be careful not to over tighten the walking belt Plug in the power cord insert the key and run the treadmill for a few minutes Repeat until the walking belt is centered b If the walking belt has shifted to the right first remove the key and UNPLUG THE POWER CORD Usi...

Page 14: ...n for prolonged periods of time This increases the demand on the heart to pump blood to the muscles and on the lungs to oxygenate the blood For aerobic exercise adjust the speed and incline of the treadmill until your heart rate is near the higher number in your training zone It may also be helpful to set the speed control on the console to AEROBIC to help you maintain the proper intensity level S...

Page 15: ...ended leg Reach toward your toes as far as possible Hold for 15 counts then relax Repeat 3 times for each leg Stretches Hamstrings lower back and groin 3 Calf Achilles Stretch With one leg in front of the other reach forward and place your hands against a wall Keep your back leg straight and your back foot flat on the floor Bend your front leg lean forward and move your hips toward the wall Hold f...

Page 16: ...or 50 1 Front Roller Pulley 51 1 Front Roller Adj Bolt 52 2 Incline Wheel 53 2 Extension Leg Screw 54 1 Power Cord 55 1 Power Cord Grommet 56 1 Circuit Breaker 57 2 Frame Pivot Washer 58 2 Frame Pivot Bolt 59 1 Latch Decal 60 1 Motor Belly Pan 61 2 Cable Tie Clamp 62 4 Rear Platform Screw 63 3 Releasable Tie 64 1 Choke 65 2 Belt Guide 66 4 Belly Pan Fastener 67 1 Walking Belt 68 1 Walking Platform...

Page 17: ...3 36 37 17 40 33 33 33 60 33 26 33 61 63 64 25 47 53 34 69 68 67 48 5 5 74 84 83 39 83 39 66 7 40 57 28 86 16 17 17 75 33 33 33 33 33 33 55 54 33 81 25 25 33 71 33 66 14 13 3 52 82 38 77 52 17 3 17 6 31 32 38 72 39 1 88 85 31 17 87 39 35 4 76 79 78 90 89 89 91 92 92 91 93 65 93 41 41 49 49 49 49 5 94 94 73 73 73 73 33 97 EXPLODED DRAWINGÑModel No PFTL49100 R0800A ...

Page 18: ...is warranty does not extend to any product or damage to a product caused by or attributable to freight damage abuse misuse improper or abnormal usage or repairs not provided by an ICON authorized service center products used for commercial or rental purposes or products used as store display models No other warranty beyond that specifically set forth above is authorized by ICON ICON is not respons...

Reviews: