background image

Page 11 

4.5 Connectivity  

The ZGM 1130 is equipped with a USB 
interface (2) which allows to download 
measurement files and to control the 
device. In order to use the ZGM 1130 
together with the 

“GlossTools” software, the 

software needs to be installed first. To 
connect the ZGM 1130 with a PC no 
additional drivers are necessary. If the 
device is connected the first time to a PC, 
the necessary driver will be installed 

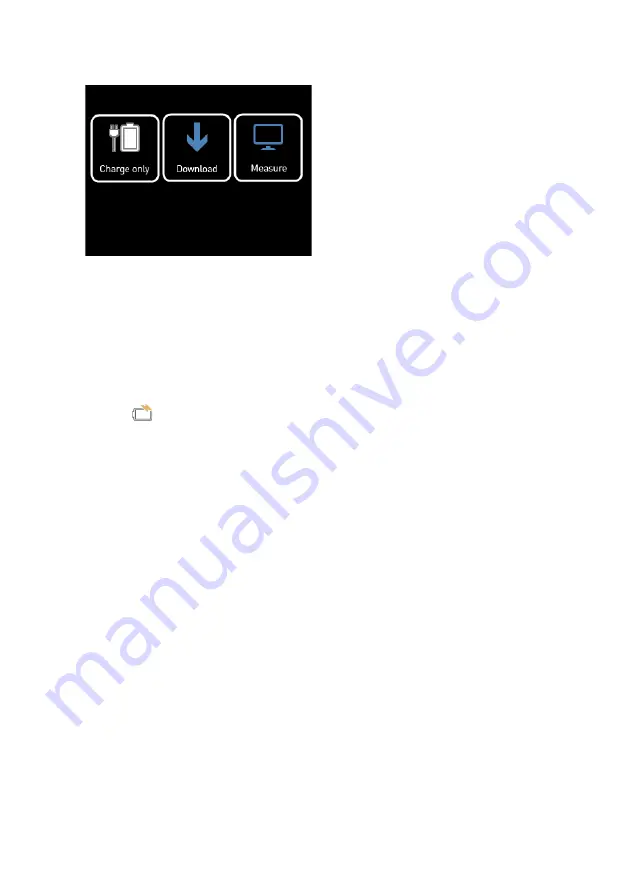
automatically. When the ZGM 1130 is recognized by the PC the shown pop up 
window appears on the touchscreen where three different connection modes are 
available. 

 
Charging only 


In charging mode the device will be charged from the PC over USB but no data 
connection will be established. This mode is used when further measurements 
should be taken with the device but the battery is critically low. A battery charging 

symbol 

 will be displayed in the upper right corner of the display when charging. 

The ZGM 1130 can be charged either via a USB PC connection or with a USB wall 
charger. The latter will charge the ZGM 1130 faster than the USB PC connection. 
 

Download


This mode connects the ZGM 1130 as a flash drive to the PC, and enables the user 
to download measuring files directly from the device to the PC without installing any 
other software. Additionally, the device will also be charged in this mode. 
 

Measure


The measure mode should be chosen when the device is used in conjunction with 
“GlossTools” or any other software. Additionally the device will also be charged in 
this mode. 


Summary of Contents for ZGM 1130

Page 1: ...ZGM 1130 Glossmeter Instruction Manual...

Page 2: ......

Page 3: ...ring Button 10 4 3 Power Supply 10 4 4 Automatic System Check 10 4 5 Connectivity 11 4 6 Measuring Display 12 4 7 Quick Menu 12 4 8 Menu Structure 13 4 8 1 Archive 14 4 8 2 Calibrate 15 4 8 3 Menu 16...

Page 4: ...Page 2 8 Maintenance and Cleaning 25 8 1 Cleaning of the device 25 8 2 Cleaning of the standard 25 9 Technical Specification 26 Glossary 27...

Page 5: ...duct development All changes resulting from technical progress modified construction or similar are reserved without obligation for Proceq SA to update Some of the images shown in this instruction man...

Page 6: ...atistical values Definition of reference and limit values for gloss measurements with colour coded indication of pass fail information Automatic calculation of the geometry reflection haze H in accord...

Page 7: ...t of all gloss ranges from matt to high gloss up to 2 000 GU Any other use is considered as not being in accordance with the intentions of the manufacturer The manufacturer is not liable for damages r...

Page 8: ...orm and hold the courier liable immediately in the following way When opening the parcel we had to notice that etc This superficial checking of the goods has to be done within the time limit set by th...

Page 9: ...n the delivery 1 ZGM 1130 glossmeter 1 calibration standard 1 universal battery charger 100V to 240V 50Hz to 60Hz 1 microfiber cleaning cloth 1 wrist loop 1 GlossTools software 1 USB cable 1 certifica...

Page 10: ...ions Second calibration standard Proceq SA refuses all warranty and liability claims for damages caused by usage of the ZGM 1130 in combination with non original accessories or accessories from 3rd pa...

Page 11: ...ries which includes 1 2 or also 3 angle models Therefore it is possible that some pictures or functional descriptions e g selection of measuring geometry may differ from your model 1 Touch Display 2 U...

Page 12: ...e USB port Either a standard PC USB port or a high power USB charger like included in the delivery of the ZGM 1130 can be used However special attention should be payed to the USB cable since fast cha...

Page 13: ...ver USB but no data connection will be established This mode is used when further measurements should be taken with the device but the battery is critically low A battery charging symbol will be displ...

Page 14: ...Simple view shows less but gives a better readability Simple View Detailed View The status bar in the upper part of the display provides information about the battery condition the measurement mode na...

Page 15: ...brate Calib value Basic Simple Detailed Menu 20 60 85 H Language Standard Sequence Scan Delete last measurement Mode Delete Right hand Left hand Orientation higher limit lower limit View Pass Fail Ang...

Page 16: ...racter and or to select add or delete a character Please consider that only capital ASCII characters and numbers are available Confirm the new filename with or discard it with Open File This menu item...

Page 17: ...t a calibration standard The current calibration values are shown on the entry window of a calibration These can be changed within the setup menu e g for calibration on a second standard When pressing...

Page 18: ...tailed statistic information or to a Detailed View which shows more detailed statistic information but in a smaller font Simple View Detailed View x Shows the average value of all measurements taken w...

Page 19: ...defined for each supported angle individually If the measured value is below or above of these values the measured value will be marked with a or Angles Each supported angle can be turned on or off se...

Page 20: ...ch is chosen the device will turn off after holding the measuring button pressed for 3 seconds The interval time can be set in the corresponding menu Units The measured values except Haze can be displ...

Page 21: ...s are taken and the statistic values are reset when the mode has been changed or the same mode has been chosen again In Sequence mode the number of single measurements which should be made and lead to...

Page 22: ...Page 20 4 8 5 Reset To reset the device press the reset button through the hole at the bottom of the device with a paper clip or something similar...

Page 23: ...lectance like mirrors or metallic specimens 5 1 Calibrating Before a series of measurements is being started the device should be calibrated In order to do a calibration follow the steps below Clean t...

Page 24: ...the steps below Create or select a measurement file in the archive menu see chapter 4 8 1 Archive on page 14 Chose a measurement mode in the quick menu see chapter 4 8 4 Modes on page 19 Chose the app...

Page 25: ...of a single measurement 20 Measurement value of the 20 angle in GU or 60 Measurement value of the 60 angle in GU or 85 Measurement value of the 85 angle in GU or H Measurement value of reflection haz...

Page 26: ...hey do not apply at all for other surfaces such as foils metals textiles and paper According to the standard ISO 2813 and ASTM D523 the correct measuring geometry should be determined by a pre measure...

Page 27: ...the aluminium housing a proper soft wet cloth can be used Do not use aggressive cleaning agents If the device has to be disinfected do not use disinfectants that contain sodium hydroxide 8 2 Cleaning...

Page 28: ...0 GU Measuring area or LxW 9 8 mm 0 39 15 5 x 8 4 mm 0 61 x 0 33 44 x 4 7 mm 1 73 x 0 19 Measuring period per geometry 0 15 s Repeatability 0 199 9 GU 0 1 GU 200 2 000 GU 0 2 Reproducibility 0 199 9 G...

Page 29: ...6 Download 11 E Exclusion of liability 3 F Features 4 I Interval 18 L Language 18 M Maintenance and Care Cleaning of standard 25 Maintenance and cleaning Cleaning of device 25 Maintenance and Cleaning...

Page 30: ...ty notes 5 Scan mode 19 Sequence mode 19 Setup 18 Shipment 6 Simple View 16 Standard delivery 7 Standard mode 19 Switch off 16 T Technical Specification 26 Transportation Damages 6 U Units 18 V View 1...

Page 31: ......

Page 32: ...Subject to change Copyright 2017 by Proceq SA Schwerzenbach All rights reserved www proceq com Version 1 8 dated 31 01 2017...

Reviews: