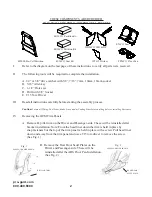
A. Prep. seat belt assemblies at this point by removing the plastic “Sheath” around
base of each set of belts, and by removing the brass washer holding the center belts together
at the mounting plate.
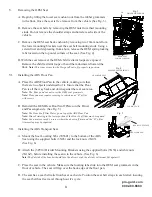
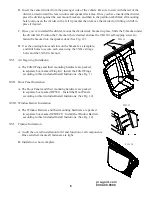
B. Insert the seat belts, mounting lugs first, through the rubber seat belt
grommets. Pass the seat belt lug through the slot in the seat belt cover
plate and install the rubber grommet into the slot of the cover plate.
Slide the cover plate/grommet assembly up the belt towards the buckles.
(See Fig. 7)
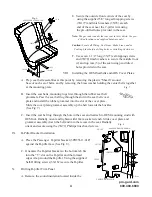
C. Insert the seat belt lug through the hole in the seat and reattach to OEM mounting stud with
OEM nut. Radially orient and tighten with 18mm socket wrench. Slide cover plate and
grommet assembly down the belt and into the recess in the seat. Radially
orient and secure using the (3X72) Phillips truss head screws.
IX.
B-Pillar Bracket Installation
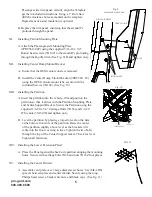
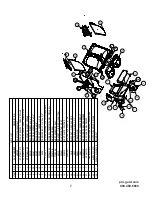
A. Place the Passenger B-pillar bracket (3PRT5611-01P)
against the B-pillar face (See Fig. 8).
C. Orientate the B-pillar bracket so the bottom tab fits
into the “T” slot on the B-pillar and the formed
edges wrap around the B-pillar. Using the supplied
Self-Drilling screws (3X162) secure the B-pillar.
X.
Drilling B-pillar Trim Panel
A. Remove the sound insulation located inside the
E. Secure the outside front corners of the seat by
using the supplied 5/8” long self-tapping screws
(3X177) and finish washers (3X78) at each
end of the seat near the C-pillar trim using
the pre-drilled holes provided in the seat.
Note:
The gas tank is under the rear seat in this vehicle. Use pre-
drilled locations and supplied hardware only!
Caution:
Locate all Wiring, Fuel Lines, Brake Lines, and/or
Cooling, Lines before drilling holes or installing Fasterners
.
F. Use seven 1-1/2” long (3X77) self-tapping screws
and (3X78) finish washers to secure the middle front
(2) and top rear (5) of the seat using pre-drilled
holes provided in the seat.
VIII. Installing the OEM Seatbelts and ABS Cover Plates.
pro-gard.com
800.480.6680
4
VEHICLE B-PILLAR
Fig. 6
PASSENGER SIDE SHOWN
3P214
3X36
3S5601
3X16Z
3X36
3X36
3X162
3PRT5611-01D
3X162
3X162
3X162
3X162
T-Slot
Fig. 8
PASSENGER SIDE SHOWN
Fig. 7


