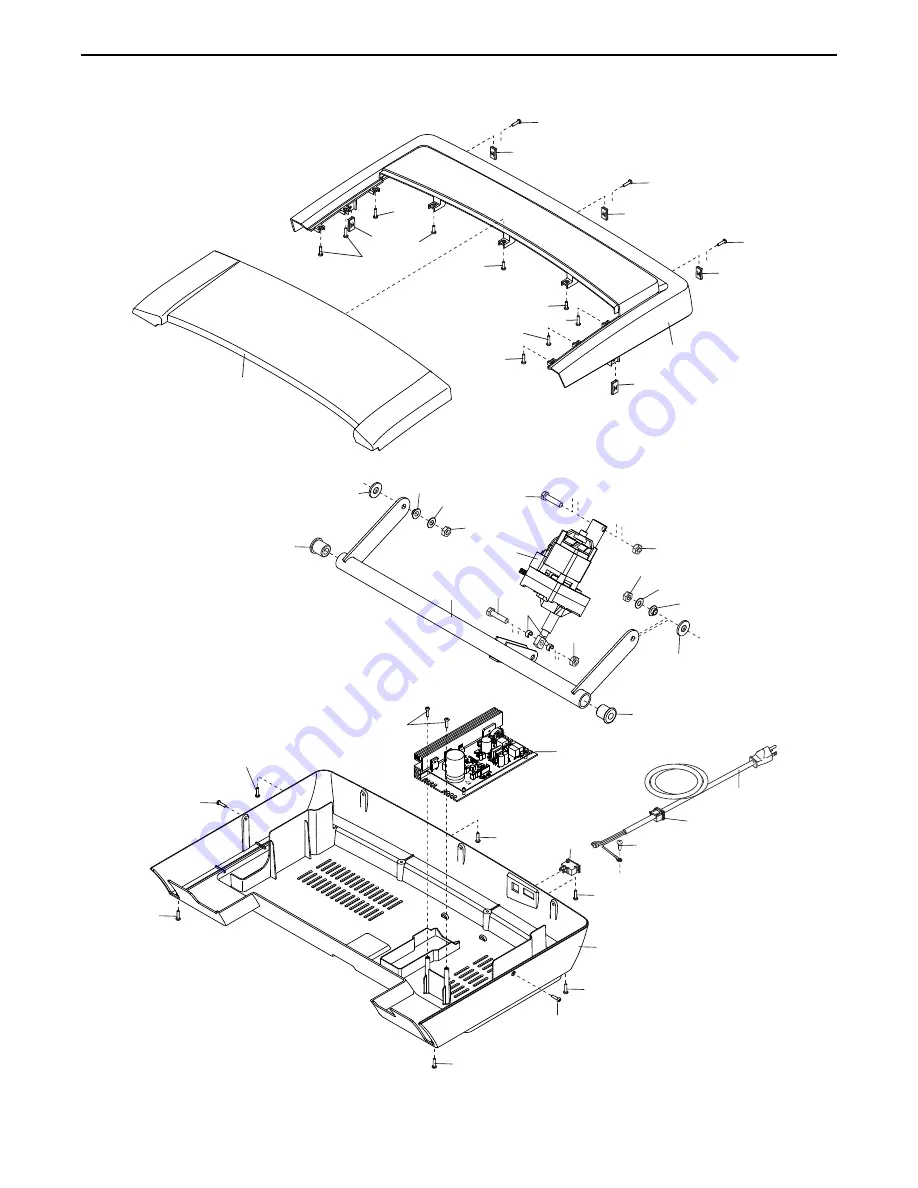
33
66
65
68
38
69
67
71
22
72
73
4
77
27
75
74
76
21
70
5
37
EXPLODED DRAWING B
Model No. PFTL59721.0 R0820A
Page 1: ...nty today go to my proform com For service at any time go to support proform com Or call 1 888 533 1333 Mon Fri 6 a m 6 p m MT Sat 8 a m 12 p m MT Please do not contact the store ACTIVATE YOUR WARRANT...
Page 2: ...the telephone number on the front cover of this manual and request a free replace ment decal Apply the decal in the location shown Note The decals may not be shown at actual size WARNING DECAL PLACEME...
Page 3: ...com mended for both men and women Always wear athletic shoes Never use the treadmill with bare feet wearing only stockings or in sandals 13 Plug the power cord into a surge sup pressor not included an...
Page 4: ...roperly assembled See ASSEMBLY on page 8 and HOW TO FOLD AND MOVE THE TREADMILL on page 26 You must be able to safely lift 45 lbs 20 kg to move the treadmill 25 When folding or moving the treadmill ma...
Page 5: ...5 all STANDARD SERVICE PLANS...
Page 6: ...r of this manual To help us assist you note the product model number and serial number before contacting us The model number and the location of the serial number decal are shown on the front cover of...
Page 7: ...r following the key number is the quantity used for assembly Note If a part is not in the hardware kit check to see whether it is preattached Extra parts may be included 1 4 x 4 1 2 Screw 8 2 10 x 3 4...
Page 8: ...ft cloth and a mild non abrasive cleaner Left parts are marked L or Left and right parts are marked R or Right To identify small parts see page 7 Assembly requires the following tools the included hex...
Page 9: ...f the Upright Wire 88 Then insert the Upright Wire into the lower end of the Right Upright and pull the upper end of the wire tie until the Wire Harness is routed through the Right Upright 86 88 A 3 L...
Page 10: ...fully tighten the Screws yet Then partially tighten a 3 8 x 1 1 4 Screw 1 and a 3 8 x 1 3 4 Screw 2 with 3 8 Star Washers 11 into the bottom of the Right Upright 86 do not fully tighten the Screws yet...
Page 11: ...side of the Right Upright Attach the Left Handrail 80 to the Left Upright 85 in the same way Note There are no wires on the left side Then remove and discard the indicated screws E 7 7 Set the console...
Page 12: ...not turn one connector and try again Then remove any wire ties A from the Upright Wire 88 9 Set the console assembly F on the Right and Left Handrails 81 80 do not pinch any wires Attach the console...
Page 13: ...ail Cover 79 Set the Right Handrail Cover on the Right Handrail 81 and slide the Right Handrail Cover forward until it rests against the console assembly F Next hold the Right Bottom Handrail Cover on...
Page 14: ...Screws 3 the two 3 8 x 1 1 4 Screws 1 and the two 3 8 x 1 3 4 Screws 2 Next set the Left Inner Base Cover 95 onto the lower end of the Left Upright 85 Then slide the Left Base Cover 93 downward and pr...
Page 15: ...the walking belt see page 28 Note Extra hardware may be included 14 IMPORTANT You must activate your Console 105 to begin using its exclusive features First plug in the power cord see page 16 and tur...
Page 16: ...d B into a surge suppressor A and plug the surge suppressor into an appropri ate outlet D that is properly installed and grounded in accordance with all local codes and ordinances The outlet must be o...
Page 17: ...et to the console and use an iFit app to record and track your workout information You can even listen to your favorite workout music or audio books with the console s sound system while you exercise...
Page 18: ...tart the walking belt press the Start button or one of the Quick Speed buttons If you press the Start button the walking belt will begin to move at 1 mph As you exercise change the speed of the walkin...
Page 19: ...the scan indicator and the word SCAN will turn off You can also customize the scan mode to display only the desired workout information in the repeating cycle To customize the scan mode first press th...
Page 20: ...the speed and or in cline setting for the next segment will flash in the display to alert you if the setting is about to change The treadmill will then automatically adjust to the speed and incline se...
Page 21: ...n the iFit app touch the buttons at the bottom of the screen to select either the main menu Home button or the workout library Browse button To select a workout from the main menu or the workout libra...
Page 22: ...including any smart devices heart rate monitors and so forth will be disconnected 7 When you are finished exercising remove the key from the console See step 6 on page 19 HOW TO CONNECT A HEART RATE...
Page 23: ...is calibrated NOTE The treadmill may occasionally calibrate the incline automatically when the power is turned on Unit of Measurement The currently selected unit of measurement will appear in the disp...
Page 24: ...see your local electronics store Next press the play button on your personal audio player Adjust the volume level using the volume increase and decrease buttons on the console or the volume control o...
Page 25: ...and on try to correct the interference by one or more of the following measures Reorient or relocate the receiving antenna Increase the separation between the equipment and the receiver Connect the e...
Page 26: ...re moving the treadmill fold it as described at the left CAUTION Make sure that the latch plate is resting against the latch pin Moving the treadmill may require two people 1 Hold the frame A and one...
Page 27: ...an AFCI equipped outlet and your circuit breaker trips repeatedly when the tread mill is used see the front cover of this manual to purchase an arc filter b After the power cord has been plugged in ma...
Page 28: ...suspect that the walking belt needs more lubricant see the front cover of this manual d If the walking belt still slows when walked on see the front cover of this manual SYMPTOM The walking belt is o...
Page 29: ...ystem you must perform aerobic exercise which is activity that requires large amounts of oxygen for prolonged periods of time For aerobic exercise adjust the intensity of your exercise until your hear...
Page 30: ...4 Platform Cushion 43 4 Cushion Bottom 44 1 Left Foot Rail 45 1 Right Foot Rail 46 1 Warning Decal 47 1 Walking Platform 48 1 Latch Plate 49 1 Walking Belt 50 2 Belt Guide 51 4 Rubber Cushion 52 2 3 8...
Page 31: ...03 2 Console Clamp 104 1 Key Clip 105 1 Console 106 2 Console Cable Tie 107 2 Wheel 108 2 9 32 Plastic Bushing User s Manual Note Specifications are subject to change without notice For information ab...
Page 32: ...46 47 20 34 5 48 50 25 34 53 20 39 51 52 26 18 40 28 27 30 54 55 27 18 27 14 26 36 52 34 51 32 39 56 50 25 42 23 35 41 35 29 57 58 59 43 42 31 16 34 20 20 34 20 29 32 44 17 49 42 43 42 26 17 17 45 32...
Page 33: ...33 66 65 68 38 33 69 67 71 22 72 38 38 33 69 67 38 68 73 4 4 4 4 4 4 4 77 4 27 75 74 76 21 70 4 5 5 4 4 5 4 4 4 37 37 4 37 37 37 4 4 EXPLODED DRAWING B Model No PFTL59721 0 R0820A...
Page 34: ...10 10 10 24 10 24 8 12 7 12 4 4 85 78 87 79 80 82 4 4 84 3 11 11 15 69 96 95 38 97 96 91 90 94 13 89 88 11 90 91 92 19 19 2 69 15 2 11 89 3 11 11 1 9 3 11 107 107 13 38 93 1 88 86 EXPLODED DRAWING C...
Page 35: ...35 103 4 4 103 4 101 27 99 98 5 5 106 4 4 4 4 4 4 4 104 102 100 105 4 5 5 5 5 5 4 4 4 4 4 5 EXPLODED DRAWING D Model No PFTL59721 0 R0820A...
Page 36: ...lay model 2 if the product is purchased or transported outside the USA 3 if all instructions and warnings in this manual are not followed 4 if the product is abused or improperly or abnormally used or...