background image

6

3. After you have 

activated the desired
massage zones, press
the Int or Ð
buttons to adjust the
intensity of the vibrat-
ing massage action. 

Note: If no buttons on the hand control are pressed
for twenty minutes, the vibrating massage action
will stop.

To restart the massage action, follow steps

1 through 3 above.

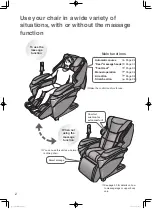
HOW TO USE THE AUTOMATIC MODES (FULL
BODY WAVE, FULL BODY PULSE, AND UPPER
BODY WAVE)

1. Press the Mode 

button repeatedly to
select the desired
mode. A mode indi-
cator will light to show
which mode is 
selected. When Full
Body Wave is select-
ed, the upper body,
lower body, and thigh
zones will be activated
in sequence, 
producing a wave-like massage motion. When Full
Body Pulse is selected, the upper body, lower
body, and thigh zones will be activated together
with a pulsing motion. The Upper Body Wave is
similar to the Full Body Wave, but only the upper
body and lower body zones will be activated. 

2. After you have selected the desired mode, press

the Speed and Intensity buttons to adjust the speed
and intensity of the vibrating massage action (see
the drawing at the top of this page). 

Note: If no buttons on the hand control are pressed
for twenty minutes, the vibrating massage action
will stop.

To restart the massage action, follow steps

1 and 2 above.

HOW TO ACTIVATE THE BUILT-IN HEATER

Whether the Manual mode
or one of the automatic
modes is selected, you can
add soothing heat to your
massage, if desired. To turn
on the heater, press the
Heater button. The Heater
indicator will light. Press the button again when you
want to turn off the heater. Note: When the heater is
on, the maximum intensity setting of the vibrating 
massage action will be lower. Therefore, the intensity
may decrease slightly when the heater is turned on.

Note: If no buttons on the hand control are pressed
for twenty minutes, the heater will turn off. 

To turn

on the heater, follow the instructions above.

HOW TO TURN OFF THE POWER

To turn off the power, slide the power switch to the
ÒoffÓ position. The power indicator will darken. 

HAND CONTROL TROUBLE-SHOOTING

If the hand control does not function properly, make
sure that the transformer on the power cord is plugged
into a 120-volt outlet. In addition, make sure that the
hand control is properly connected to the massage
pad (see assembly step 2 on page 4).

PART LISTÑModel No. PFRX30070                              

R0597A

Key No.

Qty.

Description

1

4

5/16Ó x 2Ó Carriage Bolt

2

2

Arm Cap

3

2

5/16Ó x 3 3/4Ó Bolt

4

4

5/16Ó Washer

5

4

5/16Ó Nylon Locknut

6

4

Frame Cap

7

4

Pivot Cover

8

2

Armrest

9

2

Arm

10

1

Seat Frame

11

4

1/4Ó x 1 3/4Ó Screw

12

1

Massage Pad 

Key No.

Qty.

Description

13

1

Headrest

14

1

Hand Control

15

1

Back Frame

16

1

Power Cord w/Transformer

17

1

Sling

18

4

1/4Ó Washer

19

2

5/16Ó Nylon Jam Nut

20

2

Plastic Bracket

21

1

Lower Frame

22

4

#8 x 3/4Ó Screw

#

1

UserÕs Manual (not illustrated)

Summary of Contents for Restoration PFRX30070

Page 1: ...YS PLEASE CALL DIRECT TO OUR TOLL FREE CUSTOMER HOT LINE The trained techni cians on our customer hot line will provide immediate assis tance free of charge to you CUSTOMER HOT LINE 1 800 999 3756 Mon ÐFri 6 a m Ð6 p m MST Model No PFRX30070 Serial No Write the serial number in the space above for reference Patent Pending CAUTION Read all precautions and instruc tions in this manual before using t...

Page 2: ...your benefit read this manual carefully before using the RESTORATION If you have additional questions call our Customer Service Department toll free at 1 800 999 3756 Monday through Friday 6 a m until 6 p m Mountain Time excluding holidays To help us assist you please note the product model number and serial number before calling The model number is PFRX30070 The serial number can be found on a de...

Page 3: ...massage chair if it is not working properly if it is damaged or if the power cord or plug is damaged If any of these conditions exists call the toll free telephone number on the front of this manual 10 Keep the power cord away from heated surfaces 11 Use the massage chair indoors Never use the massage chair outdoors 12 The massage chair is intended for home use only Do not use the massage chair in...

Page 4: ...ach one of the Arms 9 to the Seat Frame 10 with two 5 16Ó x 2Ó Carriage Bolts 1 two 5 16Ó Washers 4 and two 5 16Ó Nylon Locknuts 5 as shown Attach the other Arm 9 to the Seat Frame 10 in the same manner 2 Connect the wire harness on the Hand Control 14 to the wire harness on the Massage Pad 12 Refer to the inset drawing Make sure that the indicated latch on the wire harness is engaged If the wire ...

Page 5: ... SwitchÑThis switch turns the power on and off C Mode IndicatorsÑThese indicators show which mode is selected D Upper Back Lower Back and Thigh ButtonsÑ When the Manual mode is selected these buttons activate the three massage zones E Heater ButtonÑThis button turns the built in heater on and off ...

Page 6: ...ther the Manual mode or one of the automatic modes is selected you can add soothing heat to your massage if desired To turn on the heater press the Heater button The Heater indicator will light Press the button again when you want to turn off the heater Note When the heater is on the maximum intensity setting of the vibrating massage action will be lower Therefore the intensity may decrease slight...

Page 7: ...1 2 3 3 5 4 5 4 6 6 6 19 8 7 7 9 10 15 11 7 17 18 2 1 8 9 11 18 6 19 13 EXPLODED DRAWINGÑModel No PFRX30070 R0597A Specifications are subject to change without notice See the back cover to order replacement parts Not shown to scale ...

Page 8: ...y sufficient proof of purchase All returns must be pre authorized by ICON This warranty does not extend to any product or damage to a product caused by or attributable to freight damage abuse misuse improper or abnormal usage or repairs not provided by an ICON authorized service center products used for commercial or rental pur poses or products used as store display models No other warranty beyon...

Reviews: