background image

Part No. 345363 R0313A 

Printed in China © 2013 ICON IP, Inc.

To order replacement parts, please see the front cover of this manual. To help us assist you, be prepared to 
provide the following information when contacting us:

••  the model number and serial number of the product (see the front cover of this manual)

••  the name of the product (see the front cover of this manual)

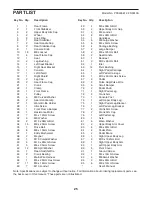
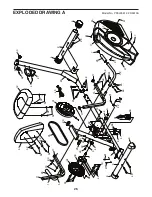
••   the key number and description of the replacement part(s) (see the PART LIST and the EXPLODED 

DRAWING near the end of this manual)

ORDERING REPLACEMENT PARTS

ICON Health & Fitness, Inc. (ICON) warrants this product to be free from defects in workmanship and 
material, under normal use and service conditions. The frame is warranted for 

 ve (5) years from the date 

of purchase. Parts and labor are warranted for ninety (90) days from the date of purchase.

This warranty extends only to the original purchaser (customer). ICON’’s obligation under this warranty is 
limited to repairing or replacing, at ICON’’s option, the product through one of its authorized service centers. 
All repairs for which warranty claims are made must be preauthorized by ICON. If the product is shipped 
to a service center, freight charges to and from the service center will be the customer’’s responsibility. If 
replacement parts are shipped while the product is under warranty, the customer will be responsible for a 
minimal handling charge. For in-home service, the customer will be responsible for a minimal trip charge. 
This warranty does not extend to freight damage to the product. This warranty will automatically be voided 
if the product is used as a store display model, if the product is purchased or transported outside the USA, 
if all instructions in this manual are not followed, if the product is abused or improperly or abnormally used, 
or if the product is used for commercial or rental purposes. No other warranty beyond that speci

 cally set 

forth above is authorized by ICON.

ICON is not responsible or liable for indirect, special, or consequential damages arising out of or in con-
nection with the use or performance of the product; damages with respect to any economic loss, loss of 
property, loss of revenues or pro

 ts, loss of enjoyment or use, or costs of removal or installation; or other 

consequential damages of any kind. Some states do not allow the exclusion or limitation of incidental or 
consequential damages. Accordingly, the above limitation may not apply to the customer.

The warranty extended hereunder is in lieu of any and all other warranties, and any implied warranties of 
merchantability or 

 tness for a particular purpose are limited in their scope and duration to the terms set 

forth herein. Some states do not allow limitations on how long an implied warranty lasts. Accordingly, the 
above limitation may not apply to the customer.

This warranty provides speci

 c legal rights; the customer may have other rights that vary from state to state.

ICON Health & Fitness, Inc., 1500 S. 1000 W., Logan, UT 84321-9813

LIMITED WARRANTY

IMPORTANT: To protect your fitness equipment with an extended service plan, see page 4.

Summary of Contents for Hybrid Trainer PFEL03812.2

Page 1: ...in the space above for reference USER S MANUAL www proform com Serial Number Decal under frame To register your product and activate your warranty today go to www proformservice com registration For...

Page 2: ...OTING 22 EXERCISE GUIDELINES 24 PART LIST 25 EXPLODED DRAWING 26 ORDERING REPLACEMENT PARTS Back Cover LIMITED WARRANTY Back Cover This drawing shows the location s of the warning decal s If a decal i...

Page 3: ...pet from damage place a mat under the hybrid trainer 7 Inspect and properly tighten all parts regu larly Replace any worn parts immediately 8 Keep children under age 12 and pets away from the hybrid t...

Page 4: ...4 all STANDARD SERVICE PLANS...

Page 5: ...lease see the front cover of this manual To help us assist you note the product model number and serial number before contacting us The model number and the location of the serial number decal are sho...

Page 6: ...x 20mm Screw 34 4 M4 x 16mm Screw 47 8 M6 x 30mm Bolt 49 4 M8 x 13mm Screw 95 6 PART IDENTIFICATION CHART Use the drawings below to identify the small parts needed for assembly The number in parenthe...

Page 7: ...LY 2 With the help of a second person place some of the packing materials not shown under the Rear Frame 1 Have the second person hold the Rear Frame to prevent it from tipping while you complete this...

Page 8: ...ess 45 in the Rear Frame 1 Then pull the upper end of the wire tie until the Main Wire Harness is routed through the Front Frame 23 45 1 Wire Tie 3 3 Orient the Front Stabilizer 2 so that the large ho...

Page 9: ...ke sure that the Locknuts are in the hex agonal holes Do not tighten the Bolts yet See steps 2 and 3 Make sure that the ends of the Rear Stabilizer 6 and the Front Stabilizer 2 are touching the floor...

Page 10: ...the Main Wire Harness 45 8 8 Identify the Left Upper Body Leg 74 and the Right Upper Body Leg 86 Using a plastic bag to keep your fingers clean apply a generous amount of the included grease to each...

Page 11: ...al Leg 71 with an M4 x 16mm Screw 47 Repeat this step with the Left Pedal Carriage 65 the Left Pedal Leg 79 and the other Small Bumper not shown 69 67 65 71 79 64 47 70 10 10 Apply a generous amount o...

Page 12: ...er 71 75 95 42 64 12 12 Have a second person hold the Handlebar 53 near the Console Post 73 Insert the indicated wire tie into the hole in the side of the Console Post 73 and then pull the wire tie un...

Page 13: ...he battery cover from the back of the Console 16 and insert batteries into the battery compartment Make sure to orient the bat teries as shown by the diagram inside the battery compartment Then reatta...

Page 14: ...e it upward onto the Right Upper Body Arm 88 Attach the Right Upper Body Arm 88 to the Right Upper Body Leg 86 with three M8 x 40mm Bolts 83 and three M8 Locknuts 10 make sure that the Locknuts are in...

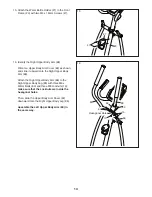
Page 15: ...ndle not shown in the same way 59 15 49 25 51 19 Make sure that all parts of the hybrid trainer are properly tightened Note Extra parts may be included To protect the floor or carpet from damage place...

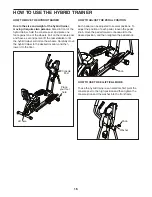
Page 16: ...refully move the hybrid trainer to the desired location and then lower it to the floor HOW TO ADJUST THE PEDAL POSITION Each pedal can be adjusted to several positions To adjust the position of each p...

Page 17: ...the opposite direction To dismount the hybrid trainer wait until the pedals come to a complete stop Note The hybrid trainer does not have a free wheel the pedals will con tinue to move until the flywh...

Page 18: ...Reset button or begin pedaling The entire display will turn on for a moment the console will then be ready for use 2 Select the manual mode When you turn on the console the manual mode will be selecte...

Page 19: ...d SCAN To reset the display press the On Reset button To pause the console stop pedaling When the console is paused the time will flash in the display To continue your workout simply resume pedaling 5...

Page 20: ...is too high or too low you can manually override the setting by pressing the Resistance buttons IMPORTANT When the current segment of the workout ends the pedals will automatically adjust to the resi...

Page 21: ...ence will not occur in a particular installation If this equipment does cause harmful interference to radio or television reception which can be determined by turning the equipment off and on the user...

Page 22: ...eed switch should be adjusted To adjust the reed switch see EXPLODED DRAWING A on page 26 Remove the M4 x 16mm Screws 47 and the M4 x 25mm Screws 41 from the Left and Right Shields 17 18 Make sure to...

Page 23: ...47 and the M4 x 25mm Screws 41 from the Left and Right Shields 17 18 Make sure to note which size of Screw you remove from each hole Then gently move the Left Shield out of the way Note For clarity t...

Page 24: ...c Exercise If your goal is to strengthen your cardiovascular system you must perform aerobic exercise which is activity that requires large amounts of oxygen for prolonged periods of time For aerobic...

Page 25: ...4 M6 Locknut 52 8 M6 x 38mm Bolt 53 1 Handlebar 54 6 M8 Large Washer 55 8 M4 x 5mm Screw 56 4 Carriage Bushing 57 2 Large Bumper 58 2 M8 x 125mm Bolt 59 2 Seat Handle 60 1 Backrest 61 3 M10 x 60mm Bo...

Page 26: ...24 21 28 30 32 32 22 29 46 34 38 38 35 37 40 43 91 45 44 44 47 47 62 61 48 40 2 69 66 92 31 47 47 41 41 17 18 41 41 41 10 11 11 26 14 93 59 32 32 52 52 60 31 4 4 52 32 12 52 10 47 42 8 7 11 11 15 25 5...

Page 27: ...56 55 55 63 63 63 47 47 71 69 69 63 68 64 70 73 80 81 67 81 88 85 82 83 83 10 90 54 34 10 39 9 87 68 86 19 84 90 95 42 63 63 81 72 72 76 79 67 74 65 89 82 3 50 78 77 75 54 34 81 90 54 34 57 31 13 13...

Page 28: ...mal trip charge This warranty does not extend to freight damage to the product This warranty will automatically be voided if the product is used as a store display model if the product is purchased or...

Reviews: