background image

4. SYMPTOM: THE WALKING BELT SLOWS WHEN WALKED ON

a. Use only a CUL-listed surge protector, rated at 15 amps, with a 14-gauge cord of five feet or less in length. 

b. If the walking belt is overtightened, treadmill performance may

decrease and the walking belt may be permanently damaged.
Remove the key and 

UNPLUG THE POWER CORD

. Using the

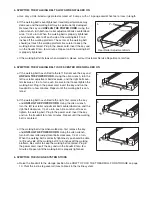
allen wrench, turn both rear roller adjustment bolts counterclock-
wise, 1/4 of a turn. When the walking belt is properly tightened,
you should be able to lift each side of the walking belt 2 to 3
inches off the walking platform. The center of the walking belt
should just touch the walking platform. Be careful to keep the
walking belt centered. Plug in the power cord, insert the key and
run the treadmill for a few minutes. Repeat until the walking belt
is properly tightened.

c. If the walking belt still slows when walked on, please call our Customer Service Department, toll-free.

5. SYMPTOM: THE WALKING BELT IS OFF-CENTER WHEN WALKED ON

a. If the walking belt has shifted to the left, first remove the key and

UNPLUG THE POWER CORD

. Using the allen wrench, turn the

left rear roller adjustment bolt clockwise, and the right bolt coun-
terclockwise, 1/4 of a turn each. Be careful not to overtighten the
walking belt. Plug in the power cord, insert the key and run the
treadmill for a few minutes. Repeat until the walking belt is cen-
tered. 

b. If the walking belt has shifted to the right, first remove the key

and 

UNPLUG THE POWER CORD

. Using the allen wrench,

turn the left rear roller adjustment bolt counterclockwise, and the
right bolt clockwise, 1/4 of a turn each. Be careful not to over-
tighten the walking belt. Plug in the power cord, insert the key
and run the treadmill for a few minutes. Repeat until the walking
belt is centered.

c. If the walking belt slips when walked on, first remove the key

and 

UNPLUG THE POWER CORD

. Using the allen wrench,

turn both rear roller adjustment bolts clockwise, 1/4 of a turn.
When the walking belt is correctly tightened, you should be able
to lift each side of the walking belt 2 to 3 inches off the walking
platform. Be careful to keep the walking belt centered. Plug in
the power cord, insert the key and run the treadmill for a few
minutes. Repeat until the walking belt is properly tightened.

6. SYMPTOM: THE INCLINE SYSTEM STICKS

a. Raise the treadmill to the storage position. See HOW TO FOLD THE TREADMILL FOR STORAGE on page

10. Pivot the incline leg several times to break in the incline system.

b

c

a

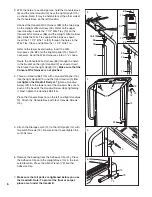
Rear Roller Adjustment Bolts

2”–3”

b

Summary of Contents for Freespirit 814

Page 1: ...QUESTIONS As a manufacturer we are com mitted to providing complete customer satisfaction If you have questions or find that there are missing or damaged parts we will guarantee you complete satisfact...

Page 2: ...The treadmill should be used only by persons weighing 250 pounds or less 8 Never allow more than one person on the treadmill at a time 9 Wear appropriate exercise clothing when using the treadmill Do...

Page 3: ...ning 22 Always unplug the power cord before per forming the maintenance and adjustment procedures described in this manual Never remove the motor hood unless instructed to do so by an authorized servi...

Page 4: ...6 4266 Monday through Friday 9 a m until 5 p m Eastern Standard Time excluding holi days To help us assist you please note the product model number and serial number before calling The model number of...

Page 5: ...xtension Leg Screw while tightening it Attach the other Extension Leg 41 as described above With the help of a second person carefully raise the treadmill to the upright position so the Extension Legs...

Page 6: ...ket into the right Upright 14 Make sure that the Console Wire Harness is not pinched 4 Thread a Handrail Bolt 15 with a Handrail Washer 16 into the right Upright 14 and the right Handrail 2 Do not tig...

Page 7: ...rly installed and grounded in accordance with all local codes and ordinances This product is for use on a nominal 120 volt circuit and has a grounding plug that looks like the plug illus trated in dra...

Page 8: ...s not included Alkaline batteries are recommended To install batteries open the battery cover under the console as shown below Press three batteries into the battery com partment Make sure that the ne...

Page 9: ...play will change from one number to the other Arrows in the display will indicate which number is currently shown The displays can be reset if desired by pressing the ON RESET button When you are fini...

Page 10: ...ct the floor or carpet from damage place a mat under the treadmill Keep the treadmill out of direct sunlight Do not leave the treadmill in the stor age position in temperatures above 85 Fahrenheit HOW...

Page 11: ...r left thumb press the storage latch and hold it Pivot the treadmill until the frame and foot rail are past the storage latch 2 Hold the treadmill firmly with both hands and lower the treadmill to the...

Page 12: ...and then press the switch back in 2 SYMPTOM THE POWER TURNS OFF DURING USE a Check the circuit breaker located on the treadmill frame near the power cord see 1 c above If the circuit breaker has trip...

Page 13: ...t bolt coun terclockwise 1 4 of a turn each Be careful not to overtighten the walking belt Plug in the power cord insert the key and run the treadmill for a few minutes Repeat until the walking belt i...

Page 14: ...Exercise If your goal is to strengthen your cardiovascular sys tem your exercise must be aerobic Aerobic exercise is activity that requires large amounts of oxygen for prolonged periods of time This i...

Page 15: ...es as far as possible Hold for 15 counts then relax Repeat 3 times Stretches Hamstrings back of knees and back 2 Hamstring Stretch Sit with one leg extended Bring the sole of the opposite foot toward...

Page 16: ...REMOVE THIS EXPLODED DRAWING AND PART LIST FROM THE MANUAL Save this EXPLODED DRAWING and PART LIST for future reference Note Specifications are subject to change without notice For information about...

Page 17: ...Power Cord Grommet 44 1 Power Cord 45 2 Upright Spacer 46 4 Isolator 47 14 Belly Pan Screw 48 1 Choke Key No Qty Description 49 1 Motor Locknut 50 2 Belt Guide 51 1 Belly Pan 52 1 Releasable Tie 53 1...

Page 18: ...28 35 35 13 30 29 3 2 32 33 35 34 30 37 38 39 36 30 36 91 30 36 54 30 30 30 40 56 35 53 52 46 35 50 48 35 47 46 45 34 41 42 43 44 47 51 47 79 80 58 59 47 4 61 60 57 77 83 46 77 46 5 74 75 32 73 72 71...

Page 19: ...23 24 82 30 35 84 37 39 86 38 87 85 45 77 77 16 81 14 28 30 29 33 35 34 30 37 38 39 36 30 36 91 30 36 54 30 30 30 40 56 35 53 52 46 35 50 48 35 47 46 45 34 41 42 43 44 47 51 47 79 80 58 59 47 4 61 60...

Page 20: ...32 33 35 34 30 37 38 39 36 30 36 91 30 36 54 30 30 30 40 56 35 53 52 46 35 50 48 35 47 46 45 34 41 42 43 44 47 51 47 79 80 58 59 47 4 61 60 57 77 83 46 77 46 5 74 75 32 73 72 71 16 31 71 16 64 62 27 6...

Page 21: ...CUSTOMER RECORD Model No Serial No Retailer Name Purchase Date Retailer Address 16...

Page 22: ...ME OF THE PRODUCT PROFORM FREESPIRIT 814 treadmill The SERIAL NUMBER OF THE PRODUCT see the front cover of this manual The KEY NUMBER OF THE PART S see the EXPLODED DRAWING and PART LIST attached to t...

Page 23: ...e and duration to the terms set forth herein Some provinces do not allow limitations on how long an implied warranty lasts Accordingly the above limitation may not apply to you This warranty gives you...

Reviews: