background image

5

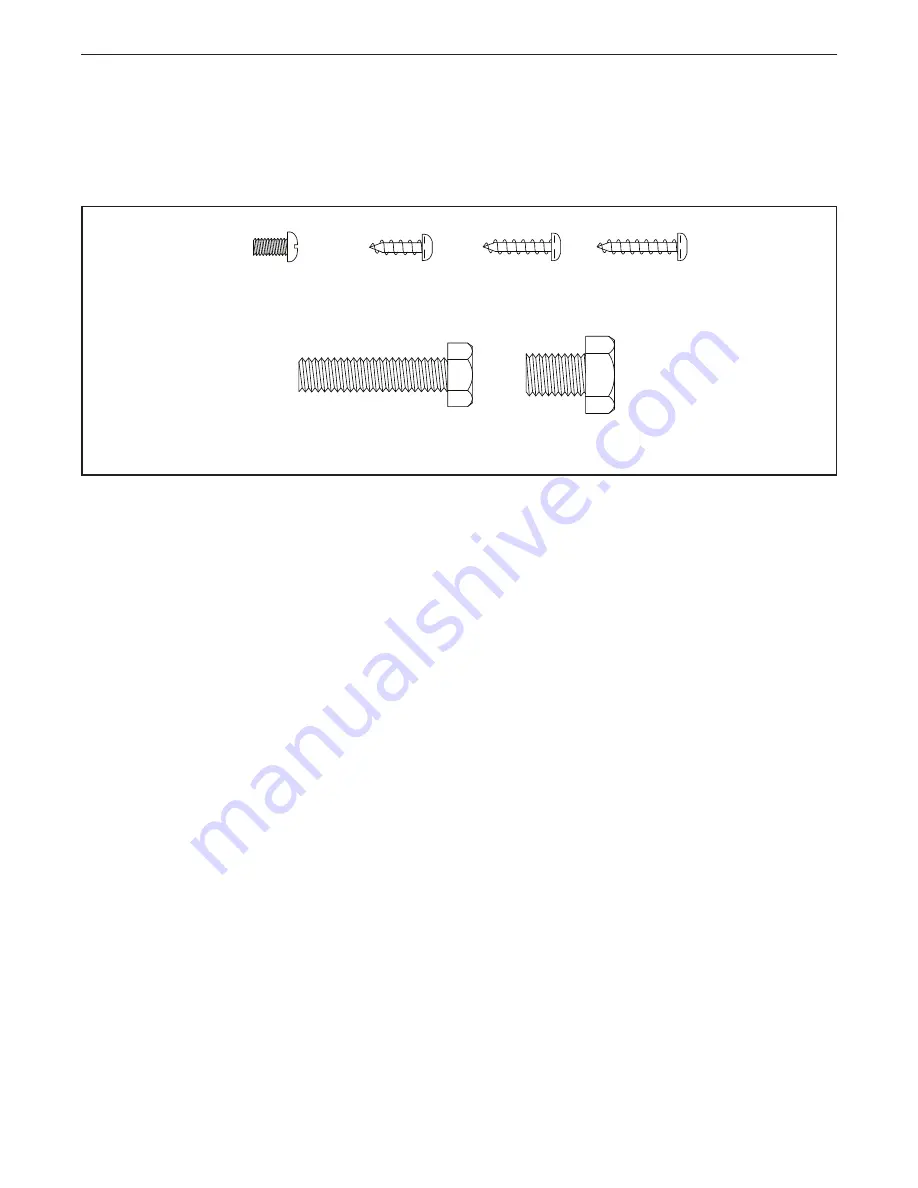
PART IDENTIFICATION CHART

Use the drawings below to identify the small parts needed for assembly. The number in parentheses below each 
drawing is the key number of the part, from the PART LIST near the end of this manual. The number following the 
key number is the quantity needed for assembly. 

Note: If a part is not in the hardware kit, check to see if it 

has been preassembled. Extra parts may be included.

M8 x 35mm Screw 

(82)–4

M10 x 14mm 

Screw (61)–2

M4 x 12mm

Screw (105)–4

M4 x 19mm

Screw (69)–2

M4 x 16mm

Screw (68)–2

M4 x 8mm 

Screw (104)–2

Summary of Contents for CARBON R10

Page 1: ...t Keep this manual for future reference CUSTOMER SERVICE UNITED KINGDOM Call 0330 123 1045 From Ireland 053 92 36102 Website iconsupport eu E mail csuk iconeurope com Write ICON Health Fitness Ltd Unit 4 Westgate Court Silkwood Park OSSETT WF5 9TT UNITED KINGDOM AUSTRALIA Call 1800 993 770 E mail australiacc iconfitness com Write ICON Health Fitness Inc PO Box 635 WINSTON HILLS NSW 2153 AUSTRALIA ...

Page 2: ...E ROWER 11 HOW TO USE THE CONSOLE 14 MAINTENANCE AND TROUBLESHOOTING 26 EXERCISE GUIDELINES 27 PART LIST 28 EXPLODED DRAWING 30 ORDERING REPLACEMENT PARTS Back Cover RECYCLING INFORMATION Back Cover PROFORM and IFIT are registered trademarks of ICON Health Fitness Inc App Store is a trademark of Apple Inc registered in the U S and other countries Android and Google Play are trademarks of Google LL...

Page 3: ... use only Do not use the rower in a commercial rental or institutional setting 6 Keep the rower indoors away from moisture and dust Do not put the rower in a garage or covered patio or near water 7 Place the rower on a level surface with a mat beneath it to protect the floor or carpet Make sure that there is at least 2 ft 0 6 m of clearance around the rower 8 Inspect and properly tighten all parts...

Page 4: ... questions after reading this manual please see the front cover of this manual To help us assist you note the product model number and serial number before contacting us The model number and the location of the serial number decal are shown on the front cover of this manual Before reading further please review the drawing below and familiarize yourself with the labeled parts Folding Clamp Rail Han...

Page 5: ...the part from the PART LIST near the end of this manual The number following the key number is the quantity needed for assembly Note If a part is not in the hardware kit check to see if it has been preassembled Extra parts may be included M8 x 35mm Screw 82 4 M10 x 14mm Screw 61 2 M4 x 12mm Screw 105 4 M4 x 19mm Screw 69 2 M4 x 16mm Screw 68 2 M4 x 8mm Screw 104 2 ...

Page 6: ...taching them With the help of a second person pull the Rail 2 outward and rotate the Stabilizer 3 downward 2 3 2 1 1 To register your product and activate your warranty in the UK go to iconsupport eu If you do not have internet access call Customer Service see the front cover of this manual To register your product and activate your warranty in Australia email or post the following information to ...

Page 7: ...e Stabilizer 3 to the Frame 1 with two M10 x 14mm Screws 61 Then hold the Rail Handle 34 pull the Rail 2 outward and rest the Rail on the floor see the drawing in step 4 61 3 4 Orient the Seat 23 as shown and slide the Seat Carriage 5 onto the Rail 2 4 23 2 2 5 34 3 1 ...

Page 8: ... connectors should slide together easily and snap into place If they do not turn one connector and try again While a second person holds the Console 75 near the Neck 76 connect the wires on the Console to the matching connectors on the Upright Wire 84 in the Neck Insert the excess wire into the Neck 76 or into the Console 75 Tip Avoid pinching the wires Attach the Console 75 to the Neck 76 with fo...

Page 9: ...the Frame 1 with four M8 x 35mm Screws 82 start all the Screws and then tighten them 7 82 77 1 84 75 Avoid pinching the wires 109 8 Loosen and remove the Knob 78 from the Upright 77 Next identify the Right and Left Upright Covers 80 81 and orient them as shown Press the Right and Left Upright Covers 80 81 together around the Upright 77 and attach them to the Upright with two M4 x 16mm Screws 68 Th...

Page 10: ...le on the front of the rower Note To plug the Power Adapter 108 into an outlet see HOW TO PLUG IN THE POWER ADAPTER on page 11 10 Make sure that all parts are properly tightened Extra parts may be included Place a mat beneath the rower to protect the floor ...

Page 11: ...slide the Foot Pad B to the desired position and then release the Footrest Bracket so that the Tab D engages a slot in the Foot Pad Then tighten the strap over your foot Adjust the other foot pad in the same way Make sure that both foot pads are in the same position HOW TO ADJUST THE CONSOLE VIEWING ANGLE To adjust the console to the desired viewing angle loosen the Knob E raise or lower the Neck ...

Page 12: ...not hold or pull on the console when moving the rower HOW TO FOLD AND STORE THE ROWER The rower can be stored in a folded position to con serve space Store the rower in a location where children cannot tip it Unplug the power adapter when storing the rower for extended periods of time To store the rower first slide the Seat J to the rear of the Rail G Next hold and lift the Frame Handle H and the ...

Page 13: ...phase is the CATCH Slide the seat forward until your knees are almost touching your chest Pull the row bar until your hands are directly above your feet 2 The second phase is the DRIVE Push backward with your legs Lean back slightly at the hips not at the waist keeping your back straight As you straighten your legs pull the row bar toward your chest Keep your elbows outward 3 The third phase is th...

Page 14: ...ch workout automatically controls the resistance of the row bar as it guides you through an effective exercise session When you use the manual mode of the console you can change the resistance of the row bar with the touch of a button While you exercise the console will display continuous exercise feedback You can even measure your heart rate using a compatible heart rate monitor You can also list...

Page 15: ...screen The console functions similarly to other tablets You can slide or flick your finger against the screen to move certain images on the screen such as the displays in a workout To type information into a text box first touch the text box to view the keyboard To use numbers or other characters on the keyboard touch 123 To view more characters touch Touch 123 again to return to the number keyboa...

Page 16: ...nsole The first time you use the console a tour presen tation will guide you through the features of the console 5 Check for firmware updates First touch the menu button three horizontal lines symbol touch Settings touch Maintenance and then touch Update The console will check for firm ware updates For more information see HOW TO CHANGE CONSOLE SETTINGS on page 23 The console is now ready for you ...

Page 17: ...t you select will determine which workout information is shown If desired adjust the volume level by pressing the volume increase and decrease buttons on the right side of the console To pause the workout simply touch the screen or stop rowing To continue the workout simply resume rowing To end the workout session touch the screen to pause the workout and then follow the prompts on the screen to e...

Page 18: ...orkout see HOW TO CREATE A DRAW YOUR OWN MAP WORKOUT on page 20 When you select a workout the screen will show an overview of the workout that includes details such as the duration and distance of the workout and the approximate number of calories you will burn during the workout 4 Start the workout Touch Start Workout to start the workout The workout will function in the same way as the manual mo...

Page 19: ...ry will appear on the screen If desired you can select options such as adding the workout to your sched ule see HOW TO USE AN IFIT WORKOUT on page 21 or adding the workout to your favorites list Then touch Save Workout to return to the home screen 5 Follow your progress See step 4 on page 17 6 Wear a compatible heart rate monitor and measure your heart rate if desired See step 5 on page 17 7 When ...

Page 20: ...liding your fingers on the screen Touch the screen to add the start point for your workout Then touch the screen to add the end point for your workout If you want to start and end your workout at the same point touch Close Loop or Out Back in the map options You can also select whether you want your workout to snap to the road If you make a mistake touch Undo in the map options The screen will dis...

Page 21: ...ear Touch the name of the desired user 4 Select an iFit workout from the home screen or the workout library Touch the buttons at the bottom of the screen to select either the home screen Home button or the workout library Browse button To select an iFit workout from the home screen or the workout library simply touch the desired work out button on the screen Slide or flick the screen to scroll upw...

Page 22: ...t library Browse button and then touch My Favorites 7 Start the workout Touch Start Workout to start the workout The workout will function in the same way as a featured workout see page 18 8 Follow your progress See step 4 on page 17 9 Wear a compatible heart rate monitor and measure your heart rate if desired See step 5 on page 17 10 When you are finished exercising the console will turn off auto...

Page 23: ...s Maintenance Wi Fi About Legal 3 Customize workout settings To customize workout settings touch In Workout and then touch the desired settings It is recom mended that you enable the option to show slider controls on the screen if available 4 Customize the unit of measurement and other settings To customize the unit of measurement the time zone or other settings touch Equipment Settings and then t...

Page 24: ...i is enabled the screen will show a list of available networks Note It may take a few moments for the list of wireless networks to appear Note You must have your own wireless network and an 802 11b g n router with SSID broadcast enabled hidden networks are not supported When a list of networks appears touch the desired network Note You will need to know your network name SSID If your network has a...

Page 25: ...d your device to the console you can simply press the Bluetooth Audio button to connect your device to the console 4 Erase the console device memory if necessary If you need to erase all the Bluetooth compatible devices saved in the console memory press and hold the Bluetooth Audio button for 10 seconds Connect Your Headphones If the console has a headphones jack you can plug your headphones into ...

Page 26: ...ed call the telephone number on the cover of this manual IMPORTANT To avoid damaging the console use only a manufacturer supplied regulated power adapter HOW TO ADJUST THE REED SWITCH If the console does not display correct feedback the reed switch should be adjusted See EXPLODED DRAWING B on page 31 Locate the Right and Left Shields 7 8 Remove the four M4 x 19mm Screws 69 and the nine M4 x 16mm S...

Page 27: ...orm aerobic exercise which is activity that requires large amounts of oxygen for prolonged periods of time For aerobic exercise adjust the intensity of your exercise until your heart rate is near the highest number in your training zone HOW TO MEASURE YOUR HEART RATE To measure your heart rate exercise for at least four minutes Then stop exercis ing and place two fingers on your wrist as shown Tak...

Page 28: ...r A 46 2 Strap Axle 47 1 Reed Switch Wire 48 1 Frame Pulley 49 1 Frame Foot 50 1 Clamp 51 1 Row Bar Rest 52 1 Frame Handle 53 1 Pivot Axle 54 3 17mm Spacer 55 4 2 3mm Spacer 56 9 M6 x 15mm Washer 57 10 M6 Locknut 58 2 M8 x 22mm Washer 59 2 M8 x 12mm Screw 60 1 M10 x 40mm Bolt 61 2 M10 x 14mm Screw 62 8 M5 Washer 63 8 M5 x 10mm Screw 64 1 Right Flywheel 65 12 M6 x 15mm Screw 66 2 M10 Flange Nut 67 ...

Page 29: ...manual These parts are not illustrated Key No Qty Description Key No Qty Description 99 20 M4 x 12mm Blunt Screw 100 1 Resistance Motor 101 2 M5 Nut 102 1 Resistance Disc 103 1 M3 x 8mm Screw 104 2 M4 x 8mm Screw 105 8 M4 x 12mm Screw 106 1 M10 Locknut 107 6 M4 x 10mm Screw 108 1 Power Adapter 109 1 Main Wire User s Manual Assembly Tool ...

Page 30: ...0 73 52 45 42 42 67 57 56 44 56 57 26 26 57 13 93 93 44 55 44 54 57 56 47 49 51 76 77 78 79 80 74 56 56 58 58 66 71 71 66 59 59 53 57 57 86 86 106 60 61 62 63 69 68 68 69 69 69 65 65 69 101 101 109 108 81 82 86 83 25 28 102 103 105 100 25 97 67 54 70 64 43 62 63 55 98 96 75 105 105 84 Model No PFRW98920 INT 0 R0321B ...

Page 31: ...31 31 34 36 38 39 33 35 92 37 40 56 57 63 63 68 65 65 62 62 67 67 107 95 107 104 107 69 69 69 94 94 36 87 55 72 99 99 69 99 99 99 99 68 99 99 6 99 68 68 68 99 99 99 99 99 9 68 68 99 99 9 69 68 6 99 99 99 99 57 56 68 95 Model No PFRW98920 INT 0 R0321B ...

Page 32: ...ST and the EXPLODED DRAWING near the end of this manual ORDERING REPLACEMENT PARTS This electronic product must not be disposed of in municipal waste To preserve the environment this product must be recycled after its useful life as required by law Please use recycling facilities that are authorized to collect this type of waste in your area In doing so you will help to conserve natural resources ...

Reviews: