


11
CONSOLE DESCRIPTION
Refer to the drawing on page 10. Note: If there is a
thin sheet of clear plastic on the face of the con-
sole, remove it.
A. Exercise feedback display—This display features
seven modes that give you instant exercise feed-
back: your current speed, the elapsed time (or the
time remaining in a Smart program), the distance
that you have pedaled, the resistance level, the
approximate numbers of calories and fat calories
you have burned (see FAT BURNING on page 20),
and your heart rate (when you use the handgrip
pulse sensor or the optional chest pulse sensor
[refer to page 18 for information about the chest
pulse sensor]). If the scan mode is selected, the
display will change from one mode to the next
every six seconds. Or, you can select a single mode
for continuous display.
Note: The console can show speed and distance
in either miles or kilometres. To change the unit
of measurement, hold down the On/Reset button
for six seconds. The mode indicators (see F
below) will show which unit of measurement is
selected. When the batteries are replaced, it may
be necessary to reselect the desired unit of
measurement.
B. Increase and decrease arrows—During Smart pro-
grams and iFIT.com programs, these arrows will
prompt you to increase or decrease your pace to
match the target pace.
C. Manual mode/program indicators—When a Smart
program is selected, the upper right corner of the
display will show a 1, 2, 3, 4, 5, 6, 7, or 8, depend-
ing on which Smart program is selected. When the
iFIT.com mode is selected, the upper right corner
will show the letters IF. When the manual mode is
selected, the upper right corner will be blank.
D. Program profiles—These profiles show how the
resistance of the exercise cycle and the target pace
will change during Smart programs. For example,
profile number 6 shows that during Smart program
6, the resistance will gradually increase during the
first half of the program, and then gradually
decrease during the last half; the target pace will
alternately increase and decrease throughout the
program.
E. Warnings—See page 3.
F. Feedback mode indicators—These indicators show
which feedback mode (scan, speed, time, distance,
resistance level, calories, fat calories, or heart rate)
is currently shown. Note: When the distance is
shown, the word Miles or the letters Kms will
appear; when your speed is shown, the letters MPH
or Km/H will appear.
G. Pace indicators—When the manual mode is select-
ed, only the left pace indicator will appear. This indi-
cator shows your exercise pace. As you increase or
decrease your pace, the indicator will increase or
decrease in height. When a Smart program or the
iFIT.com mode is selected, both pace indicators will
appear. The left indicator will show your actual
exercise pace, and the right indicator will show the
current target pace. During the program, the target
pace will periodically change; as the right indicator
changes in height, simply adjust your pace so that
both indicators are at the same height. Important:
The target pace is a goal pace. Your actual pace
may be slower than the target pace, especially
during the first few months of your exercise
program. Make sure to exercise at a pace that is
comfortable for you.
H. On/Reset button—When the console is off, pressing
this button will turn on the display. When the console
is on, pressing this button will reset the display.
This button is also used to select the unit of meas-
urement for speed and distance (see A at the left).
I. Display Mode button—This button is used to select
the feedback modes. The modes will be selected in
the following order: scan, speed, time, distance,
resistance level, calories, fat calories, and heart
rate (when the handgrip pulse sensor or the option-
al chest pulse sensor is used).
J. + and – buttons—These buttons control the resist-
ance of the exercise cycle. There are ten resistance
levels; level 10 is the most challenging.
K. Program button—This button is used to select the
manual mode and Smart programs.
L. IFIT.com button—This button is used to select the
iFIT.com mode. The indicator on the button will light
when the iFIT.com mode is selected.
To use the manual mode of the console, refer to
page 12. To use a Smart program, refer to page 13.
To use iFIT.com CDs or videos, refer to page 17. To
use a program directly from our Web site, refer to
page 18.
14
HOW TO CONNECT YOUR CD PLAYER, VCR,
OR COMPUTER
To use iFIT.com CDs, the exercise cycle must be con-
nected to your portable CD player, portable stereo,
home stereo, or computer with CD player. See pages
14 to 16 for connecting instructions. To use iFIT.com
videocassettes, the exercise cycle must be connect-
ed to your VCR. See page 16 for connecting instruc-
tions. To use iFIT.com programs directly from our
Web site, the exercise cycle must be connected to
your home computer. See page 15 for connecting
instructions.
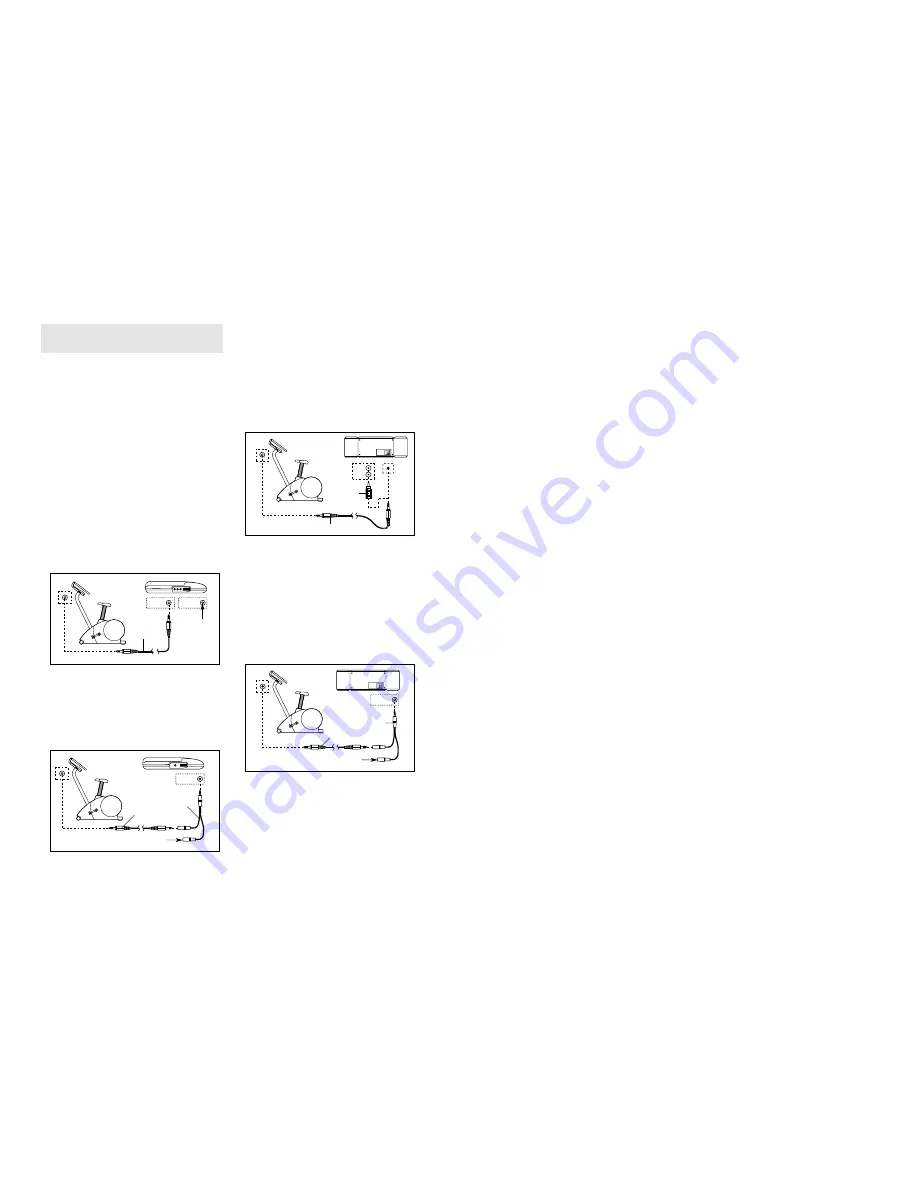
HOW TO CONNECT YOUR PORTABLE CD PLAYER
Note: If your CD player has separate LINE OUT
and PHONES jacks, see instruction A below. If
your CD player has only one jack, see instruction B.
A. Plug one end of the audio cable into the jack
beneath the console of the exercise cycle. Plug the
other end of the cable into the LINE OUT jack on
your CD player. Plug your headphones into the
PHONES jack.
B. Plug one end of the audio cable into the jack
beneath the console of the exercise cycle. Plug the
other end of the cable into a 3.5mm Y-adapter
(available at electronics stores). Plug the Y-adapter
into the PHONES jack on your CD player. Plug
your headphones into the other side of the Y-
adapter.
HOW TO CONNECT YOUR PORTABLE STEREO
Note: If your stereo has an RCA-type AUDIO OUT
jack, see instruction A below. If your stereo has a
3.5mm LINE OUT jack, see instruction B. If your
stereo has only a PHONES jack, see instruction C.
A. Plug one end of the audio cable into the jack
beneath the console of the exercise cycle. Plug the
other end of the cable into the included adapter. Plug
the adapter into an AUDIO OUT jack on your stereo.
B. Refer to the drawing above. Plug one end of the
audio cable into the jack beneath the console of the
exercise cycle. Plug the other end of the cable into
the LINE OUT jack on your stereo. Do not use the
adapter.
C. Plug one end of the audio cable into the jack
beneath the console of the exercise cycle. Plug the
other end of the cable into a 3.5mm Y-adapter
(available at electronics stores). Plug the Y-adapter
into the PHONES jack on your stereo. Plug your
headphones into the other side of the Y-adapter.
LINE OUT
PHONES LINE OUT
PHONES
Audio
Cable
Head-
phones
A
PHONES
PHONES
Audio
Cable
3.5mm
Y-adapter
Headphones
B
AUDIO OUT
RIGHT
LEFT
LINE OUT
Audio Cable
Adapter
A/B
PHONES
Audio
Cable
C
3.5mm
Y-adapter
Headphones


