background image

16

 Momentum mo8me Manual


Individual


Channel


Route


IP Address View

Control Panel Functions

Chapter 3

Description of Functions

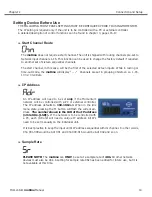
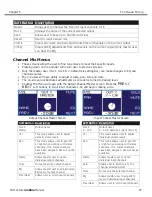
Pressing F1 will fl ash the IP address of a unit.

1. 

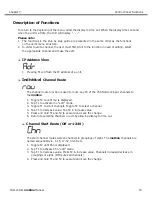
Toggle F2 to until rou is displayed.

1. 

Tap F1 to activate rou “edit” mode.

2. 

Toggle F1 to scroll channels. Toggle F2 to select a channel.

3. 

Tap F1 to decrease value. Tap F2 in increase value.

4. 

Press and hold F1 and F2 to execute and save the change.

5. 

Return to selecting channels or exit by allowing display to time out.

6. 

To return to the beginning of the menu, allow the display to time out. When the display times out and 

when the unit is at idle, the LCD will display “ - - -”.
Please note: 

The functions in the step by step guide are presented in the same order as the functions 

1. 

on the unit’s menu structure.

In order to edit a channel, the user must fi rst scroll to the function in need of editing, select 

2. 

the appropriate channel and make the edit. 


Channel Start Route (Off or 1-249)

Toggle F2 until Chn is displayed.

1. 

Tap F1 to activate Chn “edit” mode.

2. 

Tap F1 to decrease value. Press F2 in increase value. Channels increase/decrease in 

3. 

groupings of eight. (Off mutes all channels)

Press and hold F1 and F2 to execute and save the change.

4. 

The channel route function is used to route any 16 of the 256 Network input channels to 

the mo8me

The start channel routes sixteen channels in groupings of eight. The mo8me channels are 

named sequentially ie. 1-16, 17-32, 33-48 etc. 

Summary of Contents for Momentum MO8ME

Page 1: ...Mix Engine with mrc The Tweak Unit Manual mo8me Pro Co Sound Inc 225 Parsons Street Kalamazoo MI 49007 1 888 253 7360 www procomomentum com ...

Page 2: ...esentative or dealer must perform all warranty servicing of the units otherwise all aspects of this warranty are void 2 All tamper proof seals on the unit s must be intact in order for the unit s to be serviced as a warranty claim How obtain Warranty services If after following all of the operating instructions in this manual you find that service or support is still needed 1 First contact the dea...

Page 3: ...14 14 10 11 11 11 Chapter 4 The Tweak Overview Set Up Overview Powering Up Opening Screen Communications Time Out Screen Main Menu Screens Set Up Menu Description of Setup Menu Setting the Routing Connection to a mo8me Selecting Mono or Stereo Mode Selecting Default Mix Master User Setting Time out Back Light Assigning Your Tweak an ID Naming Your Tweak Chapter 5 The Tweak Mixing Main Mix Menus Se...

Page 4: ... shock do not expose any part of your Momentum System to rain or moisture To reduce the risk of electrical shock do not remove cover There are no user serviceable parts inside Refer servicing to service personnel Always follow the basic precautions listed below to avoid the possibility of physical injury to you or others or damage to the device or other property These precautions include but are n...

Page 5: ...amily When receiving your Momentum System please check all cartons for damage If there is damage notify the shipper and dealer in that order Before removing any components of your Momentum System from the shipping cartons be sure that the order is complete as expected Do this by checking each Momentum System component on your packing slip to be sure it matches the number of packing boxes and the s...

Page 6: ...pandability are enhanced through the use of modules for inputs outputs and DSPs Signal routing becomes as easy as clicking a button You can place inputs outputs DSPs and controls anywhere on the Momentum network Also digital interfaces are available for seamless system integration into many of the popular formats Standard Gigabit Ethernet Protocol Power Over Ethernet PoE 802 3af Compliant Up to 25...

Page 7: ... tasks such as personal monitor mixing and distributed audio systems Gigabit Ethernet is standard on all Momentum audio products and all components are Power Over Ethernet PoE 802 3af compliant All DSP functions are controlled by the Tweak a wireless user interface or PC software In order for the mo8me to function as it has been designed to a minimum of one or two input mi8 devices must be present...

Page 8: ...es you need Just ask for them when you order your system mo8me Front View with optional Stage Boots mo8me Front View with Rack Ears Overview Chapter 1 The mo8me Enclosure Front Panel The front of the mo8me has a 2 button control panel eight channels capable of any combination of eight mono and four stereo output mixes and an antenna for remote mixing Each channel has one signal clip LED indicator ...

Page 9: ...l to noise ratio Rear View with Contractor Panel The optional contractor panel allows input analog connection from the rear of the device These inputs are connected in parallel to the XLR connectors on the front of the mo8me 2 4 3 1 MRC The Tweak The Tweak is the companion mrc Momentum remote control unit to the mo8me It is a wire less remote control that allows the user to create and save persona...

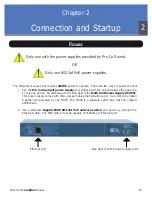
Page 10: ... This power supply comes with three jumper cables that will allow up to four units to be linked together and powered by one MUPS The MUPS is a separate option and must be ordered additionally Use a standard 2 Gigabit IEEE 802 3af PoE network switch and power up through the Ethernet cable The POE switch must be capable of 15Watts per Ethernet port The Momentum output unit requires 48VDC power to op...

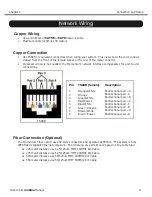
Page 11: ...e T568B or equivalent connectors when wiring your system This view shows the color code as viewed from the front of the female socket or the rear of the male connector Crossover wiring is not needed the Momentum network interface compensates for unit to unit connections Fiber Connection Optional 220 meter distance use 62 5 125um MMF 160MHz Km Cable 275 meter distance use 62 5 125um MMF 200MHz Km C...

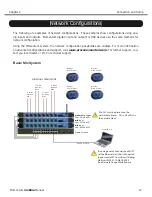
Page 12: ... Co technical support Connection and Setup Chapter 2 Basic Mix System mo8me Mix Engine Chn 001 Adr 003 mi8 Input Chn 001 Adr 001 mi8 Input Chn 009 Adr 002 CAT5E or CAT6 Ethernet Switch Control Device If running over 48 channels you MUST set the Ethernet port that is connected to your control PC to multicast filtering Multicast MAC 01 15 AB C6 00 00 See Network Design White Papers Chn 001 must be p...

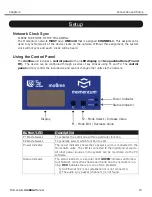
Page 13: ...e network Using the Control Panel F1 Mode Edit Decrease Value F2 Mode Select Increase Value Display Status Indicator Power Indicator Button LED Description F1 Mode Select F1 activates the edit mode within a particular function F2 Mode Select F2 generally selects which function to edit Power Indicator The power indicator shows that a power source is connected to the Momentum units The LED is connec...

Page 14: ...ton will flash the current ad dress The number shown is the LSB of the IP address 192 168 1 LSB If the network is to be controlled with a PC each mi8 unit will need a unique IP address All IPs need to be set manually on the individual unit It is best practice to keep the input unit s IP address sequential with its channel In other words Chn 001 008 would be Adr 001 and Chn 009 016 would be Adr 002...

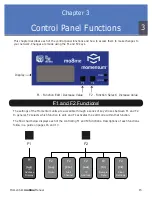
Page 15: ...ies of key strokes between F1 and F2 In general F2 selects which function to edit and F1 activates the edit mode within that function The flow chart below displays each of the controlling F1 and F2 functions Descriptions of each functions follow in a guide on pages 16 and 17 F1 Function Edit Decrease Value F1 and F2 Functions Chapter 3 Control Panel Functions 3 F2 rou Route F2 Chn Start Channel F2...

Page 16: ...idle the LCD will display Please note The functions in the step by step guide are presented in the same order as the functions 1 on the unit s menu structure In order to edit a channel the user must first scroll to the function in need of editing select 2 the appropriate channel and make the edit Channel Start Route Off or 1 249 Toggle F2 until Chn is displayed 1 Tap F1 to activate Chn edit mode 2...

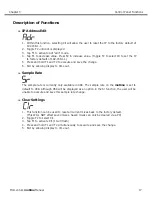
Page 17: ...5 Exit by allowing display to time out 6 The sample rate is currently only available in 48K The sample rate on the mo8me is set to default to 48K Although 96K will be displayed as an option in the Sr function the user will be unable to execute and save this sample rate change This function can be used to reset all current mixes back to the factory default 1 This WILL NOT effect saved mixes Saved m...

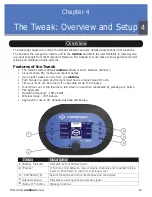
Page 18: ...h Tweak in a given environment must have a unique Tweak ID 1 99 Time out mode can be turned off or be setup for up to 4 minutes If unit times out it will resume to last screen in use when reactivated by pressing any button FCC approved Operating frequency ISM 2 4GHz Wireless range 300 indoors Approved for use in US Canada Australia and Europe Index Description 1 Battery Indicator Indicates level o...

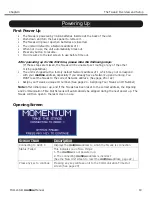
Page 19: ...o a Network address of 1 When not in use the unit automatically times out Press any button to resume It will resume to the last screen in use before time out After powering up for the first time please take the following steps If these steps are missed the Tweak will be unable to set routing or any of the other mixing capabilities The unit is shipped with a factory default Network address of 1 whi...

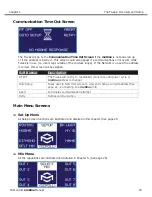
Page 20: ... connection until power cycle or mo8me address is changed Goto Setup Takes user to New Unit screen to view and change current address See page 22 Connecting to a mo8me Unit Abort Terminates communication attempt Retry Retries communication The Tweak will go to the Communication Time Out Screen if the mo8me is not powered up or if the address is incorrect This screen could also appear if a communic...

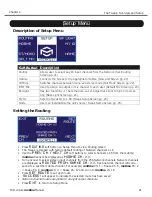
Page 21: ...e the unit s name Tweak Name Screen pg 25 Press ROUTING soft button on Setup Menu to view Routing screen The Tweak is shipped with factory default routing of Network channels 1 16 Use the PREV CH NEXT CH soft buttons to select channels 1 16 from the mo8me mo8me channels be displayed as MO8ME CH XX Turn encoder to select sixteen input channels from the 256 Network channels Network channels are disp...

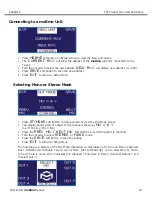
Page 22: ...w Unit screen The CURRENT AXX will show the address of the mo8me currently connected to the Tweak Turn the encoder to select the new address NEW AXX will display new address i e A03 Press SAVE soft button to save the new address Press EXIT to return to Setup Menu Selecting Mono or Stereo Mode Press ST MONO soft button on Setup screen to view the Out Mode screen The display shows pairs of output or...

Page 23: ...individual users control of only their mix Default mix 1 same as Out 1 or mix 1 2 stereo is designated as the master user Only master user can change input EQ routing channel names Changes to EQ routing channel names are global for all users connected to the same mo8me Default mix 2 8 users can only change volume pan and output EQ When a default mix has been selected the Tweak boots directly to th...

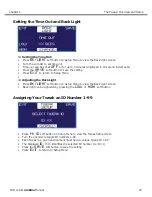
Page 24: ...VE soft button to save the setting Press EXIT to return to Setup Menu Setting the Time Out and Back Light Setting the Time Out Press BK LIGHT soft button on Setup Menu to view the Back Light screen Turn the encoder to set time out Time out can be set at OFF or for up to 4 minutes displayed in 10 second increments Press the SAVE soft button to save the setting Press EXIT to return to Setup Menu Adj...

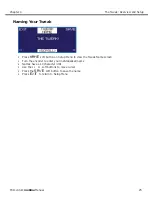
Page 25: ...our Tweak Press NAME soft button on Setup Menu to view the Tweak Name screen Turn the encoder to enter your individualized name Names have a 10 character limit Use the soft buttons to move curser Press the SAVE soft button to save the name Press EXIT to return to Setup Menu ...

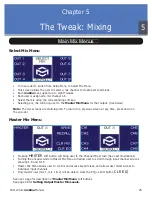
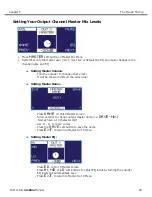
Page 26: ...d To return to a previous screen at any time press down on the encoder 5 Chapter 5 The Tweak Mixing Main Mix Menus Pressing MASTER soft button will bring user to the Channel Mix screen See next illustrations Turning the encoder while in Master Mix Menu will allow user to scroll through input channel screens showing 1 8 and 9 16 Master Mix Menu allows user to control and access saved mixes and allo...

Page 27: ...all EQ adjustments from all channels on the current output Only master user can clear the EQ These screens allow the user to fine tune mixes to meet their specific needs Pressing down on the encoder will return user to previous screens Only the master user mix 1 mix 1 2 default mix setting ALL can make changes to EQ and channels names Mix 2 8 users will have ability to adjust volume pan solo and m...

Page 28: ... Press NAME on Out X Master screen Scroll encoder to change output master name i e DAVE MIX Names have a 10 character limit Use to move curser Press the SAVE soft button to save the name Press EXIT to return to Master Out X Menu Setting Master EQ Press EQ on Out X Master screen Press HI MID or LO soft buttons to adjust EQ levels by turning the encoder EQ levels will automatically save Press EXIT t...

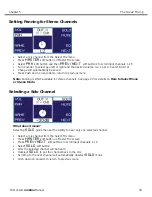
Page 29: ...n dial Pressing MUTE will mute the individual channel Volume levels will automatically be saved Push down on encoder to return to previous menu Select a mix channel from the Select Mix menu Press MASTER soft button on Master Mix screen Press EQ soft button Press PREV NEXT soft buttons scroll input channels 1 16 Select HI MID or LO and use encoder to make adjustments Select HPF to engage the High P...

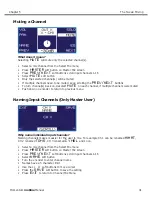
Page 30: ...to previous menu Note Panning is ONLY available for stereo channels See page 22 for details on How to Select Mono or Stereo Mode Selecting a Solo Channel Select a mix channel from the Select Mix menu Press MASTER soft button on Master Mix screen Press PREV NEXT soft buttons to scroll input channels 1 16 Select SOLO soft button Only the selected channel will be heard Deselect SOLO to put the channe...

Page 31: ...t does it mean Selecting MUTE will mute only the selected channel s The Tweak Mixing Chapter 5 Naming Input Channels Only Master User Select a mix channel from the Select Mix menu Press MASTER soft button on Master Mix screen Press PREV NEXT soft buttons scroll input channels 1 16 Select NAME soft button Turn the encoder to enter channel name Names have a 5 character limit Use the soft buttons to ...

Page 32: ...eturn to Saving Mixes screen The saved mix will be displayed as 1 VOCALS MIX Push down on encoder to return to Master Mix screen What does it mean The Tweak can save up to 16 different individual mixes See the Recalling Mixes on page 33 for details on recalling previously saved mixes Note When the master user mix 1 mix 1 2 or default mix ALL does a save or recall the EQ route and names are also sa...

Page 33: ...Menu Press RECALL soft button on Master Mix screen Press PREV NEXT soft buttons scroll saved mixes Select a previously saved mix i e 1 VOCALS MIX Unit will ask for confirmation Select desired mix again and unit will display SUCCESS to indicate recall was made Push down on encoder to return to Master Mix screen ...

Page 34: ... 0 05dB Wireless Range 300 Indoor Wireless Frequency ISM 2 4GHz Network Specifications Standard Gigabit Ethernet Protocol Power Over Ethernet PoE 802 3af Compliant Up to 256 total active system inputs at 48K sampling Onboard memory and programming 0 630 ms A A latency 48K sampling no DSP 1 00 ms A A latency 48K sampling with DSP Open UDP Ethernet communication for 3rd party control Chapter 6 mo8me...

Reviews: