background image

9

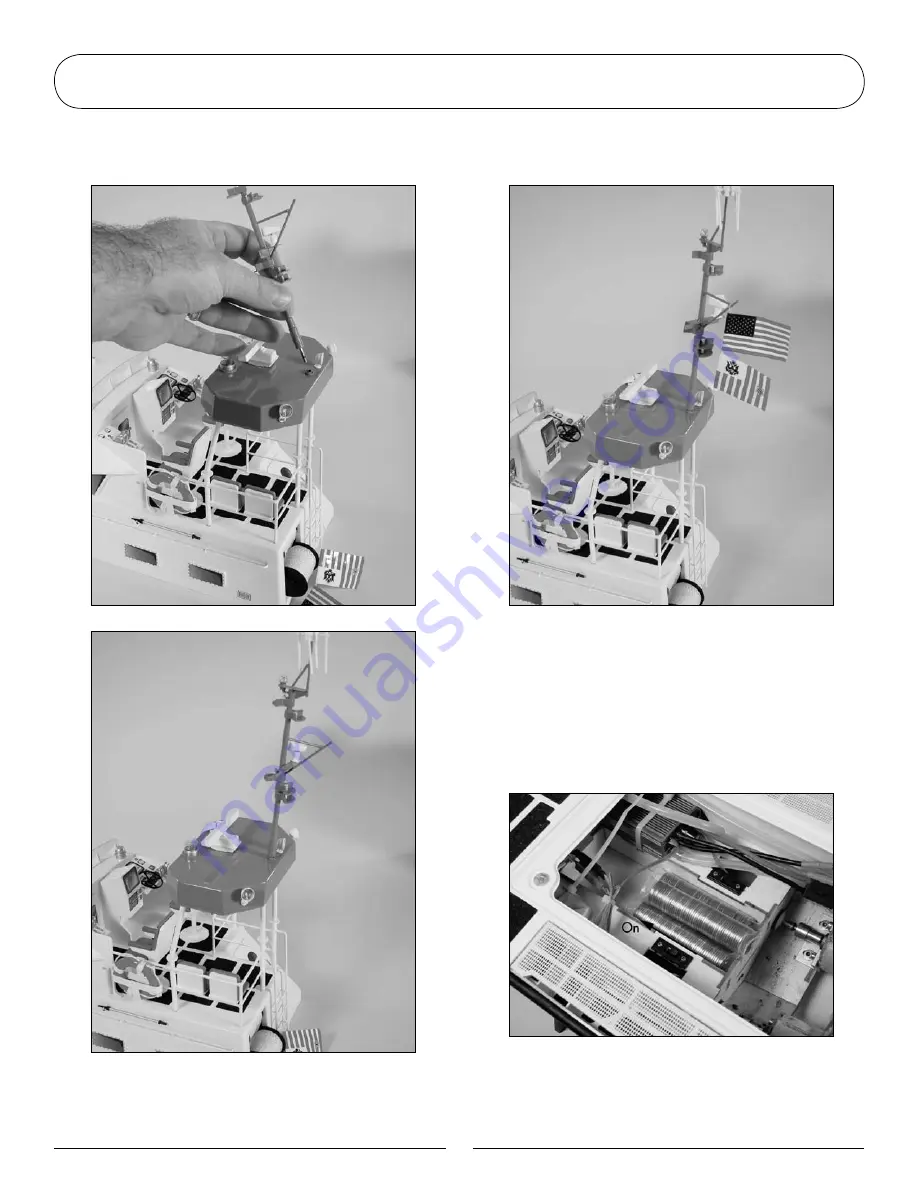
Carefully plug the mast into the jack 

located on the top of the cabin.

The flags are on an elastic band that 

loops onto the mast as shown below.

The switch to turn the accessory lighting 

on is located on the left side of the hull 

near the motor. The receiver switch  

must be turned on to allow the light 

switch to operate the lights. Sit back  

and enjoy the glow from the scale  

lighting of your Motor Lifeboat.

Accessory Installation

Summary of Contents for Motor Lifeboat

Page 1: ...mm Beam 9 4 in 238mm Motor Water cooled 550 size x2 Speed Control Watercooled electronic w reverse Radio System Pro Boat 2 stick 27MHz AM Drive System Direct drive Steering System 2 rudder www ProBoatModels com Owner s Manual Motor Lifeboat ...

Page 2: ... is done at the factory allowing you to quickly get your boat running Table of Contents 2 Introduction 2 General Guidelines 3 Additional Required Items 3 Inspection 3 Contents 4 Getting Started 4 Installing the Transmitter Batteries 5 Installing the Motor Batteries 6 Checking the Radio System 7 Accessory Installation 9 Testing Your Boat in the Water 10 Maintenance 10 Replacement Parts 12 Instructi...

Page 3: ...perate your model make sure your frequency is clear If someone is operating on the same frequency both models could go out of control possibly causing damage to the models or to others Check all of the hardware and the propeller for damage and loose screws before and after each run You will need to purchase the following to get your boat on the water 8 AA alkaline batteries for the radio transmitt...

Page 4: ...ery Plug the battery charger into a standard 110 120V AC wall outlet or 12 volt DC depending on the type of charger used Connect a fully discharged battery to the charge plug Change the battery according to the instructions provided with the charger Do not leave the battery pack unattended while charging or serious damage or fire may occur Assembled Motor Lifeboat RTR Pro Boat radio transmitter Bo...

Page 5: ...er from top to bottom Install eight 8 AA batteries into the transmitter Pay close attention to the correct direction of the positive and negative ends as marked Install the battery cover by sliding it on from bottom to top Installing the Transmitter Batteries ...

Page 6: ...Once the batteries are charged apply the supplied hook and loop tape to the batteries Attach the remaining hook and loop to the hull as shown Install the battery packs into the hull as shown Batteries are located on the left and right sides of the hull Confirm the receiver switch has been set to the OFF position at this time Plug the connectors from battery packs to the connectors from the ESC Ins...

Page 7: ...ries Checking the Throttle Operation Once the transmitter has been turned on turn on the Motor Lifeboat by sliding the switch on the speed controller to the On position If the propellers spin adjust the Throttle Trim lever located next to the throttle stick until the propellers stop Give a small amount of throttle input by moving the throttle stick toward the top of the transmitter to ensure that ...

Page 8: ...er off FIRST by sliding the switch to the OFF position After the model has been turned off turn off the transmitter Turning off the transmitter first may allow the radio to accept stray signals and the boat may run out of control If you find the steering or throttle operates backwards as described you may need to actuate the servo reversing switch Note If you are transporting your Motor Lifeboat m...

Page 9: ...ps onto the mast as shown below The switch to turn the accessory lighting on is located on the left side of the hull near the motor The receiver switch must be turned on to allow the light switch to operate the lights Sit back and enjoy the glow from the scale lighting of your Motor Lifeboat Accessory Installation ...

Page 10: ...gain Adjust the Steering Trim When going forward the model should move in a straight line If not adjust the steering trim so that it tracks in a straight line without having to turn the steering wheel Before and at the end of each run make sure all screws are tight and the propellers are free from any entanglement At the end of each run be sure to remove any debris from the rudders and or propelle...

Page 11: ...se Gun w Marine Grease see your local hobby shop against the drive shaft Apply grease along the length of the shaft Slide the shaft back into the stuffing box Use a paper towel to remove excess grease near the propeller that oozes out when inserting the shaft Note Running the Motor Lifeboat RTR in salt water could cause some parts to corrode and is not recommended If you run the boat in salt water...

Page 12: ...ar PRB3504 Light System PRB3505 Motor Mount Set PRB3506 Light Tower PRB3507 Rudder PRB3508 Driveshaft PRB3509 Rudder Pushrod Set PRB3510 Propeller PRB3511 Decals PRB3512 Rail set Front PRB3513 Rail Set Rear PRB3514 Caption s Chair PRB3515 Side Chair Set PRB3516 Life Saver PRB3517 Hull Accessory Set PRB3518 Wind Shield Set PRB3519 Boat Stand PRB3607 Cooling System PRB3623 Water cooled ESC w reverse...

Page 13: ...arranty Proof of purchase is required for warranty claims Further Horizon reserves the right to change or modify this warranty without notice and disclaims all other warranties express or implied b Limitations HORIZON MAKES NO WARRANTY OR REPRESENTATION EXPRESS OR IMPLIED ABOUT NON INFRINGEMENT MERCHANTABILITY OR FITNESS FOR A PARTICULAR PURPOSE OF THE PRODUCT THE PURCHASER ACKNOWLEDGES THAT THEY ...

Page 14: ...ty Precautions This is a sophisticated hobby Product and not a toy It must be operated with caution and common sense and requires some basic mechanical ability Failure to operate this Product in a safe and responsible manner could result in injury or damage to the Product or other property This Product is not intended for use by children without direct adult supervision The Product manual contains...

Page 15: ...acement decisions are at the sole discretion of Horizon Hobby Non Warranty Repairs Should your repair not be covered by warranty the repair will be completed and payment will be required without notification or estimate of the expense unless the expense exceeds 50 of the retail purchase cost By submitting the item for repair you are agreeing to payment of the repair without notification Repair est...

Page 16: ...his margin will help to avoid collisions or injury Always operate your model in an open area away from people Avoid operating your model where injury or damage can occur Never operate the model out in populated areas for any reason Never operate your model with low transmitter batteries Carefully follow the directions and warnings for this and any optional support equipment chargers rechargeable b...

Reviews: