background image


Page GB-2

Table of contents

Delivery . . . . . . . . . . . . . . . . . . . . . . . GB-3

Package contents . . . . . . . . . . . . . . GB-3
Check the delivery  . . . . . . . . . . . . . GB-3
Packaging tips  . . . . . . . . . . . . . . . . GB-3

For your safety. . . . . . . . . . . . . . . . . . GB-4

Intended use . . . . . . . . . . . . . . . . . . GB-4
Explanation of terms . . . . . . . . . . . . GB-4
Explanation of symbols . . . . . . . . . . GB-4
Safety notices . . . . . . . . . . . . . . . . . GB-4

Circulation or exhaust air operation? . GB-8

Circulation air operation . . . . . . . . . GB-8
Exhaust air operation . . . . . . . . . . . GB-8

Preparations for assembly . . . . . . . . . GB-9

For exhaust air operation . . . . . . . . GB-9
Connection for power supply  . . . . . GB-9

Materials required for assembly  . . . GB-10

Parts list  . . . . . . . . . . . . . . . . . . . . GB-10
Tools and aids . . . . . . . . . . . . . . . . GB-10
Screws  . . . . . . . . . . . . . . . . . . . . . GB-10

Assembly . . . . . . . . . . . . . . . . . . . . .  GB-11

Space requirements . . . . . . . . . . .  GB-11
Attachment dimensions  . . . . . . . .  GB-11
Prerequisites for installation . . . . . GB-12
Place the drill holes . . . . . . . . . . . . GB-12
Attaching the Exhaust hood . . . . . GB-12
Attaching the exhaust air hose   . . GB-14
Installing the flue screen . . . . . . . . GB-14
Final steps  . . . . . . . . . . . . . . . . . . GB-15

Operation . . . . . . . . . . . . . . . . . . . . . GB-17

Requirements   . . . . . . . . . . . . . . . GB-17
Fan . . . . . . . . . . . . . . . . . . . . . . . . GB-17
Lighting . . . . . . . . . . . . . . . . . . . . . GB-17
Activated charcoal filter . . . . . . . . . GB-17
Tips on saving energy . . . . . . . . . . GB-17

Care and maintenance  . . . . . . . . . . GB-18

Cleaning the housing . . . . . . . . . . GB-18
Cleaning the grease filters  . . . . . . GB-18
Inserting/replacing 
activated charcoal filters . . . . . . . . GB-19
Changing the lighting . . . . . . . . . . GB-20

Troubleshooting table  . . . . . . . . . . . GB-21

Our Service Centre . . . . . . . . . . . . . GB-22

General customer service . . . . . . . GB-22
Spare parts . . . . . . . . . . . . . . . . . . GB-22
Ordering activated charcoal filters  GB-22

Environmental protection . . . . . . . . . GB-23

Disposing of old electrical devices in an 
environmentally friendly manner . . GB-23
Disposing of 
activated charcoal filters . . . . . . . . GB-23
Packaging . . . . . . . . . . . . . . . . . . . GB-23

Data sheet . . . . . . . . . . . . . . . . . . . . GB-24

 Before using the appliance, 

please first read through the 
safety instructions and user 

manual carefully. Only in this way can all 
functions be used safely and reliably. Be 
sure to also observe the national regula-
tions in your country which are valid in 
addition to the regulations specified in this 
user manual.

Keep all safety notices and instructions 
for future reference. Pass all safety notic-
es and instructions on to the subsequent 
user of the product.

196374_GB_20180516.indd   GB-2

196374_GB_20180516.indd   GB-2

17.05.2018   14:13:05

17.05.2018   14:13:05

Summary of Contents for 39700332

Page 1: ...rsion 196374_DE_20180516 Artikel Nr 39700332 Nachdruck auch auszugsweise nicht gestattet SY 103A6G P1 C81 L22 600 Wand Kopffreihaube 196374_DE_20180516 indd DE 1 196374_DE_20180516 indd DE 1 17 05 201...

Page 2: ...ps DE 17 Pflege und Wartung DE 18 Geh use reinigen DE 18 Fettfilter reinigen DE 18 Aktivkohlefilter einsetzen ersetzen DE 19 Beleuchtung auswechseln DE 20 Fehlersuchtabelle DE 21 Unser Service DE 22 A...

Page 3: ...s 2 Belassen Sie die blauen Schutzfolien auf den Metallfl chen 3 Entfernen Sie alle Verpackungsteile Kunststoffprofile Klebestreifen und Schaumpolster 4 Pr fen Sie ob die Lieferung vollst ndig ist 5 K...

Page 4: ...gige oder m ige Verletzung zur Folge haben kann HINWEIS Dieser Signalbegriff warnt vor m g lichen Sachsch den Dieses Symbol verweist auf n tz liche Zusatzinformationen Symbolerkl rung Schutzklasse I...

Page 5: ...turen am Ge r t d rfen ausschlie lich autorisierte Fachkr fte vornehmen Bei Reparaturen d rfen ausschlie lich Teile verwendet werden die den urspr nglichen Ger tedaten entspre chen In diesem Ger t be...

Page 6: ...ein darf die Dunstabzugshau be nicht verwendet werden bis die Glasabdeckung ersetzt worden ist Setzen Sie sich in diesem Fall mit un serem Service in Verbindung siehe Seite DE 22 VORSICHT Verletzungsg...

Page 7: ...be niemals an einen Bel ftungsschacht bzw Raum oder Abgaskamin anschlie en Die abge f hrte Luft darf nicht in einen Kanal gef hrt werden in dem Warmluft zir kuliert Die abgesaugte Luft darf nur durch...

Page 8: ...ns etwa alle sechs Mo nate berpr fen Abluftbetrieb Beim Abluftbetrieb werden die K chend nste angesaugt ber den Fettfilter gereinigt und ber den Abluftschlauch ins Freie geleitet Vorteil Kohlefilter n...

Page 9: ...nsgefahr Dunstabzugshaube niemals an einen Bel ftungsschachtbzw Raum oderAb gaskamin anschlie en Die abgef hrte Luft darf nicht in einen Kanal gef hrt werden in dem Warmluft zirkuliert Die abgesaugte...

Page 10: ...r Arbeitshandschuhe Wir empfehlen au erdem eine weitere Per son zur Hilfe hinzuzuziehen Schrauben DiezurWandmontageben tigtenSchrau ben und D bel sind nicht im Lieferumfang enthalten daderenArtundAbme...

Page 11: ...er Montage ha ben Die Zahlen in Klammer beziehen sich auf Umluftbetrieb hierbei m ssen die L ftungs schlitze frei bleiben Befestigungsma e g f i j h Ermittlung Bohrl cher Ma e in cm f H he der Sicheru...

Page 12: ...s 65cm betragen Beachten Sie bei Gaskochmulden un bedingt die Gebrauchsanleitung der Kochmulde Wenn dort ein gr erer Abstand vorgeschrieben ist muss die ser ber cksichtigt werden 1 Um das Ger t exakt...

Page 13: ...e die Abdeckung 13 nach oben 4 L sen Sie die Verriegelung 14 des Fettfil ters 15 und entnehmen Sie den Fettfilter vorsichtig nach unten 11 11 5 H ngen Sie die Dunstabzugshaube an den Schl sselloch ffn...

Page 14: ...en wenn Sie die Dunstabzugs haube im Abluftbetrieb nutzen wollen 9 4 1 Stecken Sie das Ende des Abluftschlau ches 4 mit dem gr eren Durchmesser 153mm auf den Anschluss mit der R ck schlagklappe 2 Sich...

Page 15: ...ie die Schrauben nur leicht an 5 Setzen Sie beide Teile der Kaminblende auf die Dunstabzugshaube geschlossene Seite der Kaminblende nach vorne 2x 8 6 Schrauben Sie den unteren Teil 3 der Kaminblende m...

Page 16: ...lterung f r die obere Kaminblende 6 hoch 2 Schrauben Sie die obere Kaminblende mit zwei Blechschrauben 8 fest 3 Entfernen Sie die blauen Schutzfolien 4 Stecken Sie den Netzstecker in eine vor schrifts...

Page 17: ...etreiben Sie das Ger t im Umluftbetrieb nur mit eingesetztem Aktivkohlefilter Bei etwaiger Geruchsbel stigung der Nachbarn kann das Einsetzen der Aktiv kohlefilter auch beim Abluftbetrieb emp fehlensw...

Page 18: ...e nach jeder Benutzung zu reinigen Wischen Sie die Oberfl chen mit einem weichen feuchten Tuch und etwas Ge schirrsp lmittel ab Reinigen Sie Glasoberfl chen mit handels blichem Glasreiniger Fettfilter...

Page 19: ...beim Kochen entstehenden Ger che nicht mehr ausreichend gefiltert werden Bei h ufigem Gebrauch sollten Sie die Filter regelm ig erneuern Mindestens alle 6 Mo nate berpr fen Die Bezugsquelle entnehmen...

Page 20: ...eder los 8 Klappen Sie die Abdeckung 13 wieder nach unten und lassen Sie sie einrasten 9 Stellen Sie die Stromversorgung wieder her 10 Entsorgen Sie die verbrauchten Kohlefil ter im Hausm ll Beleuchtu...

Page 21: ...rischen Ger t Pr fen Sie die Sicherung Beleuchtung funktioniert nicht LED Lampe defekt Wenden Sie sich an einen Elektro Fachbetrieb l tropft vom Ger t herunter Fettfilter verschmutzt Reinigen Sie den...

Page 22: ...sterreich Wenden Sie sich bitte an das Kundencenter oder die Produktberatung Ihres Versandhauses Bitte beachten Sie Sie sind f r den einwandfreien Zustand des Ger ts und die fachgerechte Benutzung im...

Page 23: ...stenlos beim lokalen Wertstoff Recyclinghof abgeben F r weitere Informationen zu diesem Thema wenden Sie sich direkt an Ihren H ndler Aktivkohlefilter entsorgen Die verbrauchten Aktivkohlefilter k nne...

Page 24: ...ngerungsfaktor f 1 5 Energieeffizienzindex EEIhood 81 7 Gemessener Luftvolumenstrom im Bestpunkt in m3 h QBEP 235 5 Gemessener Luftdruck im Bestpunkt in Pa PBEP 232 Gemessene elektrische Eingangsleis...

Page 25: ...74_GB_20180516 Article no 39700332 Reproduction even of excerpts is not permitted SY 103A6G P1 C81 L22 600 Wall mounted headroom hood 196374_GB_20180516 indd GB 1 196374_GB_20180516 indd GB 1 17 05 20...

Page 26: ...nergy GB 17 Care and maintenance GB 18 Cleaning the housing GB 18 Cleaning the grease filters GB 18 Inserting replacing activated charcoal filters GB 19 Changing the lighting GB 20 Troubleshooting tab...

Page 27: ...essories see OurServiceCentre onpageGB 22 Check the delivery 1 Unpack the appliance 2 Leave the blue protective films on the metal surfaces 3 Remove all parts of the packaging plastic profiles tape an...

Page 28: ...s Protection class I Replace broken protective cover immediately Safety notices Inthischapteryouwill ndgeneralsafe ty notices which you must always ob serve for your own protection and that of third p...

Page 29: ...e to property and personal in jury any liability and warranty claims will be forfeited Never try to repair a defective or suspected defective ap pliance yourself In the event of a fault as well as be...

Page 30: ...ed Do not amb foods under the ex haust hood Only deep fry foods under the ex haust hood under constant supervi sion Keep the exhaust hood clean Grease build ups can ignite when heated to high temperat...

Page 31: ...y To operate the air extraction a wall or ceiling break of at least 15 5 cm in diameter is required We recommend having a specialist electrician carry out this break core drilling If the exhaust air h...

Page 32: ...The activated charcoal filter must be replaced depending on use check it at least every six months Exhaust air operation When air is extracted the cooking fumes are sucked in filtered through the grea...

Page 33: ...suffocation explosion Never attach the exhaust hood to a ventilation shaft chimney or smoke stack The air being extracted must not travel through a channel in which warm air circulates The extracted...

Page 34: ...gloves We also recommend having a second person with you to help Screws The screws and dowels required to mount the appliance on a wall are not included in the package contents as their type and dime...

Page 35: ...hile installing The figures in brackets refer to circulation air operation the ventilation slits must be kept clear Attachment dimensions g f i j h Calculating drill holes Dimensions in cm f Height of...

Page 36: ...se the pencil to draw a vertical guiding line on the wall Ideally use a level or a plumb bob from the ceiling of the room to the middle of the stovetop 2 Following the diagram shown above draw the six...

Page 37: ...to ensure that the hood is flush with the wall 2x 12 12 7 Turn two round head screws 12 into the prepared wall plugs to se cure the Exhaust hood and screw the Exhaust hood tightly to the wall 15 14 1...

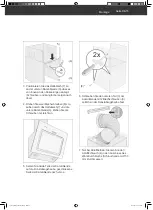
Page 38: ...or the upper flue screen 6 into the prepared dowels using 2 round head screws 10 2 3 2 Push the upper part 2 of the flue screen halfway into the lower part 3 of the flue screen 2x 7 3 8 3 Place the re...

Page 39: ...of the flue screen with 2 plate screws 8 to the sides of the exhaust hood 7 Only for exhaust air operation Insert the exhaust air hose 4 into the connection at the wall break hose end with 150 mm dia...

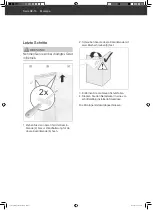
Page 40: ...upper flue screen 6 2 Screw the upper flue screen on tightly us ing two plate screws 8 3 Remove the blue protective film 4 Connect the mains plug to a properly in stalled socket Installation is now co...

Page 41: ...ula tion only do so with activated charcoal filters inserted If neighbours complain about odours it may be a good idea to insert activated charcoal filters for exhaust air operation too For the source...

Page 42: ...the surfaces of the exhaust hood after every use Wipe the surfaces with a soft damp cloth and a little dishwashing detergent Clean glass surfaces with standard glass cleaner Cleaning the grease filte...

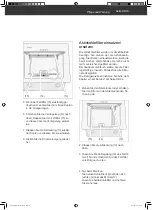
Page 43: ...ooking odours can no longer be adequately filtered If used frequently you should change the fil ters regularly Check at least every 6 months For the source of supply please see chapter Our Service Cen...

Page 44: ...and release the lock 8 Close the cover 13 again and allow it to click into place 9 Switch the power back on 10 Dispose of the used charcoal filters with household waste Changing the lighting WARNING R...

Page 45: ...er electric device Check the fuse Lighting not working LED bulb is defective Contact an electrician Grease is dripping off the appliance Grease filter is clogged Clean the grease filter see page GB 18...

Page 46: ...Customers in Austria Please contact your mail order company s customer service centre or product advice centre Please note You are responsible for the condition of the appliance and its proper use in...

Page 47: ...can dispose of old electrical appliances free of charge at your local recycling centre Please contact your dealer directly for more information about this topic Disposing of activated charcoal filter...

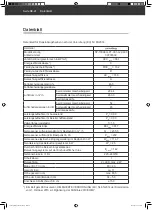
Page 48: ...Energy efficiency index EEIhood 81 7 Optimal metered air volume flow in m3 h QBEP 235 5 Optimal metered air pressure in Pa PBEP 232 Optimal metered electrical input power in W WBEP 114 7 Nominal outp...

Reviews: