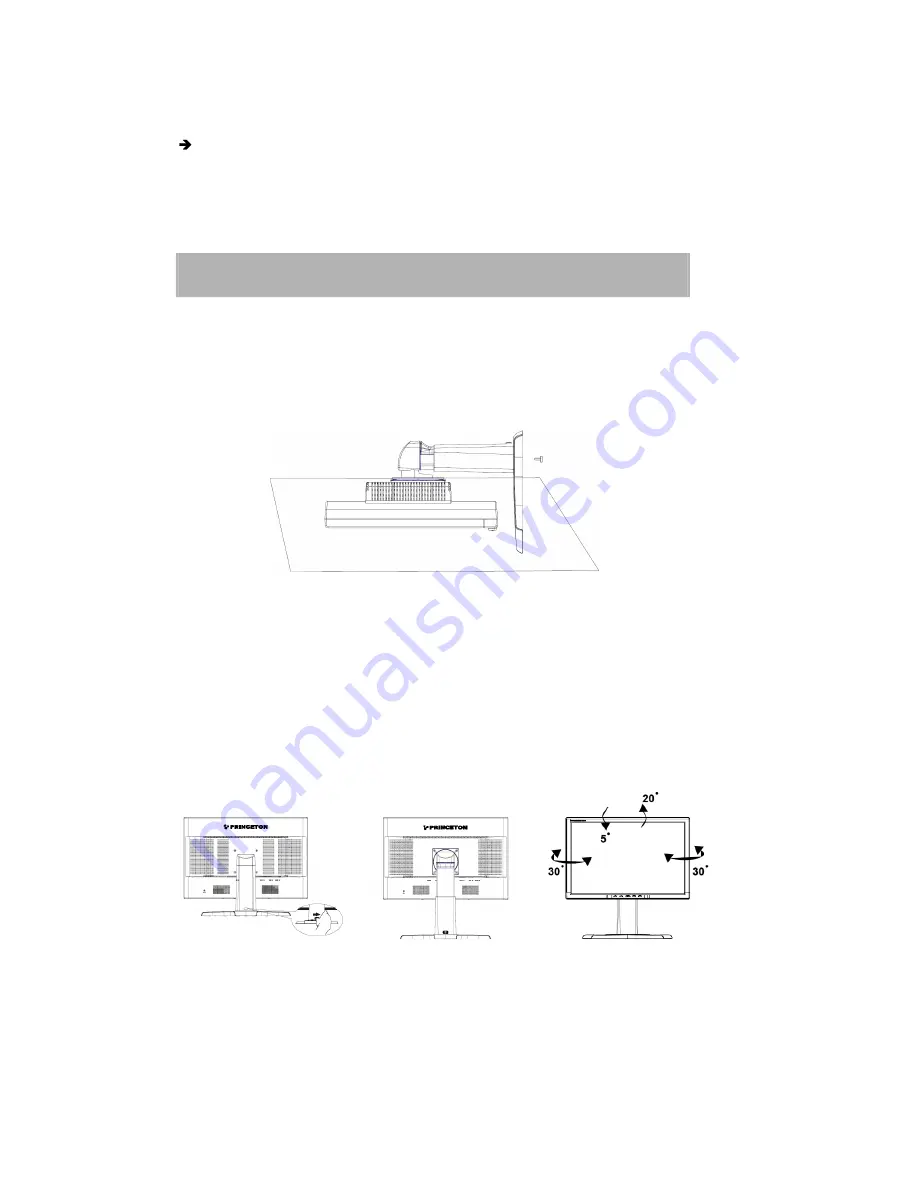
Princeton VL2418W Manual Download Page 8

ADJUSTING THE STAND


Join the stand base to the stand post. You should be able to hear it slot in. Insert the screw 

enclosed, tightening it with a coin or a screwdriver, so that the stand base is attached 

securely to the stand post.   

Adjusting the viewing angle     

Your monitor features a multi-adjustable stand that will enable it move 90mm up/down 

(height adjustment), 25 degree forward/backward (tilt adjustment), 60 degree side/side 

(swivel adjustment). To make an adjustment, grasp the monitor with both hands on the 

right and left edge of the casing and move it to the desired position. 

To connect the monitor to the multimedia source 

For multimedia device, such as DVD player and game console, you can connect video and 
audio source to monitor.
1. 

Connect the ”phone Jack to RCA Jack” to audio Input connector of the monitor (

in fig. 3) and audio output connector of multimedia device. 

8

Summary of Contents for VL2418W

Page 1: ...to technical progress PRINCETON VL2418W is an internationally registered trademark Other brand names may be registered trademarks and must be treated as such Important Safety Instructions Do not plac...

Page 2: ...nstructions operation on incorrect power supplies operation with faulty associated equipment modification alteration improper servicing tampering or normal wear and tear or LCD monitors on which the s...

Page 3: ...3 TABLE OF CONTENTS...

Page 4: ...ptimizing power consumption Safety instructions for operation z The power cord must not be damaged Do not place any objects on the power cord and make sure it does not have any knots To unplug the cor...

Page 5: ...s can damage the housing Clean the display surface only with a soft cloth otherwise you may damage the display s coating z If the monitor is only slightly dirty clean it using a soft dry and antistati...

Page 6: ...r with the screw Figure 1 LCD Monitor CONNECTING To connect the monitor to your PC 1 Make sure that the PC and the monitor is unplugged 2 Connect the 15 pin signal cable to the monitor and The PC see...

Page 7: ...nector of the monitor in fig 3 and the other end to the Line Out connector of the computer To connect the monitor to the power source 1 Connect the separate power cable in fig 3 to the power socket of...

Page 8: ...up down height adjustment 25 degree forward backward tilt adjustment 60 degree side side swivel adjustment To make an adjustment grasp the monitor with both hands on the right and left edge of the cas...

Page 9: ...status to prevent the display from ejecting Slide the lock to right from the display support frame as per the figure and then adjust the height Note that to slide the lock to right erect the machine o...

Page 10: ...heir optimal settings for the current graphics mode Press AUTO in fig 4 to launch the automatic adjustment The process will take a short while until completed Shortcut for adjusting brightness and con...

Page 11: ...U in fig 4 to activate the selected function or associated submenu 3 If you selected a submenu now select the sub function you want using the or OSD buttons and in fig 4 4 Set the desired value using...

Page 12: ...ed Phase Adjusts the internal clock s time lag in order to optimize the screen image Sharpness Controls image sharpness only for resolutions less than 1920 1200pixels COLOR This menu lets you select a...

Page 13: ...guage selection English French German Italian Spanish Dutch Russian Polish Input Controls the selection of the input signal The monitor allows you to make the following connections analog graphics car...

Page 14: ...blems Image is displaced to the left right or to the top bottom If the image appears normal but off center you can adjust it using the OSD functions For further information see chapter Basic Setup sec...

Page 15: ...l 5 ms typical Tr Td 400 cd typical Video analog 15 pin mini D Sub and digital 24 pin DVI D 16 7 mill Colors 31 81 kHz horizontal 56 75 Hz vertical 1920 x 1200 Amplifier 2 Watt at 4 Ohms Loudspeaker 2...

Reviews: