background image

26

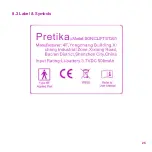
8.3 Label & Symbols

No.

Symbols

Description

1


CONSULT INSTRUCTIONS FOR USE.

2

Symbol for “ATTENTION, CONSULT ACCOMPANYING 

DOCUMENTS”.

3

BATCH CODE. This symbol should be accompanied by 

batch code.

4

Symbol for “SERIAL NUMBER”. This symbol shall be 

accompanied by the manufacturer’s serial number.

5

DATE OF MANUFACTURE. This symbol shall be accom-

panied by a date to indicate the date of manufacture.

6

Symbol for “MANUFACTURER”. This symbol shall 

be accompanied by the name and the address of the 

manufacturer.

7

“WEEE (Waste Electrical and Electronic Equipment)”. 

The waste products should be handled legally.

Summary of Contents for SonicLift ST261

Page 1: ...1 ...

Page 2: ...perate properly use the Electrolyte Conductive Gel that comes with your device For important information about safety and how to use the device read the full Instructions for Use booklet Contact the experts at Pretika for any assistance in helping you get started Customer Service Contact 1 949 481 8818 Email customerservice pretika com Or visit our website at www pretika com Hours of Operation Mon...

Page 3: ... 12 4 1 Before Treatment 12 4 2 Activate the SonicLift 12 4 3 Select Mode 12 4 4 Adjust Intensity 13 4 5 Treatment 13 4 6 Switch the SonicLift off 13 4 7 After Treatment 14 4 8 Charging 14 5 0 Maintenance 15 5 1 Cleaning 15 5 2 Trouble Shooting 15 5 3 Disposal of Electrical 16 Electronic Equipment Waste E waste 6 0 Service 16 6 1 Outside Warranty Period 17 7 0 Safety EMC Biocompatibility 17 8 0 Pr...

Page 4: ... area to another with shades of tan brown or black sometimes white red or blue Diameter usually but not always larger than 6 mm in size diameter of a pencil eraser Bleeding any skin growth that bleeds or will not heal 2 Do not use if you have a history of light triggered seizures It is recommended that you test a small less sensitive patch of skin i e such as the forearm SonicLift Model ST261 shou...

Page 5: ... 9 Never drop or insert any object into any opening on the device 10 Never operate this device if it has been damaged If it is not working properly if it has been dropped or damaged or submerged in water Return the device to Pretika Corporation for examination and repair 11 Do not disassemble the device as this may cause damage malfunction or personal injury There are no user serviceable parts ins...

Page 6: ...STEM 19 A warning on potential hazard from operation in close proximity to a shortwave or microwave therapy equipment 20 The long term effects of chronic electrical stimulation are unknown 21 Stimulation should not be applied over the carotid sinus nerves particularly in patients with a known sensitivity to the carotid sinus reflex 22 Stimulation should not be applied over the neck or mouth Severe...

Page 7: ...tructions before using your SonicLift Model ST261 This product is designed for cosmetic purposes only and is designed specially for the face 5 Safety of SonicLift for use during pregnancy has not been established 6 Caution should be used by patients with suspected or diagnosed heart problems 7 Caution should be used by patients with suspected or diagnosed epilepsy 8 Caution should also be used in ...

Page 8: ...ended for facial stimulation and is indicated for the over counter cosmetic use 3 0 DEVICE DESCRIPTION SonicLift Model ST261 is a non invasive facial toning device intended for at home cosmetic use This device delivers low level electrical micro current impulses to strategic locations on the face to improve your facial tone Electrical current is emit ted from dual probes that are designed for opti...

Page 9: ...he stimulation of facial muscles as indicated in the instruction manual for personal beauty purposes All other uses shall be deemed improper 3 1 Accessories List No Name Quantity Picture 1 Main Device 1 2 Charger Station 1 3 Charging Adaptor 1 4 Gel 1 ...

Page 10: ... on when power is off all the light indicators will be off MODE Button A MODE button on the inside handle of the SonicLift device can switch between 2 modes Vibration mode Micro Current Mode INTENSITY Button An INTENSITY button on the inside handle of the SonicLift device can adjust output intensity from Level 1 to Level 4 ON OFF Button Mode Button Intensity Button Spheres ...

Page 11: ...ne step Adjustment Mode 1 Vibration Stimulation Mode 2 Current Stimulation Intensity 1 Left intensity light appears green color Left intensity light appears green color Intensity 2 Left intensity light appears blue color Left intensity light appears blue color Intensity 3 Right intensity light appears green color Right intensity light appears green color Intensity 4 Right intensity light appears b...

Page 12: ...ft treatment you can apply more gel 4 2 Activate the SonicLift 1 Unpack the device and all the accessories 2 Be sure that your device is charged We recommend a full 12 hour charge before the first use 3 Blue light will show when charging Green light will show after fully charged 4 Press the ON OFF Button to turn on the SonicLift Model ST261 and the orange Power light will be on 4 3 Select Mode Sel...

Page 13: ...s on the skin at the same time as the device will automatically switch polarity during treatment Repeat until the entire facial area has been treated avoiding eye area and around the mouth Micro Current Mode Select the Micro Current Mode to enhance absorption of skin care products into the skin or for a relaxing facial massage To use this feature simply apply moisturizing and other skin care treat...

Page 14: ...le are aligned with metal pads in the Charging station Cradle before placing into cradle for charging Plug the Charging Adaptor into wall outlet and then connect the output cord of Charging Adaptor into the socket inlet on the back of the Cradle The BATTERY Light turning blue indicates the metal contact points are aligned and the device is charging A full charge is indicated by the BATTERY Light t...

Page 15: ...ice to remove any product Gently wipe down the case of your device 5 2 Troubleshooting In the event that the device fails to perform as intended the following notes will help to identify potential problems with the device and its setup Problem Solution Device turns off automatically Check and recharge batteries Device cannot not turn on Check and recharge batteries Make sure contact points on devi...

Page 16: ...epair must have the following During Warranty Period with Proof of Purchase store receipt RMA Number Should your product become defective during the warranty period call Pretika Corporation s customer service team at 949 481 8818 to request an RMA number Package the item securely and return it prepaid insured along with Proof of Purchase to Pretika Corporation Warranty Repair Department 12215 Holl...

Page 17: ... shall be performed only by a Service Technician certified by Pretika Corporation 7 0 SAFETY EMC BIOCOMPATIBILITY 1 This device is Class II equipment with type BF applied part It complies to Medical Electrical Safety Standards IEC 60601 1 IEC 60601 2 10 2 This device is also complied to Medical EMC Standard IEC 60601 1 2 3 All the user directly contracting materials for main device housing and out...

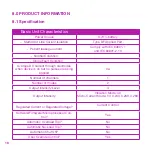
Page 18: ...Fault Condition Average DC current through electrodes when device is on but no pulses are being applied 0A Number of channels 1 Number of modes 2 Output Intensity Level 4 Output Intensity Vibration Mode 4V Micro Current Mode 0V 0 24V 0 26V 0 28V Regulated Current or Regulated Voltage Current Control Software Firmware Microprocessor Con trol Yes Automatic Overload Trip No Automatic No Load Trip No ...

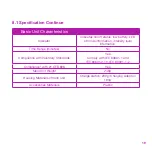
Page 19: ...l information Time Range minutes No Compliance with Voluntary Standards Yes Comply with IEC 60601 1 and IEC 60601 2 10 IEC 60601 1 2 Compliance with 21 CFR 898 Yes Main Unit Weight 248g Housing Materials of main unit Charge station 200g Charging Adaptor 180g Accessories Materials Plastic 8 1 Specification Continue ...

Page 20: ...39mC 500Ω Maximum Phase Charge 500Ω Maximum Average Current 0 198mA 500Ω Maximum Current Density 0 0105mA cm2 500Ω The Electrode Size 16cm Maximum Power Density 0 0018 mW cm2 500Ω The Electrode Size 16cm Pulse Duration 1 s Pulse Cycle 2 s Frequency Vibration Mode 1s 3 9ms 5 3ms 1s 5 4ms 3 8ms 1s 6 8ms 2 3ms 1s 8 3ms 0 9ms Contraction and Relaxation Time Due to different modes See below Pro gram Sp...

Page 21: ...al Features Environment for operation Temperature 5 45 Humidity 20 65 RH Environment for storage Temperature 0 45 Humidity 10 90 RH 8 2 Mode Specification Table Vibration Output Specification Contraction and Relaxation Time Level 1 Level 2 ...

Page 22: ...22 8 2 Mode Specification Table Continue Vibration Output Specification Contraction and Relaxation Time Level 3 Level 4 ...

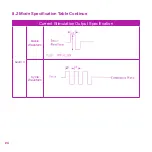
Page 23: ...8 2 Mode Specification Table Continue Current Stimulation Output Specification Level 1 Basic Waveform T 0 Vpp 0Vdc Cycle Waveform Level 2 Basic Waveform Cycle Waveform Level 3 Basic Waveform Cycle Waveform ...

Page 24: ...24 Current Stimulation Output Specification Level 4 Basic Waveform Cycle Waveform 8 2 Mode Specification Table Continue ...

Page 25: ...25 8 3 Label Symbols ...

Page 26: ...ymbol for SERIAL NUMBER This symbol shall be accompanied by the manufacturer s serial number 5 DATE OF MANUFACTURE This symbol shall be accom panied by a date to indicate the date of manufacture 6 Symbol for MANUFACTURER This symbol shall be accompanied by the name and the address of the manufacturer 7 WEEE Waste Electrical and Electronic Equipment The waste products should be handled legally ...

Page 27: ...27 9 MANUFACTURER INFORMATION Company Pretika Corporation Address 12215 Holly Street Riverside CA 92509 Tel 9491882 8818 Fax 949 481 8828 Email customerservice pretika com ...

Page 28: ...FacialToning Lift Firm and Tone Skin ...

Reviews: