Prestigio P260DVD-X User Manual Download Page 23


Prestigio P260DVD-X P420DVD-X 

23 

ENG 

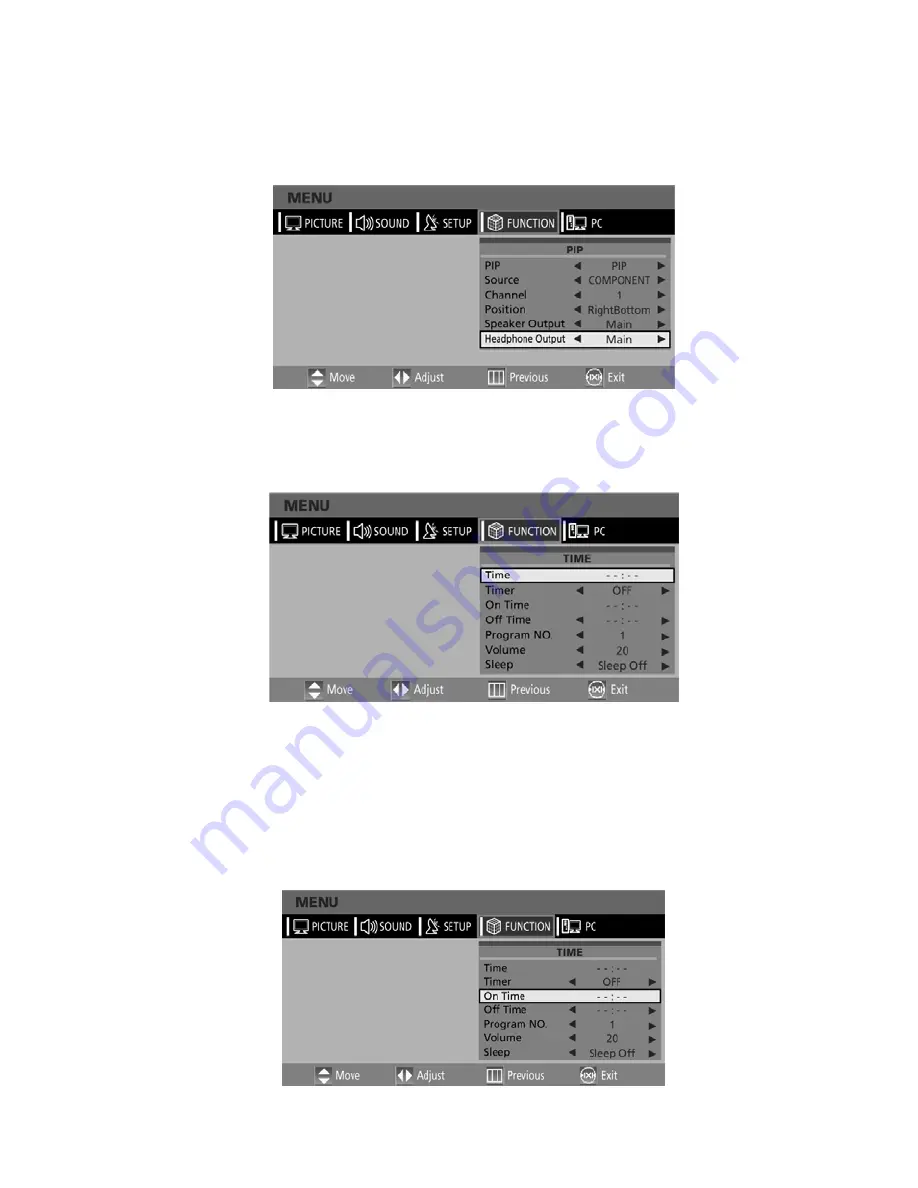
Selecting the Headphone Output in the PIP Screen Mode 

Note. 

This function is supported in RF mode only. 

You can simultaneously listen to the sound of the main picture using the internal speaker as well as listen to the sound of the 
sub-picture using the headphones, by setting up the headphone output configuration or vice versa. 


1-4. STEP1~STEP4 is the same as that of Viewing Picture-in-Picture. 
5. Select HEADPHONE OUTPUT using the /\ / \/ button and then press the > button. 
6. Select a desired status (MAIN or SUB/PIP) by pressing the 

</>

 button. 

Setting the Clock 


1. Press the TV.MENU button. The OSD MENU will be displayed. 
2. Select FUNCTION using the 

</>

 button. 

3. Select TIME using the /\ / \/ button and then press the > button. 
4. Move to the Hour using the > button and then set the Hour to the correct time using the /\ / \/ button. 
5. Move to the Minute using the > button and then set the Minutes to the correct time using the /\ / \/ button. 
6. Press the EXIT button to exit the menu. 

Setting the On/Off Timer 

You can set the On/Off Timer to automatically turn the TV on and off at a desired time. The current time has to be configured first to 
set the On/Off Timer. 


Summary of Contents for P260DVD-X

Page 1: ...Prestigio P260DVD X P420DVD X 1 ENG Prestigio P260DVD X P420DVD X User s Manual ...

Page 2: ...ease contact your local city office your household waste disposal service or the shop where you purchased the product Important Safety Instructions This equipment has been designed and manufactured to meet international safety standards but like any electrical equipment care must be taken if you are to obtain the best results and safety is to be assured So please read the points below for your own...

Page 3: ...ect device shall remain readily operable Do not defeat the safety purpose of the polarized or grounding type plug A grounding type plug has two blades with one wider than the other A grounding type plug has two blades and a third grounding prong The side blade or the third prong are provided for your safety If the provided plug does not fit into your outlet consult an electrician for replacement o...

Page 4: ...4 Prestigio P260DVD X P420DVD X ENG Overview Front View LM LQ ...

Page 5: ... This is also used to select the MOVE ADJUST item on the on screen menu 6 PROGRAM Changes channels or MOVE ADJUST to items on the on screen menu 7 MENU To access or close menus simultaneously 8 TV VIDEO Selects an external device connected to the TV DVD Depend on the model 9 PLAY PAUSE Play the DVD or temporarily stop playback 10 STOP Stop the DVD playback 11 OPEN CLOSE OPEN CLOSE the DVD ...

Page 6: ... DVI INPUT VIDEO AUDIO L R JACK 4 COMPONENT JACKS VIDEO Y Pb Pr AUDIO L R 5 LINE VIDEO AUDIO OUTPUT JACKS 6 VIDEO3 VIDEO AUDIO INPUT JACKS 7 S VIDEO INPUT JACK 8 DIGITAL AUDIO OUTPUT JACK 9 SCART JACKS BOTTOM SCART1 TOP SCART2 10 HEADPHONE JACK Used for headphones that can be purchased additionally 11 TV ANTENNA INPUT JACK ...

Page 7: ...utoff 22 TV MENU Displays the OSD menu 23 S STD Configures various audio settings 24 EXIT Exit the current configuration DVD Depend on the model 25 SLOW For fast and slow playback 26 TITLE For selecting a title on the disc 27 SETUP For initial DVD player settings 28 REC DVD R W option 29 OPEN CLOSE OPEN CLOSE the DVD tray 30 STOP Stop the DVD playback 31 PLAY PAUSE Play the DVD or temporarily stop...

Page 8: ... game devices or video disc players This end can be fitted with A SCART connector Three RCA connectors VIDEO AUDIO_L AUDIO_R Procedures for watching a Video over a VCR 1 Turn the TV on and select VIDEO1 using the LINE button on the remote control 2 If you have a second VCR and wish to copy cassette tape connect the source VCR to SCART1 and the target VCR to SCART2 so that you can redirect the sign...

Page 9: ...N terminal on the back of your VCR 2 Connect the VIDEO AUDIO INPUT jacks of the TV and the video audio output jacks of your VCR with the video audio cables Connect the cable to the terminal of the same color You can use the S Video cable to connect a VCR or a DVD player for better video quality If your VCR does not support stereo sound connect the mono audio out jack to the AUDIO INPUT left jack P...

Page 10: ...g VIDEO INPUT jack on external TV To watch the external TV 1 Turn the external TV on and select VIDEO using the external input button 2 Turn your TV on Connecting the DTV Receiver Connection Procedures 1 The COMPONENT VIDEO IN and COMPONENT AUDIO IN connectors are used for equipment with a DVD or DTV receiver out 480i 60Hz 480p 60Hz 576i 50Hz 576p 50Hz 720p 50Hz 720p 60Hz 1080i 50Hz 1080i 60Hz To ...

Page 11: ...g the HDMI JACK USE DVI JACK Connection Procedures 1 Connect the HDMI input jack of the TV and the DVI output jack of your DTV Receiver Using the adapter or HDMI cable 2 Connect the DVI audio input jacks of the TV and the DVI audio output jacks of your DTV Receiver with the audio cable 480p 60Hz 576p 50Hz 720p 50Hz 720p 60Hz 1080i 50Hz 1080i 60Hz 3 VESA Standard Mode Resolution Vertical Frequency ...

Page 12: ...the television toward ON I Depend on the model 3 Press the POWER button on the remote control or on the front panel of the unit You can also switch on by pressing the PROG buttons When you turn the power ON the screen appears and the POWER STANDBY light is turned off When you turn the power OFF the screen goes blank and the POWER STANDBY light turns red Do not leave your television in Standby mode...

Page 13: ...on and then press the button Manual Storing of Channels When storing channels manually you can choose Whether or not to store each of the channels found The programme number by which you wish to identify each stored channel 1 Press the TV MENU button The OSD MENU will be displayed 2 Select SETUP using the button 3 Select MANUAL PROGRAM using the button and then press the button 4 Select SYSTEM usi...

Page 14: ...k cannot be released using front panel buttons Only remote control can release the Child Lock setting so keep the remote control away from children 1 Press the TV MENU button The OSD MENU will be displayed 2 Select SETUP using the button 3 Select MANUAL PROGRAM using the button and then press the button 4 Select CHILD LOCK using the button 5 To lock the channel select LOCK by pressing the button A...

Page 15: ...am to the desired program number with the buttons All the following programs are shifted down one position 3 Press the YELLOW button again to release this function Moving a Program 1 Select a program to the moved with the buttons 2 Press the GREEN button 3 Move the program to the desired program number with the buttons 4 Press the GREEN button again to release this function Skipping a Program Numb...

Page 16: ...l to tune using the numeric or channel buttons 2 Press the TV MENU button The OSD MENU will be displayed 3 Select SETUP using the button 4 Select MANUAL PROGRAM using the button and then press the button 5 Select FINE TUNE using the button and then press the button to fine tune If you are unable to fine tune a channel check that the SYSTEM settings are correct 6 Select STORE using the button and t...

Page 17: ...nd the background BRIGHTNESS Determines the brightness of the screen SHARPNESS Determines the sharpness of an object image COLOR Determines the color density Selecting the Sound Mode You can select a sound mode from among STANDARD MUSIC SPEECH or USER mode according to your personal preference QUICK Press the S STD button Whenever you press this button SOUND STATUS changes to STANDARD MUSIC SPEECH...

Page 18: ...to exit the menu Adjusting the Headphone Volume You can listen to the sound of the main or sub PIP using the headphones You can also adjust the volume of the headphones Note Prolonged use of headphones at a high volume may damage your hearing 1 Press the TV MENU button The OSD MENU will be displayed 2 Select SOUND using the button 3 Select HEADPHONE VOLUME using the button 4 Select the desired vol...

Page 19: ...ONO mode in this order 1 Press the TV MENU button The OSD MENU will be displayed 2 Select SOUND using the button 3 Select STEREO or DUAL using the button 4 Select the desired status using the button 5 Press the EXIT button to exit the menu If the receiving conditions deteriorate listening will be easier if the mode is set to the MONO position using the M S button If the stereo signal is weak or if...

Page 20: ...OOM1 Magnifies the size of the picture on the screen ZOOM2 Magnifies the size of the picture on the screen leaving the subtitles visible Note You can select only WIDE 4 3 screen size in the PC Mode Freezing the Picture You can freeze a moving picture on the screen Quick Press the STILL button Whenever you press this button the freezing function is turned on or off Note Even if the picture has been...

Page 21: ...er you press this button the source of the PIP window is changed to the next video signal of an externally connected device in that order 1 4 STEP1 STEP4 is the same as that of Viewing Picture in Picture 5 Select SOURCE using the button 6 Select the desired external input signal using the button Since this product has a single tuner you cannot watch two TV channels simultaneously when in PIP mode ...

Page 22: ... select the desired audio source fromeither the main screen or the PIP window Quick Pressing the SOUND button Whenever you press this button the mode is changed to MAIN PIP When MAIN is selected Audio of the main screen is heard When PIP is selected Audio of the PIP DW screen is heard 1 4 STEP1 STEP4 is the same as that of Viewing Picture in Picture 5 Select SPEAKER OUTPUT using the button and the...

Page 23: ...nd then press the button 6 Select a desired status MAIN or SUB PIP by pressing the button Setting the Clock 1 Press the TV MENU button The OSD MENU will be displayed 2 Select FUNCTION using the button 3 Select TIME using the button and then press the button 4 Move to the Hour using the button and then set the Hour to the correct time using the button 5 Move to the Minute using the button and then ...

Page 24: ...the ON Timer Volume You can configure the channel and volume to play when the TV is turned on by the Timer 1 3 STEP1 STEP3 is the same as that of Setting the clock 4 Select PROGRAM NO using the button 5 Select the desired channel to watch when the TV is turned on using the button 6 Select VOLUME using the button 7 Select the volume level for when the TV turns on using the button 8 Press the EXIT b...

Page 25: ... off 5 Press the EXIT button to exit the menu Change Password To play or unlock a locked channel in CHILD LOCK channel mode requires password 1 Press the TV MENU button The OSD MENU will be displayed 2 Select FUNCTION using the button 3 Select CHANGE PASSWORD using the button and then press the button 4 Enter the password using the numeric button Initial password is 0000 5 Enter the change passwor...

Page 26: ...ng Some pages may not be displayed 1 Select the channel providing the Teletext service using the PREPAGE or NEXTPAGE button 2 Press the TTX button to activate the teletext mode Result The contents page is displayed It can be redisplayed at any time by pressing the INDEX button 3 If you wish to display the actual broadcast at the same time as the teletext page press the MIX button again 4 Press the...

Page 27: ...uded in the teletext pages are color coded and can be selected by pressing the colored buttons on the remote control 1 Display the teletext contents page by pressing the MIX button 2 Press the coloured button corresponding to the topic that you wish to select the available topics are given on the status line Result The page is displayed with other coloured information that can be selected in the s...

Page 28: ...PC screen through the TV 1 Turn the PC on and check that the PC settings are correct If the PC settings are incorrect the screen may display a duplicated or distorted picture For PC configuration procedures refer to the corresponding chapter of this manual 2 Press the LINE button and select PC INPUT mode 3 Adjust the PC screen For adjustment procedures refer to the corresponding chapter of this ma...

Page 29: ...3 Select H POSITION using the button and adjust the horizontal position using the button Adjusting the Vertical Position 3 Select V POSITION using the button and adjust the vertical position using the button Initializing Settings RESET 3 Select RESET using the buttons and then select using the button This returns you to the factory default screen 4 Press the EXIT button to exit the menu Auto Adjus...

Page 30: ...in shows the SINGLE REMAIN for the track Pressing the button again shows the TOTAL ELAPSED for the track Pressing the button again shows the TOTAL REMAIN for the track Pressing the button again exits the status display Searching for a Specific Screen Song You can use one of the functions listed below to jump to a specific chapter or track during playback Fast Forward Reverse Use this function to p...

Page 31: ...track Repeat off Exits repeat mode Changing the Audio Language Changing the Subtitle Language Select the language on discs that contain more than one language by following the instructions below Changing the Audio Language It is possible to change the audio soundtrack language to a different language from the one selected at the initial settings This operation works only with discs on which multip...

Page 32: ...ENU or TITLE remote control 1 Press the MENU button The menu contained on the disc will appear on the screen The menu appears differently with different disc 2 Press the TITLE button The title contained on the disc will appear on the screen The title menu appears differently with different disc Programming ina Specific Order Program play This function is used to play the Title Chapter and Tracks o...

Page 33: ... CD CD RW disc that contains a MP3 files To Play a MP3 File 1 Insert the MP3 disc Make sure that the disc s label is facing up 2 Using the button to find the desired folder 3 Using the button to select the desired a mp3 files 4 Press the ENTER button to start playback a file Repeat Playback Playback of a CD CD RW disc that contains a MP3 files 1 Press the REPEAT button Each press of the REPEAT but...

Page 34: ... AVI only DTS Audio is not supported WMA is not supported When burning a subtitle file to a CD ROM in your PC be sure to burn it as an SMI file Reverse of slow playback does not work DivX Supported format VIDEO Divx3 11 4 x 5 x AUDIO AC3 MP3 80kbps 320kbps Playing Kodak Picture CD and JPEG File To play Kodak Picture CD and JPEG File When a Kodak Picture CD is inserted an automated slide show is la...

Page 35: ... to left and right in turn mode 10 It displays from outside to inside in turn mode 11 It displays from horizontal blind mode RAND It displays at random NONE Starting music slide show 1 Whenever SUBTITLE button pressed at STOP mode SLIDE SHOW MODE1 SLIDE SHOW MODE2 SLIDE SHOW MODE3 SLIDE SHOW OFF will be selected repeatedly 2 Starting slide show mode 1 After selecting SLIDE SHOW MODE 1 press ENTER ...

Page 36: ... it will display subtitles in that DISC MENU Use the Disc Menu option to select the language you want a DVD s disc menu to be displayed in not the same as the player menu Video Setup For selecting TV screen ratio 1 Press the SETUP button during stop mode and Press the button to move to Video Setup 2 Press the button and press the ENTER button 3 Press the button to select desired item TV DISPLAY 4 ...

Page 37: ...isconnect the digital output sound OFF Set to output digital sound DUAL MONO STEREO For stereo sound output LEFT MONO For stereo the output of the left channel of the audio track RIGHT MONO For selecting the output of the right channel of the audio track MIXED MONO For selecting the output of both the left and right channels of the audio track Dynamic For increasing the output of the audio only 4 ...

Page 38: ...up 2 Press the button and press the ENTER button 3 Press the ENTER button again 4 Enter your old password and new password in 4 digits 5 Re enter new password for confirmation then press the ENTER button The Password is preset to 0000 Default If user selects reset from the setup menu all the value of setup menu will be initialized by factory setting value Exception Parental level and Password valu...

Page 39: ...84k bytes Note Our solution supports a maximum constant 6Mbps bitrate AUDIO DivX certified devices can play back any interleaved MP3 audio at any bitrate both CBR and VBR The audio must be sampled at standard frequencies such as 32khz 44 1khz and must conform to the AVI file specification DivX VOD Playback This chapter explains how to playback DivX VOD 1 Press SETUP at disc stop mode 2 Use to move...

Page 40: ...e procedure from No 1 In case of Bad Registration code are inserted It turns out to be invalid registration code the file will not be play back This video player is not authorized to play this video showing following message Using ARM on the Outer Wall This LCD TV is available for installing Wall Mount Rack When you install Wall mount rack to this product please make sure to use the same manufactu...

Page 41: ...l pixels This is not a problem No picture on the screen No audio Discordance between the external device jack and the input switch button location Adjust the input switch location A picture is displayed on the screen but there is no audio The volume is adjusted to 0 Mute is active The audio cable is disconnected Turn up the Volume button Press the Mute button again Check the audio cable connectivi...

Page 42: ...Is the power cord plugged in properly or is there a power failure Is fluorescent lighting or a neon sign near the unit Warning If a problem has been detected unplug the power cable from the wall outlet first Using the product when it has a fault may cause electric shocks or fire Do not place objects near the wall outlet so that you can unplug the power cable if necessary ...

Page 43: ...l out Dolby digital DTS digital Output Analog Audio out Down Mix 2 CH Stereo Lt Rt TV VIDEO Receiver Channels VHF Channel E2 Channel E12 UHF Channel E21 Channel E69 CATV Channel S1 Channel S41 Television Broadcasting System PAL SECAM B G D K I L L Antenna Interface VHF UHF 75ohm Video Signal PAL SECAM NTSC 3 58 4 43 PC Synchronization Horizontal F 30 60KHz Vertical F 56 75Hz Color Quality 16 772 2...

Page 44: ... Clock Frequency MHz Polarity H V MAC 640 X 480 31 469 59 94 25 175 VESA 640 X 480 37 861 72 809 31 5 VESA 640 X 480 37 5 75 31 5 IBM 720 X 400 31 469 70 087 28 322 VESA 800 X 600 37 879 60 317 40 VESA 800 X 600 48 077 72 188 50 VESA 800 X 600 46 875 75 49 5 MAC 832 X 624 49 726 74 551 57 284 VESA 1024 X 768 48 363 60 004 65 VESA 1024 X 768 56 476 70 069 75 VESA 1280 X 768 47 693 59 992 80 125 PIP...

Reviews: