22
INSTALLATION "C" BY USING HOUSING UNIT
(figs. 6.3a, 6.3b, 6.3c)
•
Remove the upper cross member support as indicated in figure 6.3b.
•
Cut the bottom of the housing as indicated in figure 6.3b.
•
Screw oven base housing to adjoining cabinetry by suitable screws (not supplied) as
indicated in figure 6.3c.
•
Check the position of the cabinet legs to ensure the cut-out does not interfere with
the legs support. Otherwise the cabinet may have to be removed as in INSTALLA-
TION TYPE "B".
•
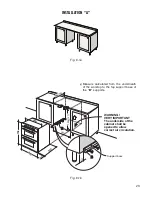
Mount the 2 (two) metal supports “B” (supplied with the appliance in a separate kit)
as indicated in Figs. 6.3c).
•
Build in the double oven making it slide on the metal supports “B”.
FIXING THE DOUBLE OVEN
The double oven should then be secured by 6 screws (not supplied) fitted into the
holes provided at the sides of the oven (Fig. 6.4). If you open the oven doors, you will
see some screw holes.
Remember the housing should not be free standing but be secured to the wall and/or
adjacent fittings.
NOTE
It is essential that when installing your double oven, adequate air circulation is avail-
able within the installation.
Inadequate air circulation may greatly impair the performance of your double oven and
may affect adjacent cabinets due to an increase in temperature.
Adjust the hinges of furniture door adjacent to the double oven to allow a 5 - 7 mm
gap between the furniture door and the oven frame.


