background image

ASSEMBLY INSTRUCTIONS

STEP 1

Remove all contents from the carton packaging. Make sure all parts are 

present before attempting assembly. Once the grill is fully assembled, go back 

and check to make certain all the bolts are secure. Tighten again using the 

screwdriver provided if necessary.

Note:

 Before beginning assembly, make certain the two swivel casters on the 

bottom panel assembly are locked.

a) Align the holes on 

3

 right side panel with the holes on the 

1

 bottom panel 

assembly.

b) Insert each pre-installed bolt on the right side panel into the pre-drilled holes 

on the bottom panel and tighten by hand until secure. 

c)  Repeat the procedure for the 

2

 left side panel. Go back to tighten all the 

bolts using the screwdriver provided.

15

1

2

3

pre-installed bolt (6)

Summary of Contents for PC25774

Page 1: ...100 000 BTU double lid gas grill instructions manual model PC25774 LOBLAWS INC 1 PRESIDENT S CHOICE CIRCLE BRAMPTON ONTARIO L6Y 5S5 CANADA 2008 ...

Page 2: ...OUGH FRIDAY FROM 10 00 AM TO 7 00 PM EST DO NOT RETURN TO PLACE OF PURCHASE DANGER If you smell gas 1 Shut off gas to the appliance 2 Extinguish any open flame 3 Open lid 4 If odour continues keep away from the appliance and immediately call your gas supplier or your fire department WARNING Failure to follow these instructions could result in fire or explosion which could cause property damage per...

Page 3: ...tion operation and maintenance instructions thoroughly before installing or servicing this equipment DANGER Failure to follow these instructions could result in a fire or explosion that could cause property damage personal injury or death DANGER DO NOT use gas grill for indoor cooking or heating TOXIC fumes can accumulate and cause asphyxiation DO NOT use in or on boats or recreational vehicles WA...

Page 4: ... valves please follow these instructions carefully 1 First open lid and turn gas tank on slowly 2 Turn only one knob on at a time when lighting up the grill 3 Use protective gloves when grill gets hot Please refer to the Owner s Manual for details After grilling 1 Burn grill for 10 15 minutes to burn off food residues 2 Wait until the grill is completely cooled before closing lid 3 Clean up grease...

Page 5: ...OF CONTENTS SECTION ONE Safety instructions 6 General information 12 SECTION TWO Parts list Description 13 Assembly instructions 15 SECTION THREE Safety 26 Natural gas connection 27 Leak testing 29 SECTION FOUR Lighting instructions 30 Excess flow safety valve reset 34 SECTION FIVE Cleaning 35 Troubleshooting 37 SECTION SIX Limited warranty 41 Read this Owner s Manual carefully and completely befo...

Page 6: ...pane Storage and Handling code B149 2 IMPORTANT NOTICE READ ALL INSTRUCTIONS PRIOR TO ASSEMBLY AND USE Safety First Read and understand all warnings and precautions prior to operating your grill WARNING 1 This grill is for outside use only It should not be used in a building garage or any other enclosed area 2 The use of alcohol prescription or non prescription drugs may impair an individual s abi...

Page 7: ...hildren and pets away from the grill at all times 7 This is not a tabletop grill Do not place this grill on any type of tabletop surface 8 Do not use the grill in high winds 9 This grill must be used with natural gas only 10 Do not attempt to attach this grill to the self contained propane system of a camper trailer motor home or house 11 Do not use charcoal or lighter fluid 12 Do not use gasoline...

Page 8: ...mbustible constructions 17 Do not use in an explosive atmosphere Keep grill area clear and free from combustible materials gasoline and other flammable vapours and liquids 18 Do not attempt to use or assemble with missing or damaged parts Contact customer service for a replacement CAUTION Prevention of burns 1 To avoid burns do not touch metal parts of the grill until they have completely cooled f...

Page 9: ... as possible from hot surfaces and dripping hot grease SAFE LOCATIONS FOR USE OF THIS OUTDOOR GRILL DANGER Never use this outdoor grill inside any building garage shed or breezeway or inside any boat trailer or recreational vehicle to prevent a possible fire and to prevent the possibility of carbon monoxide poisoning or asphyxiation WARNING 1 Do not use this appliance under overhead combustible su...

Page 10: ... in the vicinity of this grill 4 The temperature of a grease fire or of the radiated heat might otherwise be sufficient to ignite nearby combustible or volatile substances 5 Always locate this grill where there will be ample combustion and ventilation air but never position it in the direct path of a strong wind 6 Never allow the grill to operate while unattended to prevent uncontrolled grease fir...

Page 11: ...ANGER Gas safety Natural gas is flammable and hazardous if handled improperly Become aware of its characteristics before using any natural gas product Natural gas characteristics Flammable explosive under pressure lighter than air and settles in pools in high areas In its natural state natural gas has no odour For your safety an odorant has been added This grill is shipped from the factory for nat...

Page 12: ...sect nests by removing the burner and inserting a bottle brush cleaner into each tube to make sure the passage is clear A clogged tube can lead to a fire beneath the grill 3 Ensure that the valve nozzle is pointing straight and completely inserted into the venturi tube GENERAL INFORMATION 1 A natural gas hose is required for operation 2 This gas grill is NOT intended for commercial use 12 ...

Page 13: ...d 1 pc 22 grease cup support 2 pcs 23 grease cup 2 pcs 24 motor support 1 pc 25 grease pan 1 pc 26 grease pan stopper 1 pc 1 bottom panel assembly 1 pc 2 left side panel 1 pc 3 right side panel 1 pc 4 back panel 1 pc 5 left drawer support 1 pc 6 right drawer support 1 pc 7 natural gas hose 1 pc 8 spare cylinder stopper 2 pcs 9 front beam 1 pc 10 drawer 2 pcs 11 door 2 pcs 12 body assembly 1 pc 13 ...

Page 14: ...bolt M6x15 23 pcs C bolt M4x15 20 pcs D bolt M4x10 2 pcs E flat washer M6 22 pcs F spring washer M6 22 pcs G flat washer M4 22 pcs H spring washer M4 20 pcs I nut M6 2 pcs J nut M4 20 pcs K screwdriver 1 pc HARDWARE LIST 14 ...

Page 15: ...essary Note Before beginning assembly make certain the two swivel casters on the bottom panel assembly are locked a Align the holes on 3 right side panel with the holes on the 1 bottom panel assembly b Insert each pre installed bolt on the right side panel into the pre drilled holes on the bottom panel and tighten by hand until secure c Repeat the procedure for the 2 left side panel Go back to tig...

Page 16: ...driver provided STEP 3 a Align the holes on the 5 left drawer support with the holes on the 1 bottom panel assembly b Insert B one bolt with F one spring washer and E one flat washer into each pre drilled hole Tighten by hand until secure c Align the holes on 5 left drawer support with the holes on 4 back panel d Insert B one bolt with F one spring washer and E one flat washer into each pre drille...

Page 17: ...the upper drawer support and make sure the lower drawer is installed first b Align the holes on the right track support with the holes on the right drawer support c Insert one bolt into each pre drilled hole on the right track support then place one flat washer one spring wahser and one nut onto each bolt as shown Tighten by hand until secure d Repeat the procedure for the left track support and t...

Page 18: ... washer into each hole Tighten by hand until secure B d Repeat the procedure for the frame of the left side panel e Align the hole on the front beam with the top hole on the right drawer support f Insert one bolt with one spring washer and one flat washer into each hole Tighten by hand until secure 18 F E B F E g Repeat the procedure for the left drawer support h Go back and tighten all bolts usin...

Page 19: ...pin on the bottom of the 1 1 1 left door into the hole on left side of the 1 bottom panel assembly as shown b Insert the pin on the top of the 1 1 1 left door into the hole on the left side of 9 front beam c Repeat the procedure for the 1 1 2 right door 19 ...

Page 20: ...ighten all the bolts using the screwdriver provided STEP 9 a Loosen the five pre installed bolts on the right side of body assembly and allow bolt length to extend from the body assembly b Align the large holes on the 14 right side shelf with the bolts extending from the body assembly and push down on the right side shelf until the shelf locks into place Tighten bolts by hand until secure c Align ...

Page 21: ...1 a Open the side burner lid and put the side burner assembly on the right side shelf Make certain the valve nozzle is inserted into the venturi tube b Align the holes on the side burner assembly with the holes on the right side shelf Insert C one bolt into each hole and place G one washer H one spring washer and J one nut from the bottom of side shelf onto each bolt and tighten by hand c Go back ...

Page 22: ...ng washer and I one nut on the bolts from the opposite side of the side panel of the body assembly Tighten by hand c Go back to tighten all the bolts using screwdriver provided STEP 13 a Place 18 five flame tamers inside the body assembly over the burners b Place 19 three cooking grids inside the body assembly over the flame tamers c Place the 21 warming grid onto the warming grid support as shown...

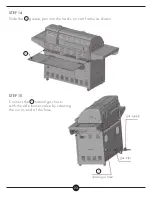
Page 23: ...upply gas inlet natural gas hose STEP 14 Slide the 25 grease pan into the tracks on cart frame as shown STEP 15 Connect the 7 natural gas hose with the side burner valve by screwing the nut on end of the hose 23 ...

Page 24: ...e 22 grease cup supports into the holes on the grease pan as shown b Place the 23 grease cups onto the grease cup supports STEP 17 a Insert the 26 grease pan stopper into the hole on the back panel as shown b Tighten the stopper by hand ...

Page 25: ...STEP 18 a To fix the wire clip on the side panel as shown b Insert the connector plugs into the hole on transformer Tighten the plastic nut until secure STEP 19 Fully assembled 25 ...

Page 26: ... or call a licensed and qualified installer It is recommended that an ON OFF manual shut off valve be installed at the gas supply source outdoors after the gas line exits outside wall and before release quick disconnect or before gas supply line enters ground Pipe sealing compound or pipe thread tape of the type resistant to the action of natural gas must be used on all male pipe threads Apply com...

Page 27: ...ipe threads Attach to side burner valve Connect the other end of the flex hose to manual shut off valve through a nipple NATURAL GAS HOSE ASSEMBLY CAUTION During any high pressure testing of the gas supply piping system at test pressures in excess of psi 3 5 kPa your gas grill and its individual shut off valve must be disconnected from the gas supply piping system During any low pressure testing o...

Page 28: ...l gas hose is connected for use See the Leak testing section on page 29 2 Do not smoke or allow other sources of ignition in the area while conducting a leak test 3 Conduct the leak test outdoors in a well ventilated area 4 Do not use matches lighters or a flame to check for leaks 5 Do not use grill until all leaks have been stopped If you are unable to stop a leak disconnect the natural gas suppl...

Page 29: ...ee parts water 2 Make sure control knobs are in the OFF position 3 Spray some solution on the connection points of the natural gas hose 4 Inspect the solution at the connections for bubbles If no bubbles appear the connection is secure 5 If bubbles appear you have a leak Go to Step 6 6 Disconnect the natural gas hose from the valve and reconnect Make sure the connection is secured 7 Retest with so...

Page 30: ...ighting burner Warning Attempting to light the burner with the lid closed may cause an explosion Make sure there are no obstructions of airflow to the gas unit Spiders and insects can nest and clog the burner venturi tube at the orifice A clogged burner tube can lead to a fire beneath the appliance 2 All valves must be in the OFF position 3 Open natural gas valve 4 Ignite only the burner s you wis...

Page 31: ...red repeat procedures 2 3 until all desired burners are lit 4 Adjust burners to the desired cooking temperature Burner installation and adjustment Precautions 1 After lighting observe the burner flame Make sure all burner ports are lit 2 If the burner flame goes out during operation immediately turn the gas OFF Open lid to let the gas clear for at least 5 minutes before re lighting 3 Before cookin...

Page 32: ...e lighting stick then insert a match into the end of lighting stick 3 Light the match 4 Once lit place the flame to reach the burner ports See diagram 5 Press the control knob and rotate it counter clockwise to the HIGH position The burner should light immediately 6 Adjust burner to the desired cooking temperature 7 Confirm that the burner is properly lit and that the flame pattern is as desired s...

Page 33: ...e DO NOT use abrasive or flammable cleansers as it will damage the parts of this product and may start a fire Clean with warm soapy water Observing the heat and colour of the infrared ceramic burner when lit Flame of infrared burner might be visible in shaded area After burner is lit it should feel warm in 5 10 seconds and colour of the ceramic plate turns red in approximately 2 3 minutes FLARE UP...

Page 34: ...tices of grill operation could activate the safety device without having a gas leak A sudden shut off of the gas flow typically occurs if you open the natural gas supply valve rapidly or if one or more of the burner control knobs is in an open position when opening the natural gas supply valve To ensure the procedure is safely and successfully performed please carefully follow the below procedure ...

Page 35: ...il you hear the ignition click 12 After the first front burner is lit turn on the other control knob s to the HIGH position If you have more than two burners ONLY turn them on ONE AT A TIME 13 When all front burners are lit close the grill lid 14 Wait for 10 15 minutes the temperature should reach 400 F 450 F 204 C 232 C SECTION FIVE CLEANING IMPORTANT Always allow your grill to completely cool of...

Page 36: ...nse thoroughly with water Inside surface If the inside surface of the grill lid has the appearance of peeling paint baked on grease has turned to carbon and is flaking off Clean thoroughly with a strong solution of detergent and hot water Rinse with water and allow it to completely dry Interior of grill bottom Remove residue using brush scraper and or cleaning pad Wash with a dishwashing detergent...

Page 37: ... small bottle brush or compressed air 7 Remove all food residue and dirt on outside of burner surface 8 Clean any clogged ports with a stiff wire such as an opened paper clip 9 Inspect burner for damage cracks or holes If damage is found replace with a new burner 10 Reinstall burner Make certain the gas valve orifices are correctly positioned pointing straight into burner inlet venturi tube Also c...

Page 38: ...r to valve Spider webs or insect nest in venturi Burner ports clogged or blocked SOLUTION Clean wire and or electrode with rubbing alcohol Wipe dry with cloth Replace electrode Reconnect wire or replace electrode wire assembly Check if natural gas supply is functioning If it is not call your local gas company If natural gas supply is functioning refer to the Excess flow safety valve reset procedur...

Page 39: ...g salt on burner Poor alignment of valve to burner venturi High or gusting winds Low on natural gas Excess flow valve tripped Grease build up Excessive fat in meat SOLUTION Call your local gas company Refer to the Excess flow safety valve reset procedure on page 34 Clean burner ports Burn grill for 15 minutes with the lid closed Clean venturi Clean burner Ensure burner venturi is properly engaged ...

Page 40: ...ir Noisy blue flames SOLUTION Adjust lower temperature accordingly Turn knobs to OFF Turn gas OFF at natural gas valve Leave lid in closed position and let fire burn out After grill cools remove and clean all parts Clean burner and or burner tube s Baked on grease build up has turned to carbon and is flaking off Clean thoroughly Natural Gas Models must be open a minimum of 1 59 mm 1 16 If flames a...

Page 41: ...e affecting the operation of the gas grill WARRANTY PROVISIONS This warranty is non transferable and does not cover failures due to misuse or improper installation or maintenance This warranty is for replacement of defective parts only We are not responsible for incidental or consequential damages or labour costs This warranty does not cover chips and scratches of porcelain non stick or painted su...

Page 42: ...ations or exclusions may not apply to you This warranty gives you specific legal rights and you may also have other rights that vary from province to province If you have any questions related to the product or warranty please call customer service at 1 877 630 5396 Monday through Friday from 10 00 AM to 7 00 PM EST ...

Page 43: ...43 NOTES AND OBSERVATIONS ...

Page 44: ...NA PRODUIT DE CHINE LOBLAWS INC MONTRÉAL H4N 3L4 TORONTO M4T 2S8 CALGARY T2E 7S9 CANADA 2008 Try it you ll love it Un essai vous convaincra or money refunded with proof of purchase ou argent remis avec preuve d achat ...

Reviews: