background image

Page 4  


         Installation Instructions

PSD-S

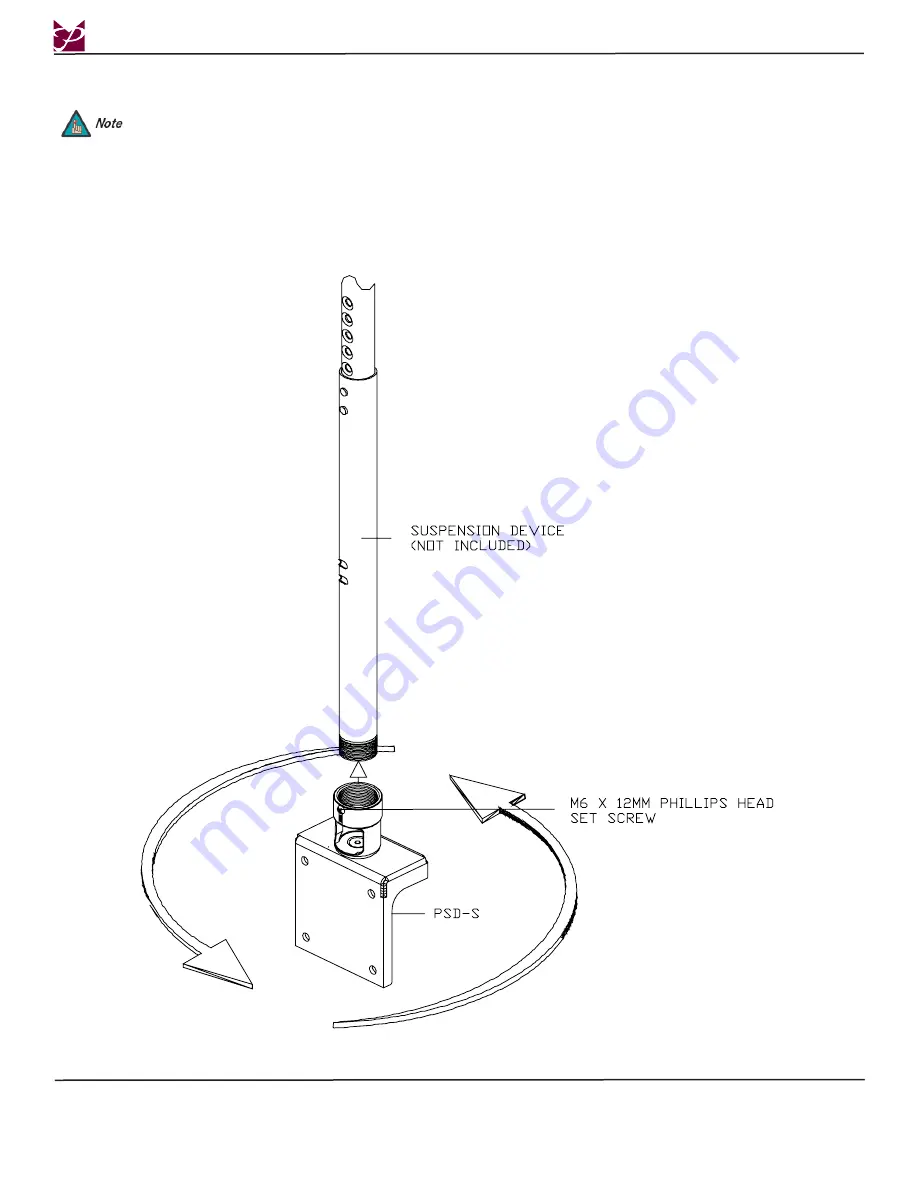
Attaching the Ceiling Adapter

Step 1.

  To attach the ceiling adapter to the suspension device (not included), rotate the ceiling adapter clockwise onto the suspension 


device a minimum of five (5) complete turns.


Before the following steps are begun, the appropriate suspension device must be installed. Premier mounts offers the 
AST-1321, AST-2446 or a standard 1-1/2” NPT extension pipe. Please see the installation instructions that are included 
with these respective mounting configurations.

Summary of Contents for PSD-S

Page 1: ...32 4888 EUROPE Swallow House Shilton Industrial Estate Shilton Coventry England CV79JY Phone 44 0 2476 614700 Fax 44 0 2476 614710 AUSTRALIA NEW ZEALAND OCEANIA DISTRIBUTOR P O Box 295 Mordialloc Vict...

Page 2: ...N EASILY ACCESSIBLE LOCATION FOR FUTURE REFERENCE Warning Statements Indicates that the power plug is to be disconnected from the power outlet Safety precautions must be taken at all times Warning and...

Page 3: ...one of these parts are missing and or damaged before beginning installation If there are parts missing and or damaged please stop the installation and contact Premier Mounts 800 368 9700 Ceiling Adapt...

Page 4: ...ng adapter clockwise onto the suspension device a minimum of five 5 complete turns Before the following steps are begun the appropriate suspension device must be installed Premier mounts offers the AS...

Page 5: ...ructions Page 5 PSD S A Phillips head screwdriver is required to perform the following step Step 2 Once the ceiling adapter has been attached tighten the M6 x 12mm Phillips head set screw using a Phil...

Page 6: ...nstructions PSD S Attaching the Mounting Plate Step 1 Use four 4 M10 hex head bolts eight 8 M10 flat washers and four 4 M10 nuts to attach the mounting plate to the ceiling adapter At this time finger...

Page 7: ...7 PSD S A 17mm open end wrench and a 17mm socket wrench will be required to perform the following step Step 2 Once the both units have been attached together use a 17mm socket wrench and a 17mm wrenc...

Page 8: ...Page 8 Installation Instructions PSD S Technical Specifications All measurements are in inches mm...

Page 9: ...UDING WARRANTIES OF MERCHANTABILITY AND FITNESS FOR A PARTICULAR PURPOSE PREMIER MOUNTS IS NOT RESPONSIBLE FOR INCIDENTAL OR CONSEQUENTIAL DAMAGES INCLUD ING BUT NOT LIMITED TO INABILITY TO USE ITS PR...

Reviews: