


2
CONTENTS
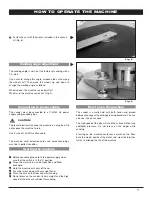
Important Parts of the Machine
...........................
3
Machine Set-up
Fitting the dustbag . . . . . . . . . . . . . . . . . . . . . . . . . . . . . . . . . . . . . . . . . . . . . . . . . . .
4
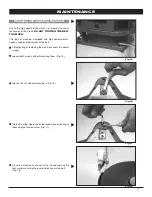
How to Operate the Machine
Fitting the sandpaper . . . . . . . . . . . . . . . . . . . . . . . . . . . . . . . . . . . . . . . . . . . . . . .
4
Sanding angle adjustment . . . . . . . . . . . . . . . . . . . . . . . . . . . . . . . . . . . . . . . . .
5
Connection to power supply . . . . . . . . . . . . . . . . . . . . . . . . . . . . . . . . . . . . . .
5
Starting the machine . . . . . . . . . . . . . . . . . . . . . . . . . . . . . . . . . . . . . . . . . . . . . . . .
5
How to operate the machine
.................................
5
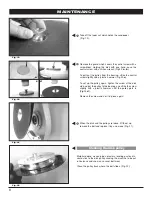
Maintenance
Brush replacement . . . . . . . . . . . . . . . . . . . . . . . . . . . . . . . . . . . . . . . . . . . . . . . . . .
6
Changing and adjusting the V-belt . . . . . . . . . . . . . . . . . . . . . . . . . . . . . .
7
Cleaning the disk pulley . . . . . . . . . . . . . . . . . . . . . . . . . . . . . . . . . . . . . . . . . . . .
8
Wheel replacement . . . . . . . . . . . . . . . . . . . . . . . . . . . . . . . . . . . . . . . . . . . . . . . . . .
9
Dust suction . . . . . . . . . . . . . . . . . . . . . . . . . . . . . . . . . . . . . . . . . . . . . . . . . . . . . . . . . . .
9
Equipment
.............................................................
9
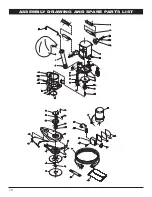
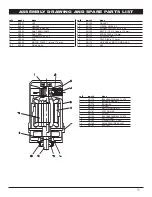
Assembly Drawing and Spare Parts List
...........
10
CAUTION
Read all instructions, warnings and
cautions before using!
These guidelines are provided for your
protection and convenience. Please read
them carefully. If you have any questions
regarding the use of your equipment call
Powr-Flite Technical Service at
800.880.2913. This manual contains
important information for the use of this
machine and safety instructions for
preventing personal injuries, damage to
the machine or to other property. Failure
to adhere to instructions provided can
potentially void any warranties.
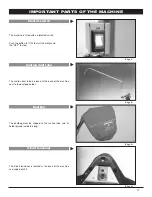
INTRODUCTION
Congratulations on your purchase of a Powr-Flite
Edger Sander. Read this entire manual before
operating or servicing the sander.
Unpacking the Edger Sander
The Powr-Flite Edger Sander was thoroughly
inspected, tested, and packaged to deliver the
equipment in good operating condition. The freight
carrier received and signed for the equipment in good
condition. Damage can occur during shipping and to
protect your interest, all cartons must be inspected for
damage (including any concealed damage) that might
have occurred during shipment. Any damage is the
responsibility of the freight carrier and should be
reported immediately to the carrier. It is your
responsibility to issue a claim and to receive
compensation from the freight carrier for any damage
done in transit. Shipping damage is not warranted.


