background image

www.powershield.com.au 

  16 

3. Connect devices to UPS 

After the UPS is turned on, you can connect devices to the UPS. 
1)    Turn on the UPS first and then switch on the devices one by one, the LCD panel will display total 

load level.   

2)    If it is necessary to connect the inductive loads such as a printer, the in-rush current should be 

calculated carefully to see if it meets the capacity of the UPS, because the power consumption of 

this kind of loads is too big. 

3)    If the UPS is overload, the buzzer will beep twice every second. 
4)    When the UPS is overload, please remove some loads immediately. It is recommended to have the 

total loads connected to the UPS less than 80% of its nominal power capacity to prevent overload 

for system safety.   

5)    If the overload time is over acceptable time listed in spec at AC mode, the UPS will automatically 

transfer to Bypass mode.    After the overload is removed, it will return to AC mode. If the overload 

time is over acceptable time listed in spec at Battery mode, the UPS will become fault status. At this 

time, if bypass is enabled, the UPS will power to the load via bypass. If bypass function is disabled 

or the input power is not within bypass acceptable range, it will cut off output directly. 

4. Charge the batteries 

1)    After the UPS is connected to the utility power, the charger will charge the batteries automatically 

except in Battery mode or during battery self-test.   

2)    Suggest  to  charge  batteries  at  least  10  hours  before  use.  Otherwise,  the  backup  time  may  be 

shorter than expected time. 

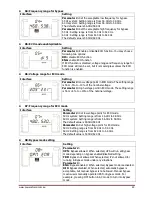
3)    Make sure the battery numbers setting on the control board (Please refer to the section 3-4-12 for 

detailed setting) is consistent to real connection. 

5. Battery mode operation 

1)    When the UPS is in Battery mode, the buzzer will beep according to different battery capacity. If the 

battery  capacity  is  more  than  25%,  the  buzzer  will  beep  once  every  4  seconds;  If  the  battery 

voltage drops to the alarm level, the buzzer will beep quickly (once every sec) to remind users that 

the battery is at low level and the UPS will shut down automatically soon. Users could switch off 

some non-critical loads to disable the shutdown alarm and prolong the backup time (the UPS would 

cut off the programmable output terminal automatically when the programmable timer function is 

enabled). If there is no more load to be switched off at that time, you have to shut down all loads 

as soon as possible to protect the devices or save data. Otherwise, there is a risk of data loss or 

load failure.   

2)    In Battery mode, if buzzer sound annoys, users can press the Mute button to disable the buzzer. 
3)    The backup time of the long-run model depends on the external battery capacity. 
4)    The backup time may vary from different environment temperature and load type. 
5)    When setting backup time for 16.5 hours (default value from LCD panel), after discharging 16.5 

hours, UPS will shut down automatically to protect the battery. This battery discharge protection 

can be enabled or disabled through LCD panel control. (Refer to 3-7 LCD setting section) 

6. Test the batteries 

1)    If you need to check the battery status when the UPS is running in AC mode/CVCF mode/ECO mode, 

you could press the “Test” button to let the UPS do battery self-test. 

2)    Users also can set battery self-test through monitoring software. 

7. Turn off the UPS with utility power supply in AC mode 

1)    Turn off the inverter of the UPS by pressing “OFF” button for at least 0.5s, and then the buzzer will 

beep once. The UPS will turn into Bypass mode.


NOTE 1: 

If the UPS has been set to enable the bypass output, it will bypass voltage from utility 

power to output sockets and terminal even though you have turned off the UPS (inverter). 

Summary of Contents for Centurion 10000 VA

Page 1: ...Centurion 10000 15000 20000 VA Tower Online UPS Users Manual www powershield com au...

Page 2: ...distortions The Centurions true online double conversion topology will continuously protect your equipment by internally isolating your equipment from the utility power ensuring that all your equipme...

Page 3: ...and operating instructions in this manual strictly Save this manual properly and read carefully the following instructions before installing the unit Do not operate this unit before reading through al...

Page 4: ...UPS INSTALLATION FOR PARALLEL SYSTEM 10 2 5 SOFTWARE INSTALLATION 12 3 OPERATIONS 13 3 1 BUTTON OPERATION 13 3 2 LED INDICATORS AND LCD PANEL 13 3 3 AUDIBLE ALARM 15 3 4 SINGLE UPS OPERATION 15 3 5 P...

Page 5: ...Do not connect appliances or devices which would overload the UPS e g big motor type equipment to the UPS output sockets or terminal Place cables in such a way that no one can step on or trip over th...

Page 6: ...connect the mains Ensure that no liquid or other foreign objects can enter into the UPS system The UPS can be operated by any individuals with no previous experience 1 5 Standards Safety IEC EN 62040...

Page 7: ...Unpack the package and check the package contents The shipping package contains One UPS One user manual One monitoring software CD One RS 232 cable option One USB cable One parallel cable only availab...

Page 8: ...ershield com au 7 Diagram 3 15K 20K Rear Panel Diagram 5 15KL 20KL Input Output Terminal Diagram 6 15K 20K Input Output Diagram 7 15K 20K Grounding Terminal Terminal Diagram 4 10K 10KL Input Output Te...

Page 9: ...execute the following instructions by professional personnel 1 Make sure the mains wire and breakers in the building are enough for the rated capacity of UPS to avoid the hazards of electric shock or...

Page 10: ...s 5 Remove the terminal block cover on the rear panel of UPS Then connect the wires according to the following terminal block diagrams Connect the earth wire first when making wire connection Disconne...

Page 11: ...tall the battery pack Pay highly attention to the rated battery voltage marked on the rear panel If you want to change the numbers of the battery pack please make sure you modify the setting simultane...

Page 12: ...rshield com au 11 NOTE The parallel system can not use one battery pack Otherwise it will cause system permanent failure 5 Refer to the following wiring diagram Wiring diagram of parallel system for 1...

Page 13: ...w powershield com au 12 Wiring diagram of parallel system for 15K L 20K L 2 5 Software Installation For optimal computer system protection install UPS monitoring software to fully configure UPS shutdo...

Page 14: ...utton to display next selection in setting menu Mute Down Button Mute the alarm Press and hold the button more than 0 5s to mute the buzzer Please refer to section 3 4 9 for details Down key Press thi...

Page 15: ...ion Indicates the output voltage frequency or battery voltage Vac output voltage Vdc battery voltage Hz frequency Load information Indicates the load level by 0 25 26 50 51 75 and 76 100 Indicates ove...

Page 16: ...seconds later UPS operates in Bypass mode and supplies power to the loads via the bypass NOTE When UPS is in Bypass mode the output voltage will directly power from utility after you switch on the in...

Page 17: ...buzzer will beep according to different battery capacity If the battery capacity is more than 25 the buzzer will beep once every 4 seconds If the battery voltage drops to the alarm level the buzzer w...

Page 18: ...a fatal error in the UPS Users can get the fault code from display panel Please check the trouble shooting table in chapter 4 for details 2 Please check the loads wiring ventilation utility battery an...

Page 19: ...ctly b Turn on the output breaker of each UPS c Turn on each UPS in turns After a while the UPSs will enter to AC mode synchronously and then the parallel system is completed 6 Turn on the parallel sy...

Page 20: ...g UPS and the system will transfer to Bypass mode Set the maintenance switches from BPS to UPS and put the maintenance bypass covers back 5 Turn on the remaining UPS according to the previous section...

Page 21: ...utdown point for programmable output Y Y Y Y Y Y 12 Reserved Neutral loss detection Y Y Y Y Y Y 13 Battery voltage calibration Y Y Y Y Y Y 14 Charger voltage adjustment Y Y Y Y Y Y 15 Inverter voltage...

Page 22: ...UPS to CVCF mode If selected the output frequency will be fixed at 50Hz or 60Hz according to setting in parameter 2 The input frequency could be from 46Hz to 64Hz NCF Setting UPS to normal mode not C...

Page 23: ...10 of the nominal voltage Parameter 3 High voltage point in ECO mode The setting range is from 5 to 10 of the nominal voltage 07 Frequency range for ECO mode Interface Setting Parameter 2 Set low volt...

Page 24: ...setting point or shutdown time arrives the programmable output will be cut off automatically After the utility is recovering the output will turn on automatically If overload happens the programmable...

Page 25: ...nter key to make the CHE flash Secondly press the Enter key again to activate the neutral detection check If neutral is detected the alarm will be muted and the UPS will go back to normal mode If neut...

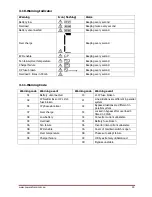
Page 26: ...hase difference between L2 and L1 with 120 L3 and L2 with 120 or phase difference between L2 and L1 240 and L3 and L2 with 240 3 8 Operating Mode Status Description Following table shows LCD display f...

Page 27: ...s the UPS has no output Alarm beeps every two minutes LCD display AC mode Description When the input voltage is within acceptable range UPS will provide pure and stable AC power to output The UPS will...

Page 28: ...e UPS can be set at a constant output frequency 50 Hz or 60 Hz The UPS will still charge battery under this mode LCD display Battery mode Description When the input voltage is beyond the acceptable ra...

Page 29: ...the UPS will beep once and start Battery Test The line between I P and inverter icons will blink to remind users This operation is used to check the battery status LCD display Warning status Descript...

Page 30: ...over None 21 Battery SCR short circuited None 03 Bus under None 24 Inverter relay short circuited None 04 Bus unbalance None 29 Battery fuse broken in Battery mode None 06 Converter over current None...

Page 31: ...de Warning code Warning event Warning code Warning event 01 Battery unconnected 10 L1 IP fuse broken 02 IP Neutral loss or IP L2 L3 fuse broken 21 Line situations are different in parallel system 04 I...

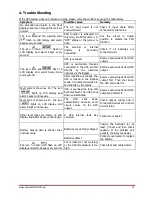
Page 32: ...UPS output After repetitive overloads the UPS is locked in the Bypass mode Connected devices are fed directly by the mains Remove excess loads from UPS output first Then shut down the UPS and restart...

Page 33: ...nnection If the connection is ok and the alarm is still displaying please refer to the LCD setting section to enter the neutral loss check menu to see if the parameter3 is CHE if it is please press th...

Page 34: ...nd with the required precautionary measures may replace batteries and supervise operations Unauthorized persons must be kept well away from the batteries Verify that no voltage between the battery ter...

Page 35: ...Time 9 hours recover to 90 capacity Charging Current 1 0 A 10 max 2 0 A 10 max 2 0 A 10 max Charging Voltage 273 VDC 1 Long run Model Type Depending on applications Numbers 18 20 Charging Current 4 0...

Page 36: ......

Reviews: