background image

1. An automatic airline oilier is recommended but oil 
may be added manually before every operation or after 
about 1 hour of continuous use. 
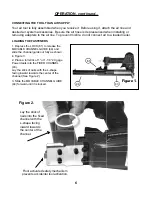
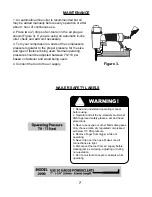
2. Place two (2) drops of air-tool oil in the air plug as 
shown (Figure 3). If you are using an automatic in-line 
oiler, check and add oil if necessary.
3. Turn your compressor on and set the compressors 
pressure regulator to the proper pressure for the size 
and type of fastener being used. Normal operating 
pressure should be adjusted between 70-110 psi 
based on fastener and wood being used.
4. Connect the tool to the air supply.


7

MAINTENANCE

Figure 3.

WARNING!

1. Read and understand operating manual 
before using.
2. Operator and all the by-standers must wear 
ANSI approved safety glasses, ear and head 
protections.
3. Never use oxygen or other fl ammable gases. 
Only choose clean dry regulated compressed 
air below 110 PSI pressure.
4. Remove fi nger from trigger while not 
operating.
5. Never trip over the hose. Make sure all 
connections are tight.
6. Disconnect the tool from air supply before 
clearing jams, serviceing, adjusting or during 
non-operation.
7. Don’t point tool at people or animals while 
operating.

NAILER SAFETY LABELS

Summary of Contents for 2000TN

Page 1: ...O MANUEL D INSTRUCTIONS ET D ENTRETIEN Read this manual before you use this Powernailer Follow all safety warnings and instructions If you are uncertain about the operation of the nailer call us direc...

Page 2: ...cements itself or through its authorized contractors POWERNAIL is not responsible for shipping labor or other direct or indirect costs Damage caused by abuse misuse unusual or excessive wear is exclud...

Page 3: ...ils other than Powernail Powercleats which are 20 gage L cleat nails speci cally designed for use in any 20 gage Powernailer Powercleat nails are available in lengths of 1 and 1 1 4 Contact your Power...

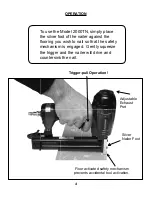
Page 4: ...ing you wish to nail so that the safety mechanism is engaged Gently squeeze the trigger and the nailer will drive and countersink the nail OPERATION Adjustable Exhaust Port Floor activated safety mech...

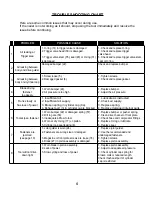
Page 5: ...Tool skips a fastener 1 Worn bumper 22 or damaged spring 57 2 Dirt in gate 50 3 Inadequate air ow to tool 4 Worn or dry O ring 17 on piston 5 Cylinder cap seal leaking 8 1 Replace bumper or pusher sp...

Page 6: ...MOVABLE CHANNEL GUIDE 44 and slide the channel guide out fully as shown in Figure 3 2 Place a full stick of 1 or 1 1 4 20 gage Powercleats into the FIXED CHANNEL 43 Lay the stick of nails with the L...

Page 7: ...70 110 psi based on fastener and wood being used 4 Connect the tool to the air supply 7 MAINTENANCE Figure 3 WARNING 1 Read and understand operating manual before using 2 Operator and all the by stan...

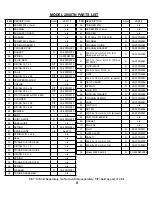
Page 8: ...TEM n a 36 SPRING n a 37 WASHER S 09 20FN2037 38 TRIGGER ASSEMBLY n a ITEM DESCRIPTION Avail PART 39 TRIGGER PIN n a 40 SCREW M4 x 16mm n a 41 WASHER n a 42 125 DIA x 312 ROLL PIN S 09 20FN2042 43 CHA...

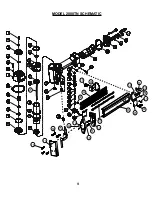
Page 9: ...9 MODEL 2000TN SCHEMATIC 46 44 27 65 59 61 60 58 47 46 45 43 57 48 49 56 51 50 42 75 80 78 71 72...

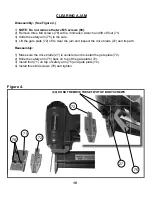
Page 10: ...t the gate plate 72 o to clear the jam and inspect the drive blade 27 and its path Reassembly 1 Make sure the drive blade 27 is centered and re install the gate plate 72 2 Slide the safety arm 75 back...

Page 11: ...s into place and ratchets tightly for hands free operation The base of the PowerJack 500 has mounting holes for mid oor use Simply screw nail the PowerJack 500 to your sub oor in front of your ooring...

Page 12: ...12 POWERNAIL COMPANY INC 1300 Rose Road Lake Zurich IL 60047 US Phone 1 800 323 1653 or 847 847 3000 www powernail com...

Reviews: